The SETUP: Step by Step
by Dr. Tonny Mulder & Meike Mulder

WELCOME TO THE 5-STEP EEG PRACTICAL SET UP
Choose where to start, or scroll down:
STEP 1: The Component Checklist
First things first, you need to check if all the necessary components are present. Do this by using the checklist below:
ALSO: Read the descriptions carefully to get a feel of what every component does.
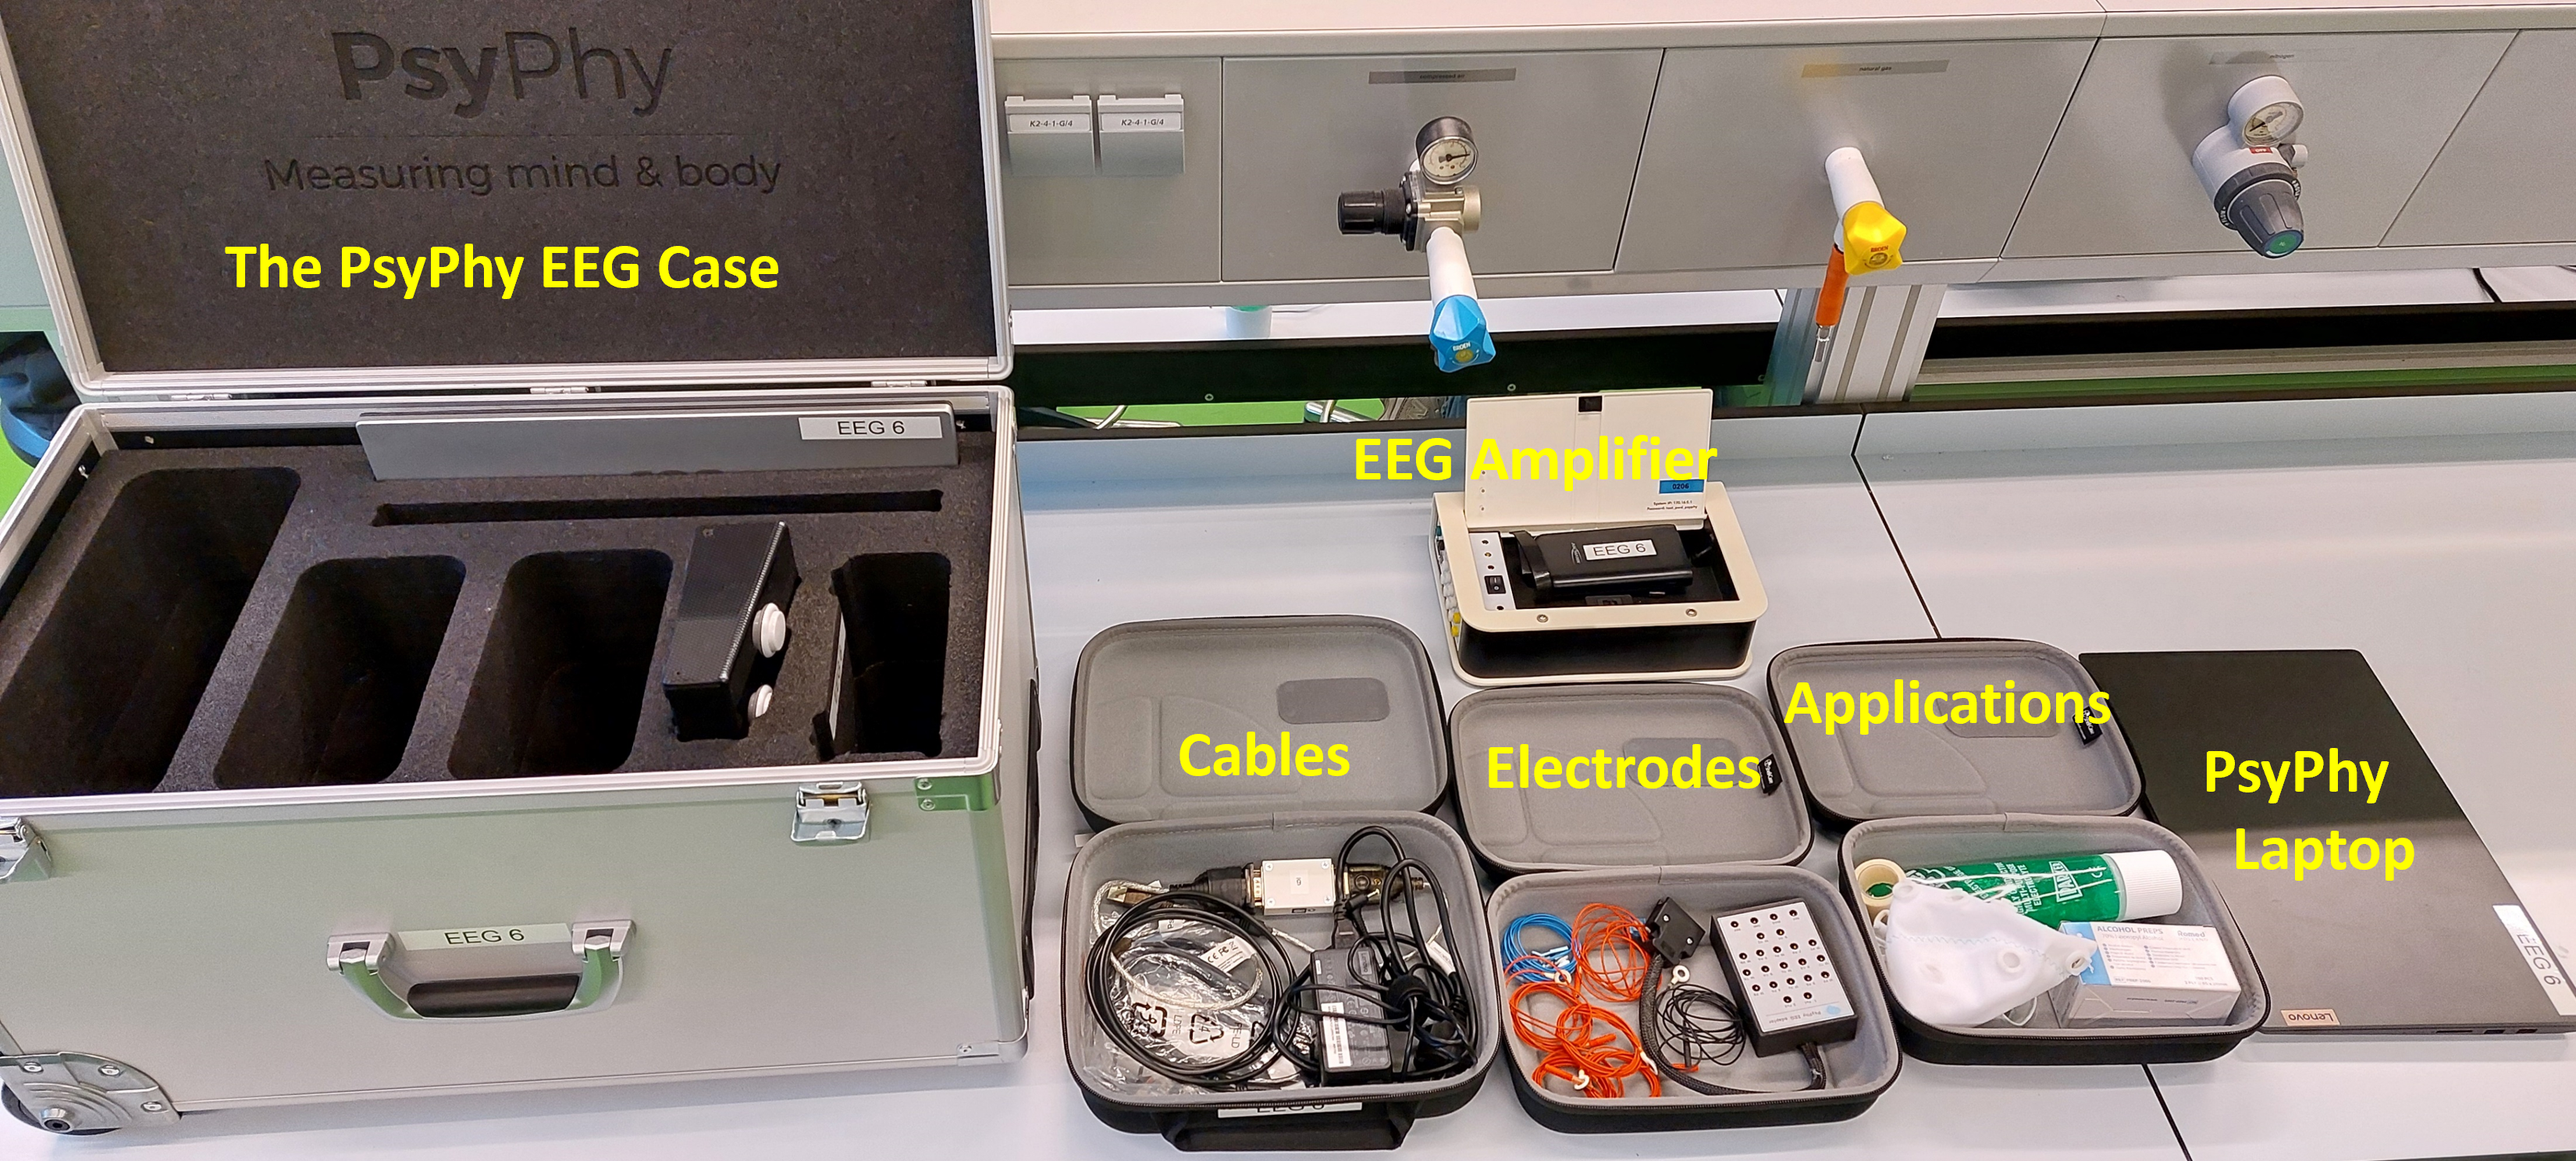
The Component Checklist
| COMPONENTS | DESCRIPTION | |
|---|---|---|
| Stimulus Laptop (your own laptop) | 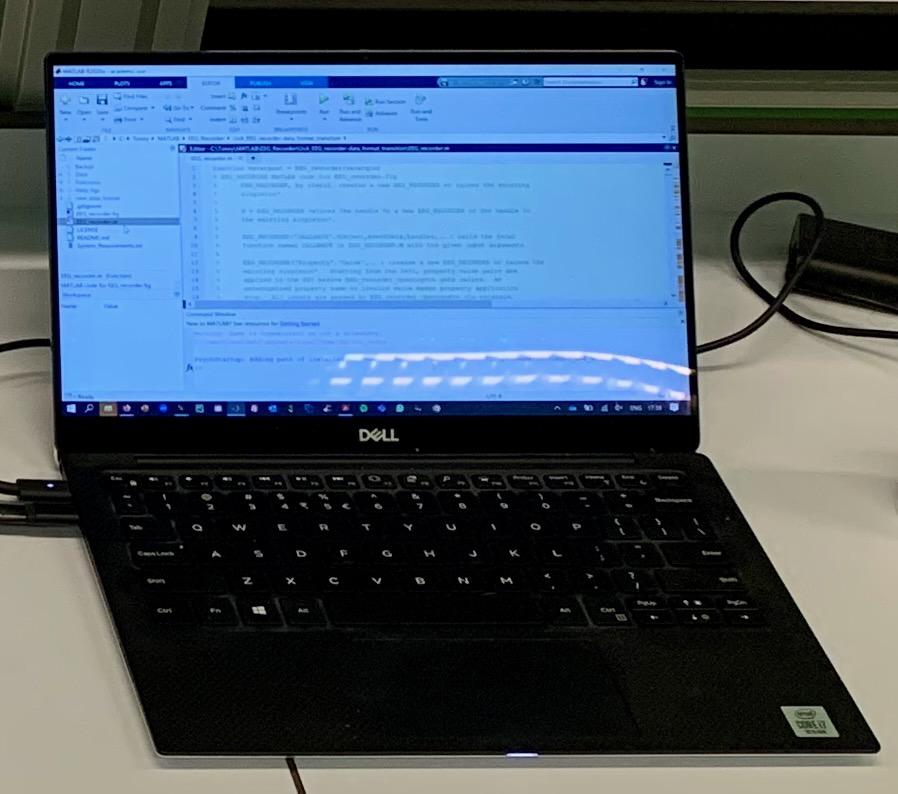 |
Used by the participant to perform the experiment. Sends out a predetermined markers (in the form of numbers between 1 and 255) every trial (corresponding with the condition). |
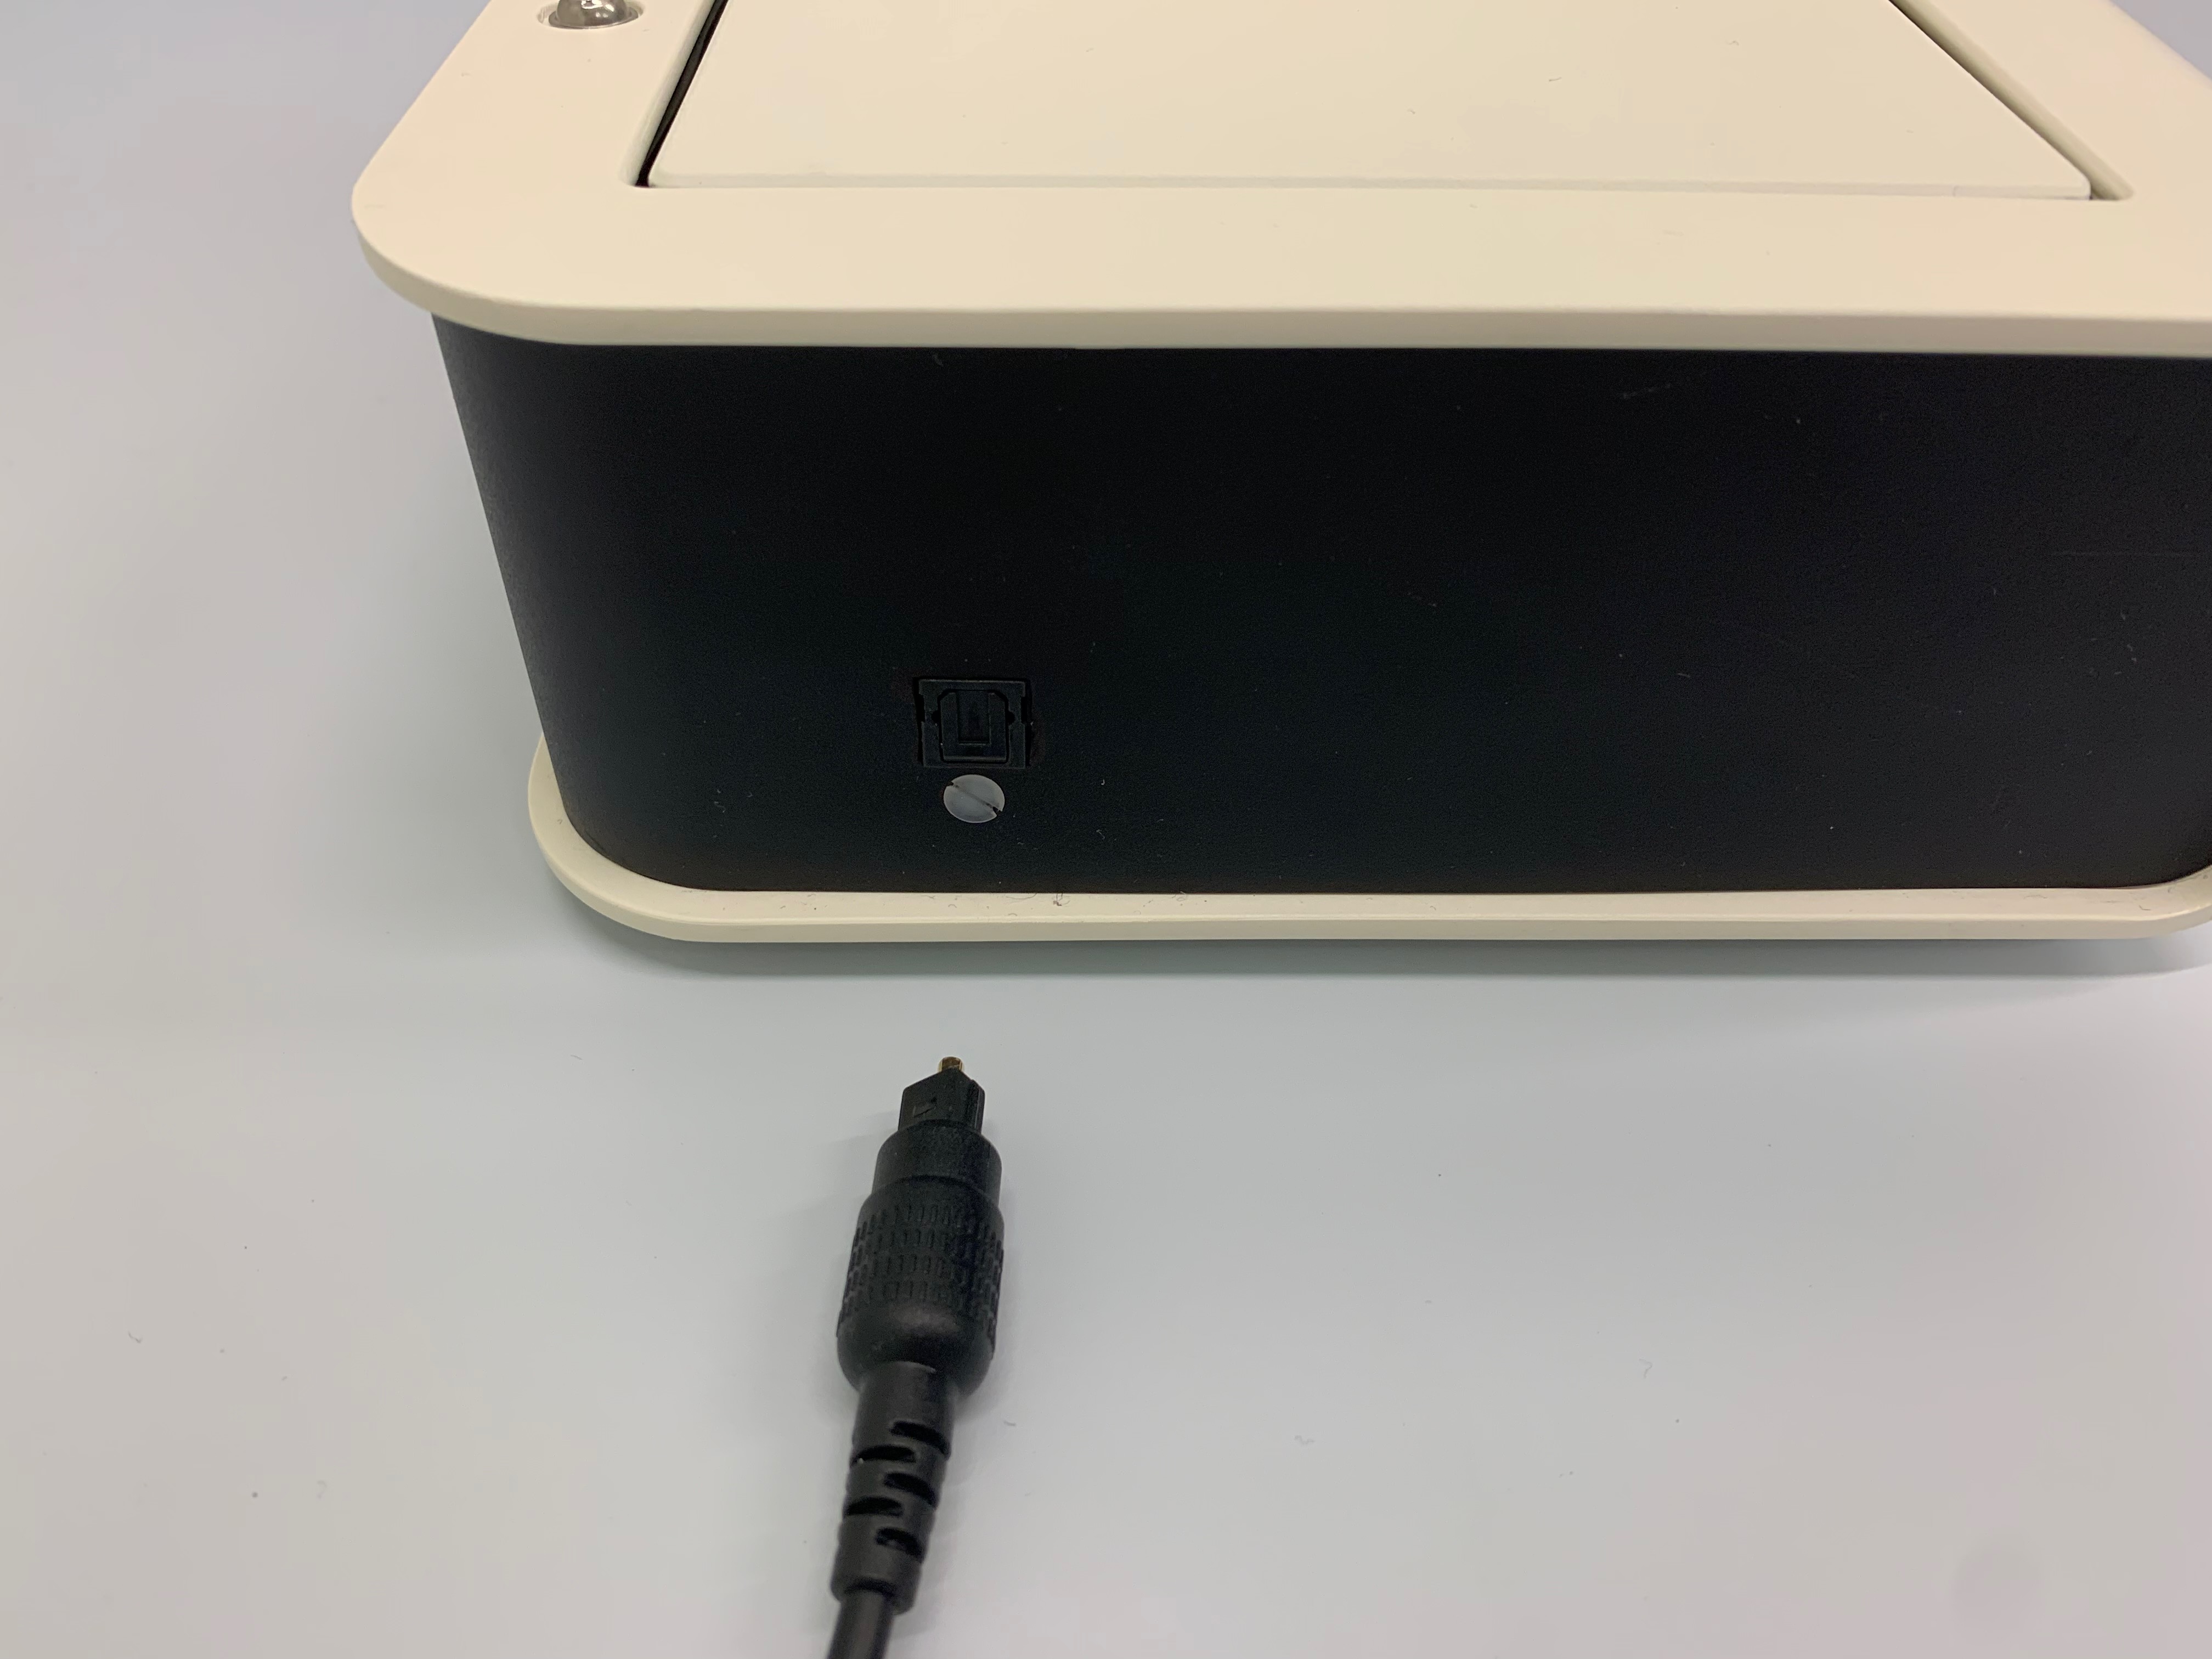
| 1x Serial USB to USB Connector, connecting the Stimulus laptop to the EEG recorder laptop. |  |
Serial cable: sends markers from the stimulus computer to EEG computer.
USB connector: sends the marker number. Optical cable: connects the USB cable to the back of the EEG amplifier and sends the actual marker time. |
| EEG Laptop | 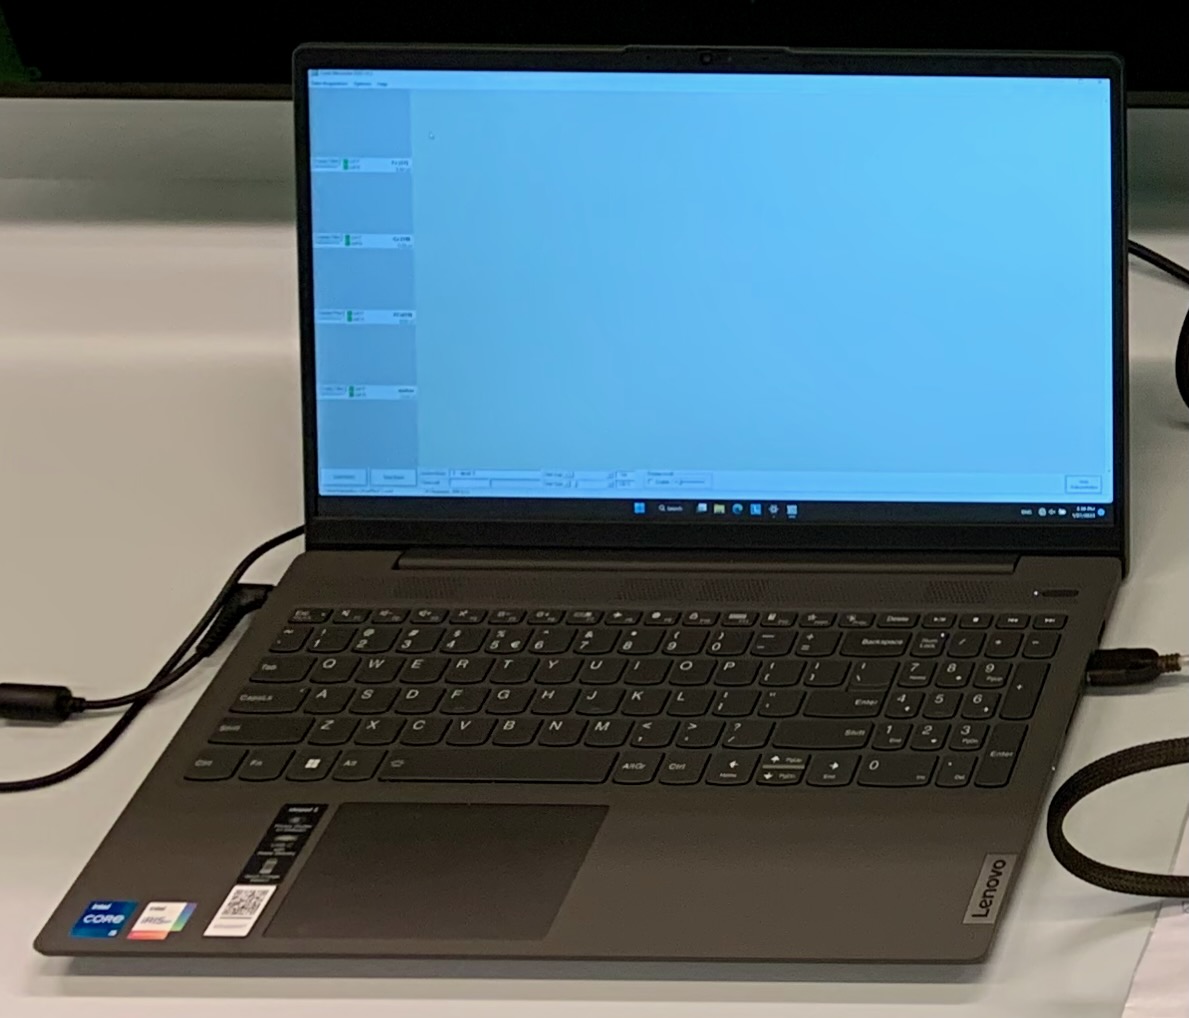 |
Receives the EEG signals via Wi-Fi and markernumbers (1 to 255) via USB. Records and saves the EEG and marker data. |
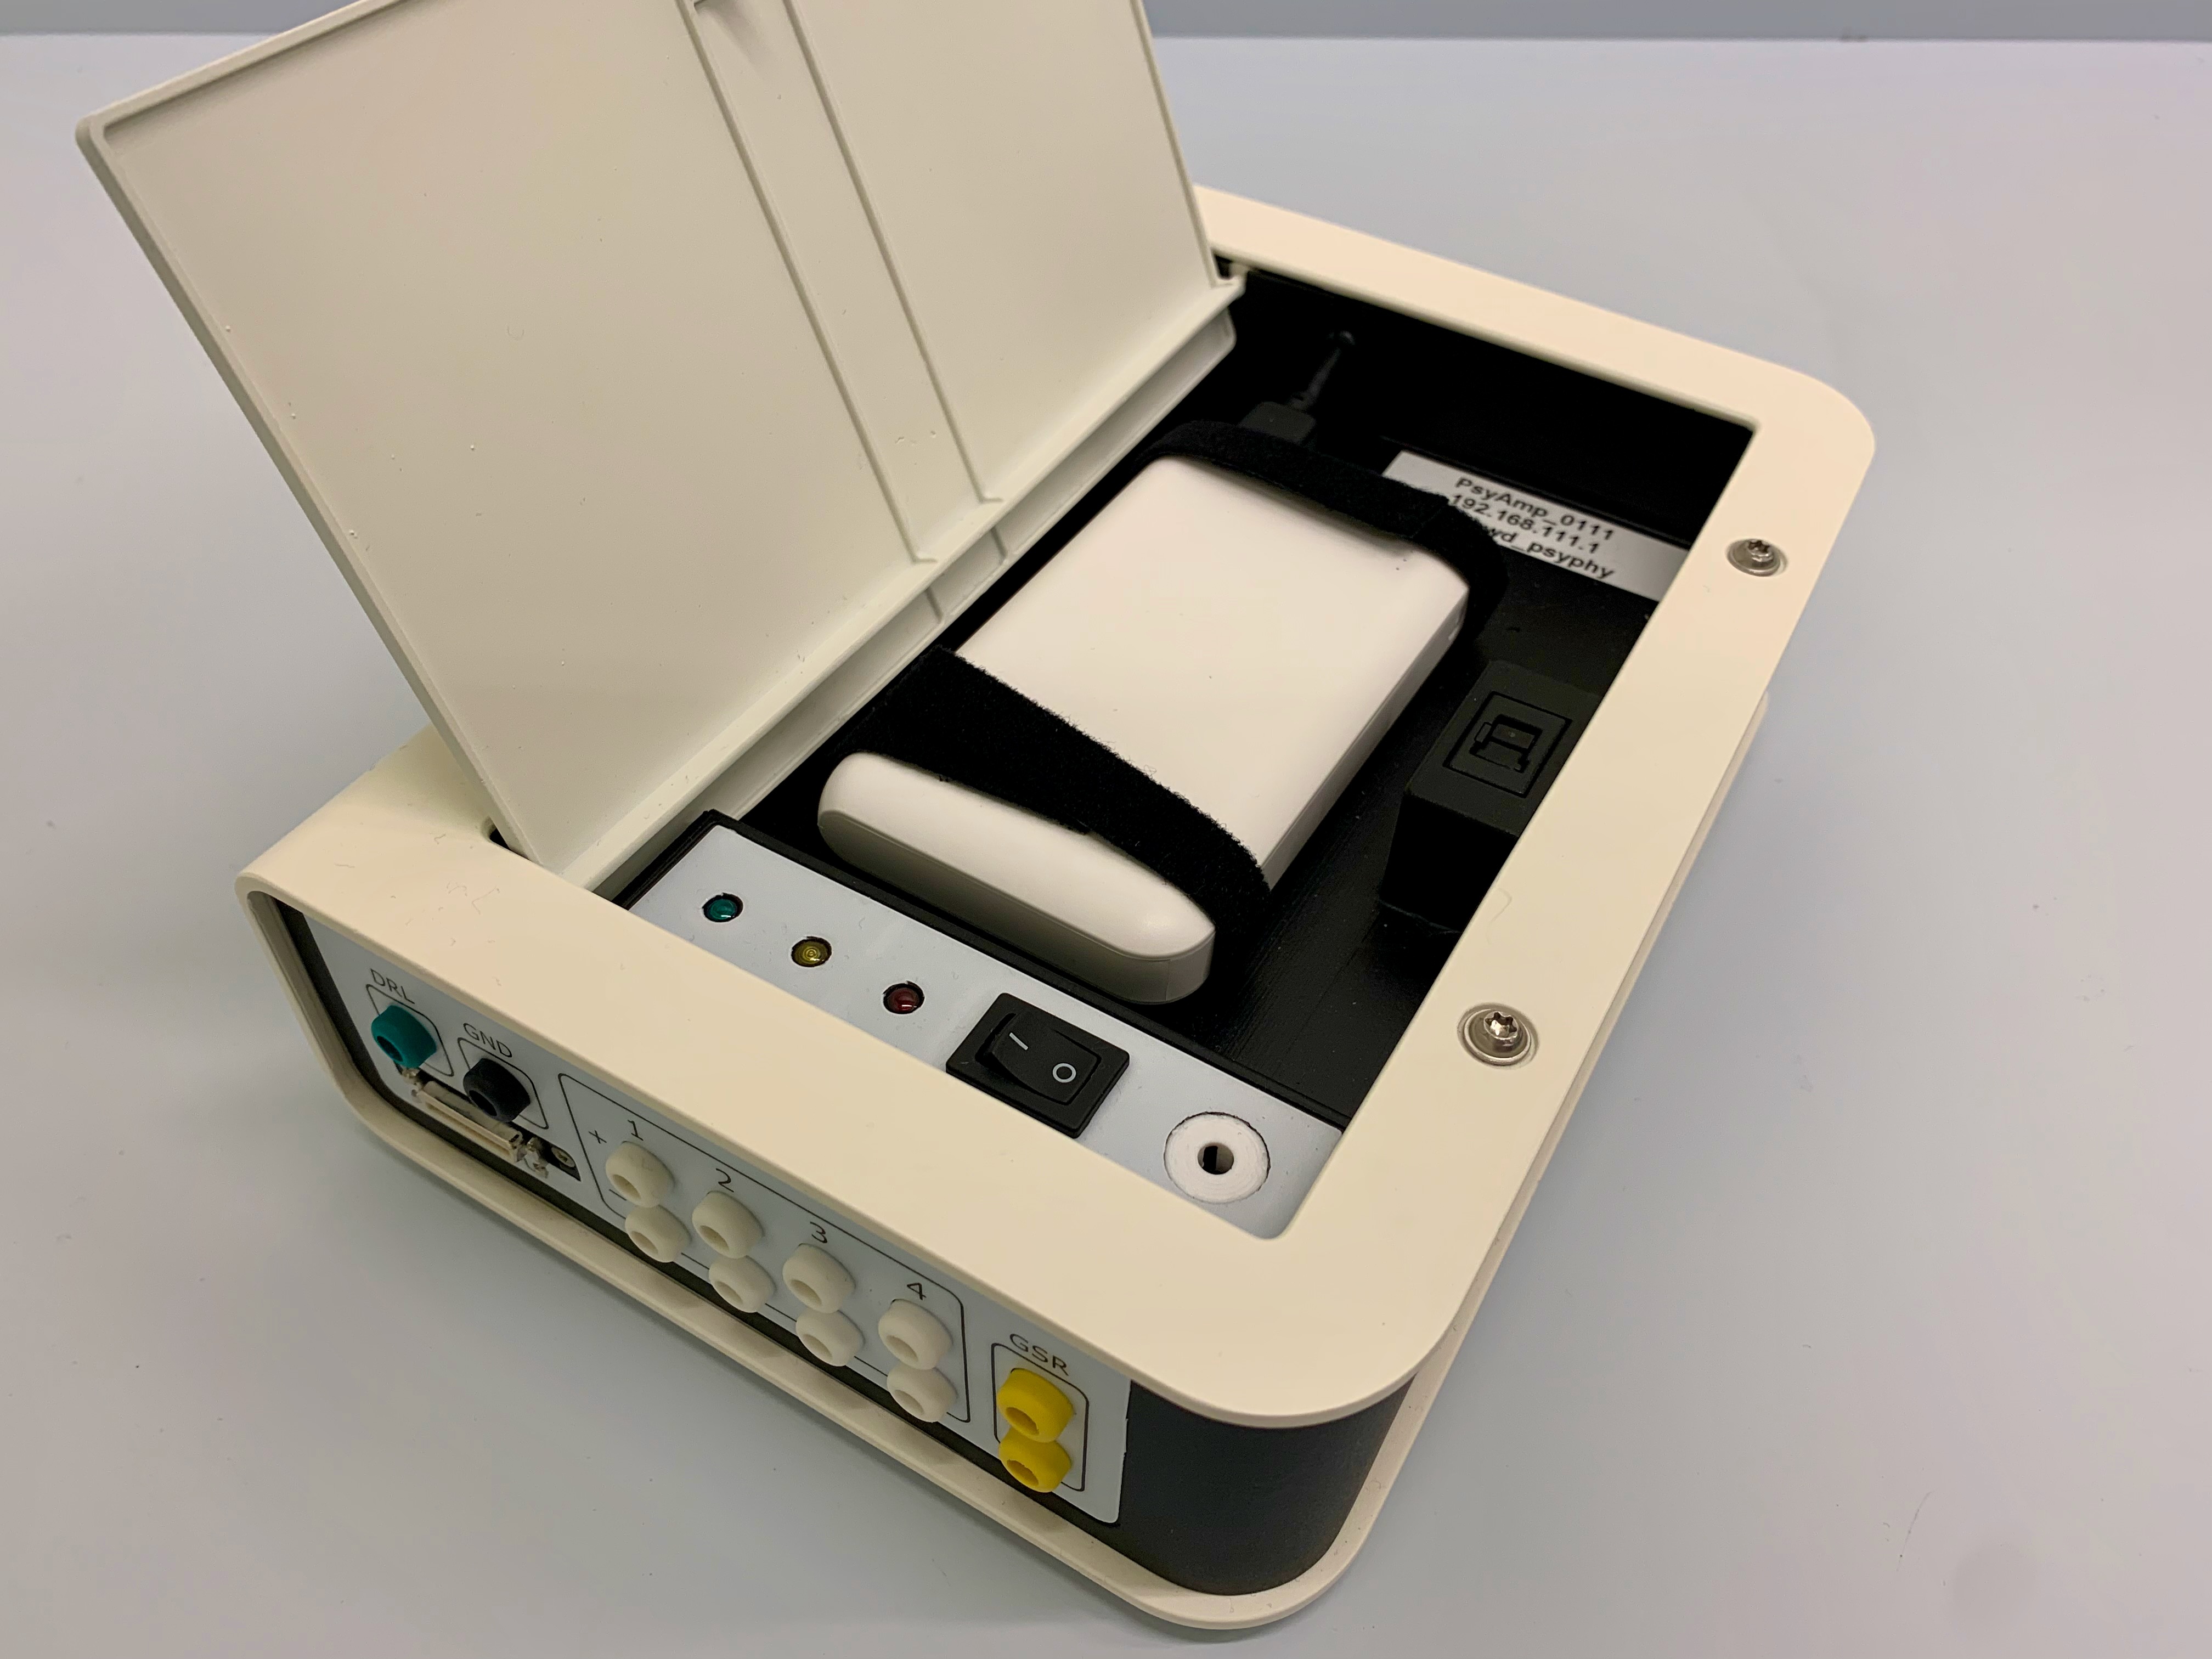
| EEG amplifier | 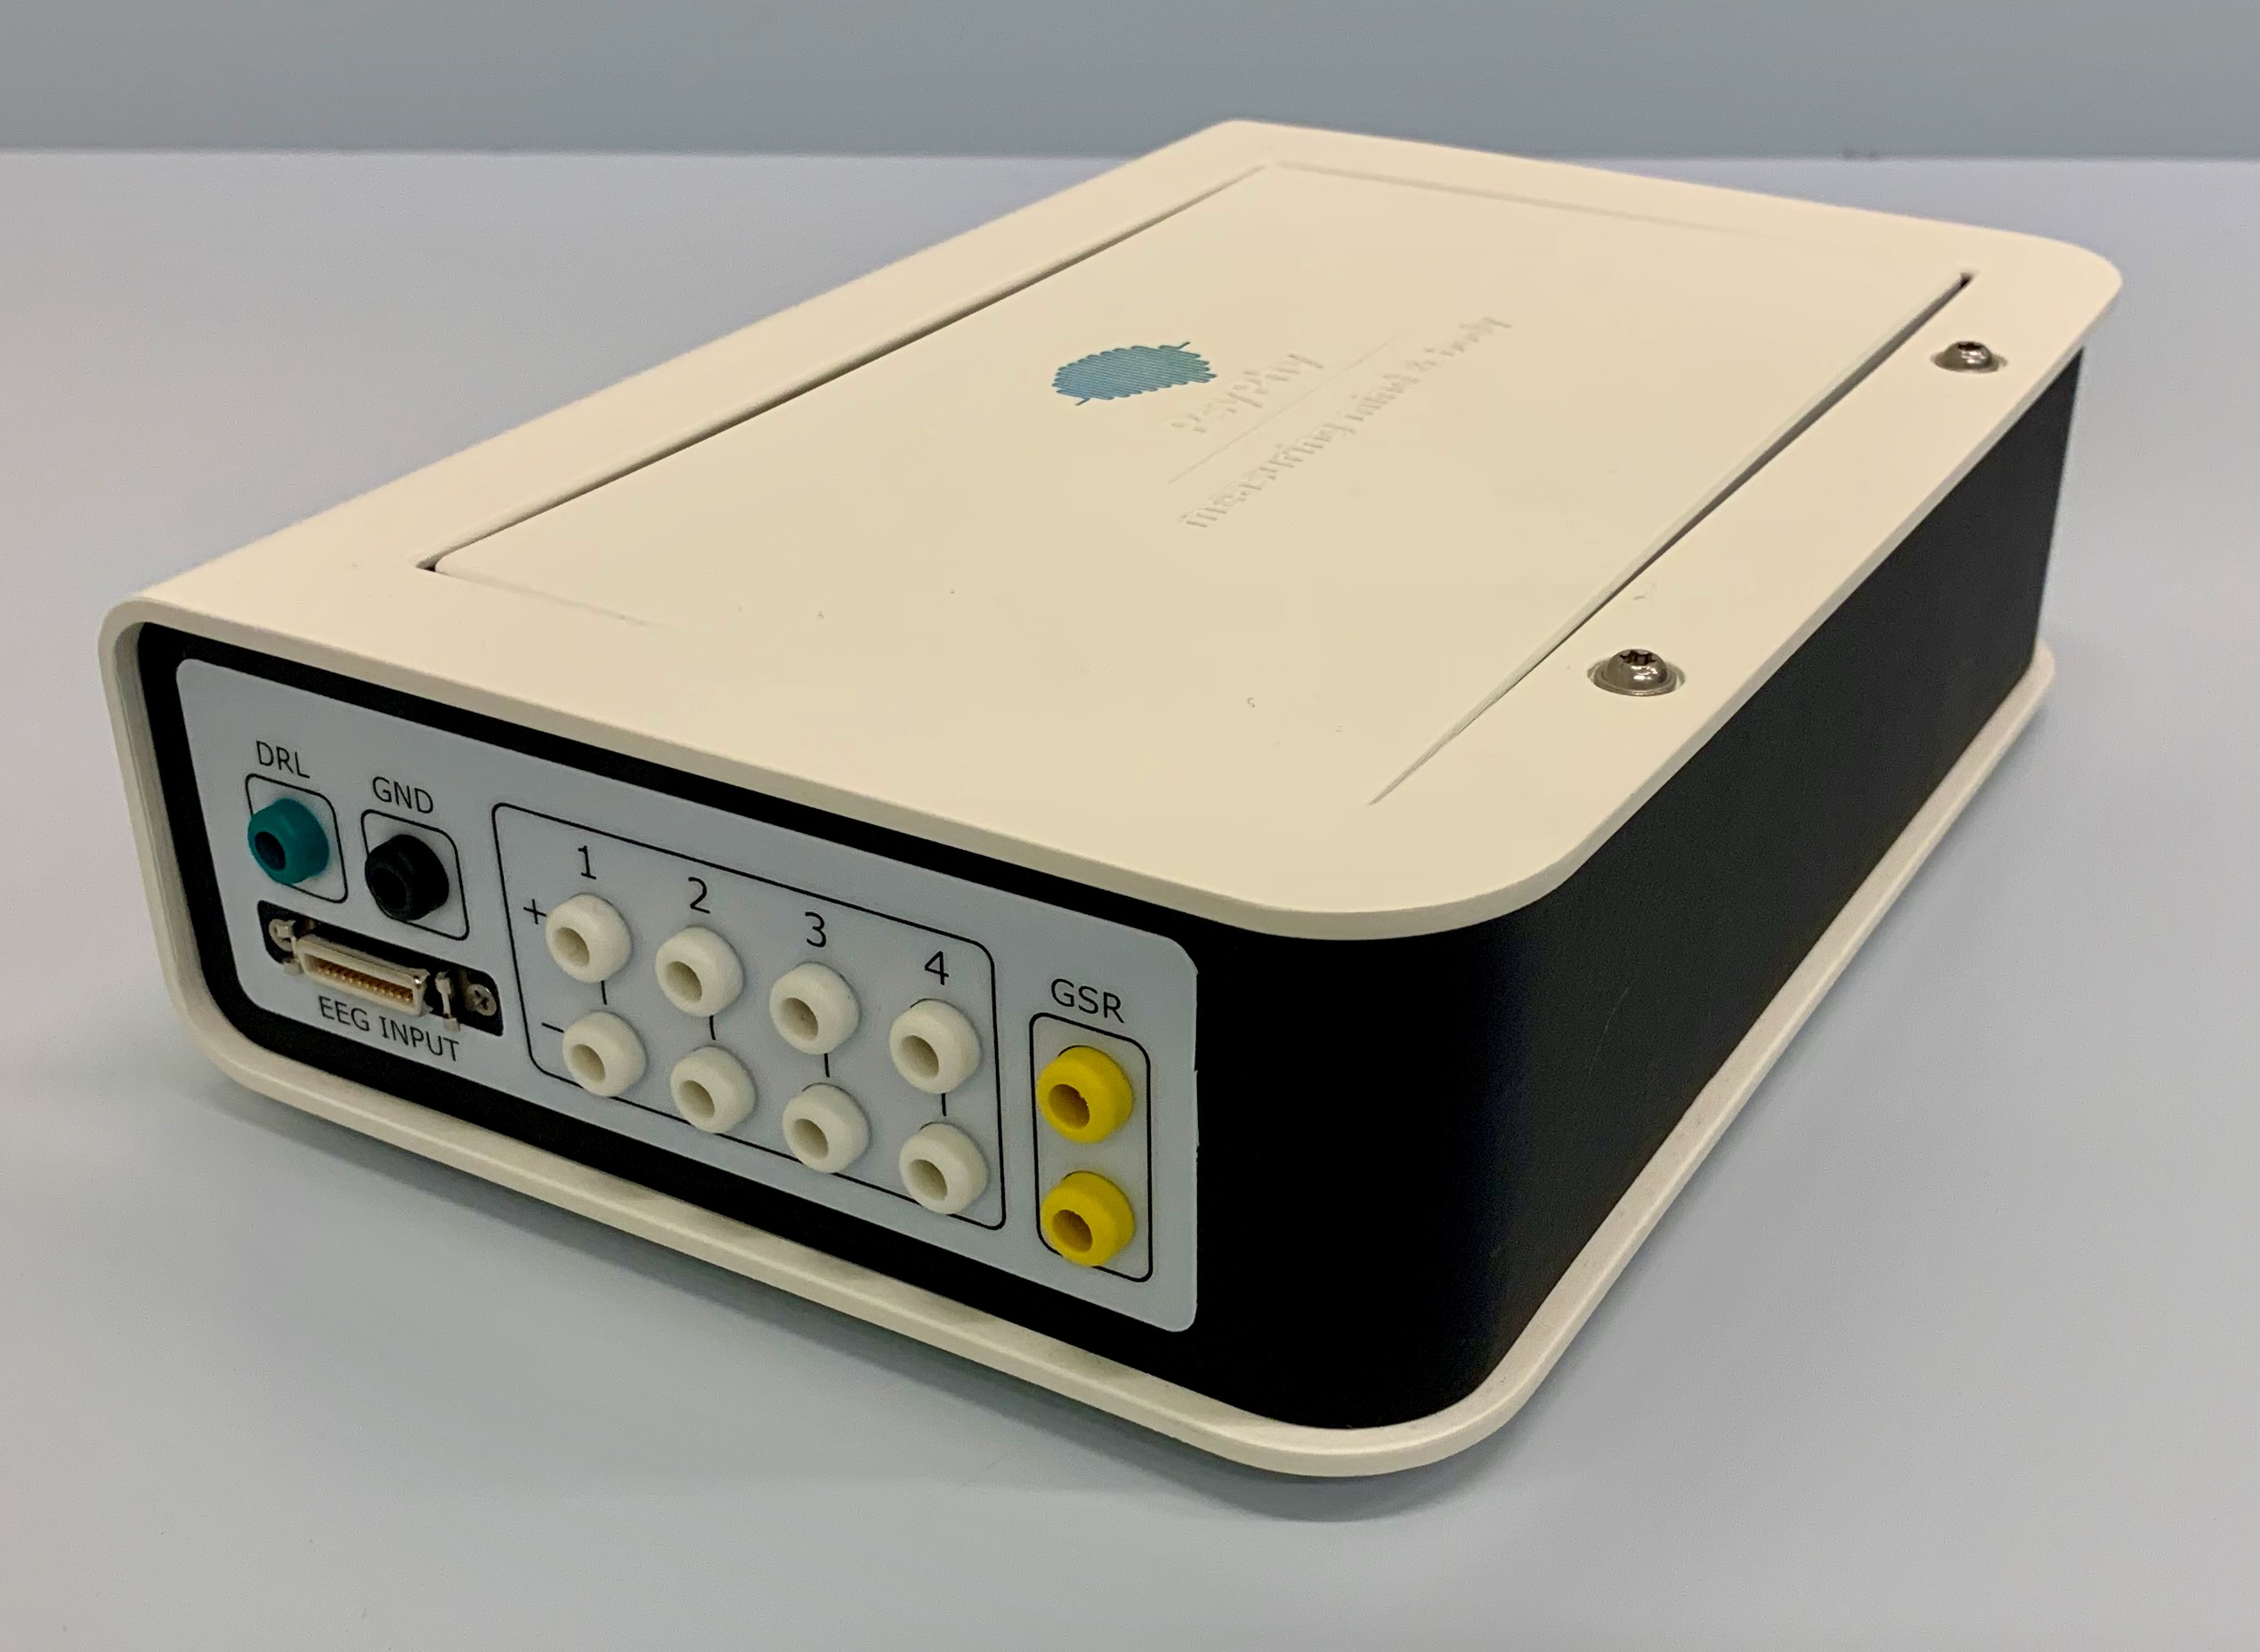 |
Amplifies the weak scalp-recorded EEG signals. Sends these amplified EEG signals + markers via Wi-Fi to the EEG computer. |
| Powerbank. To be found inside the EEG amplifier | 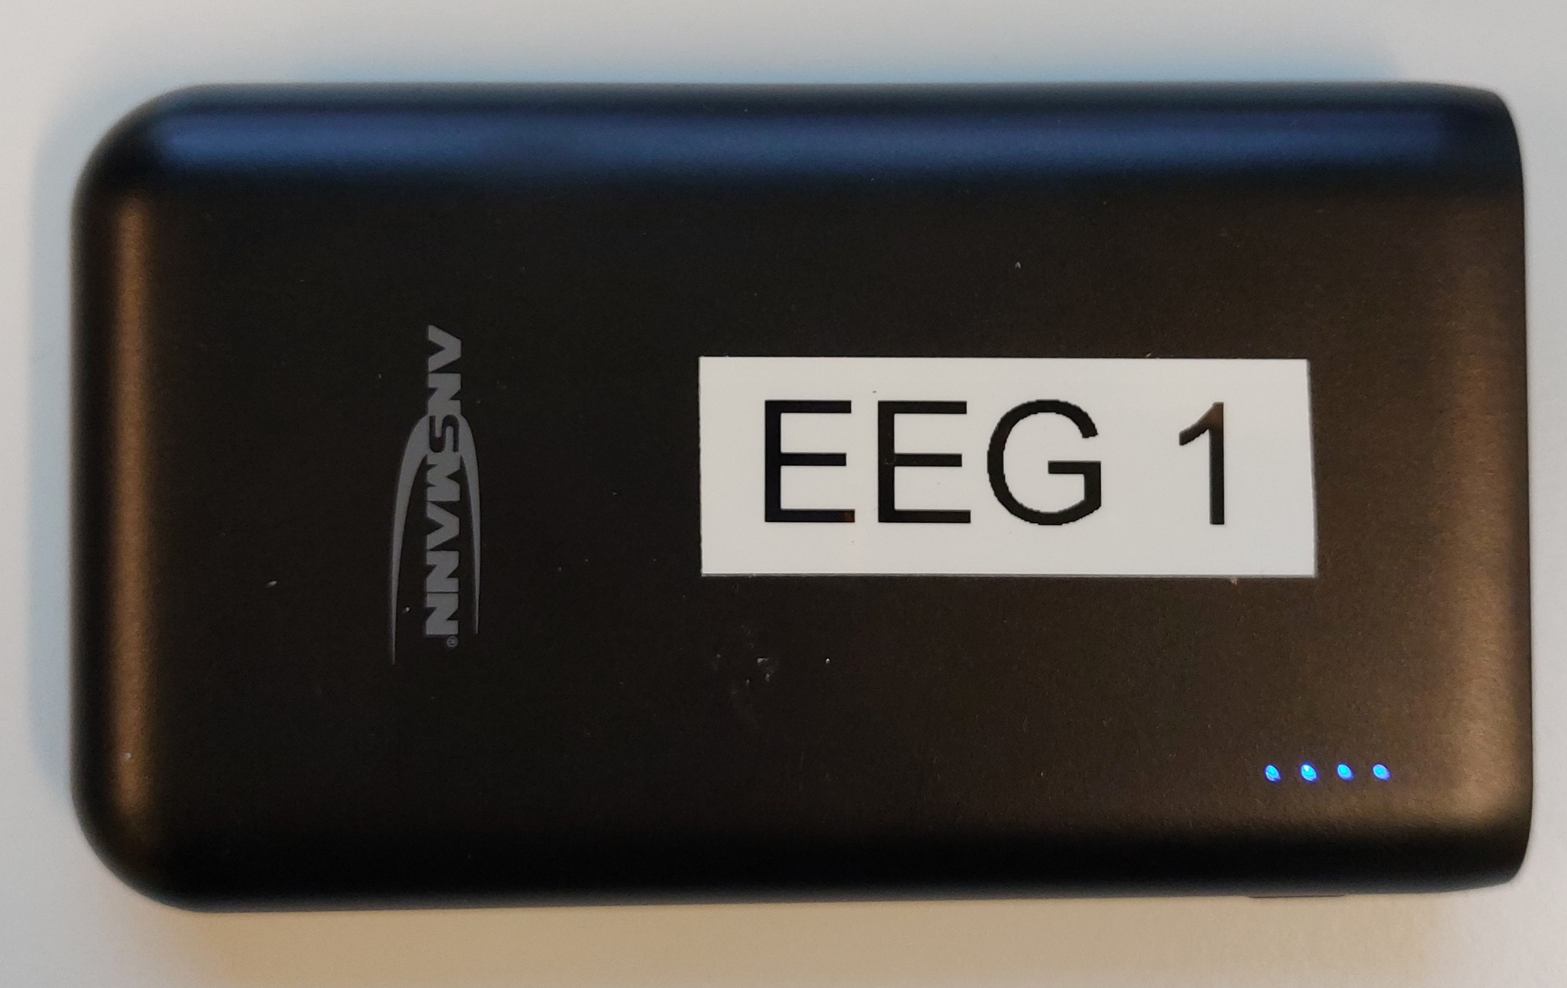 |
Powers the EEG amplifier. Must be charged at the end of every recording day. |
| Electrode 'Adapter' box | 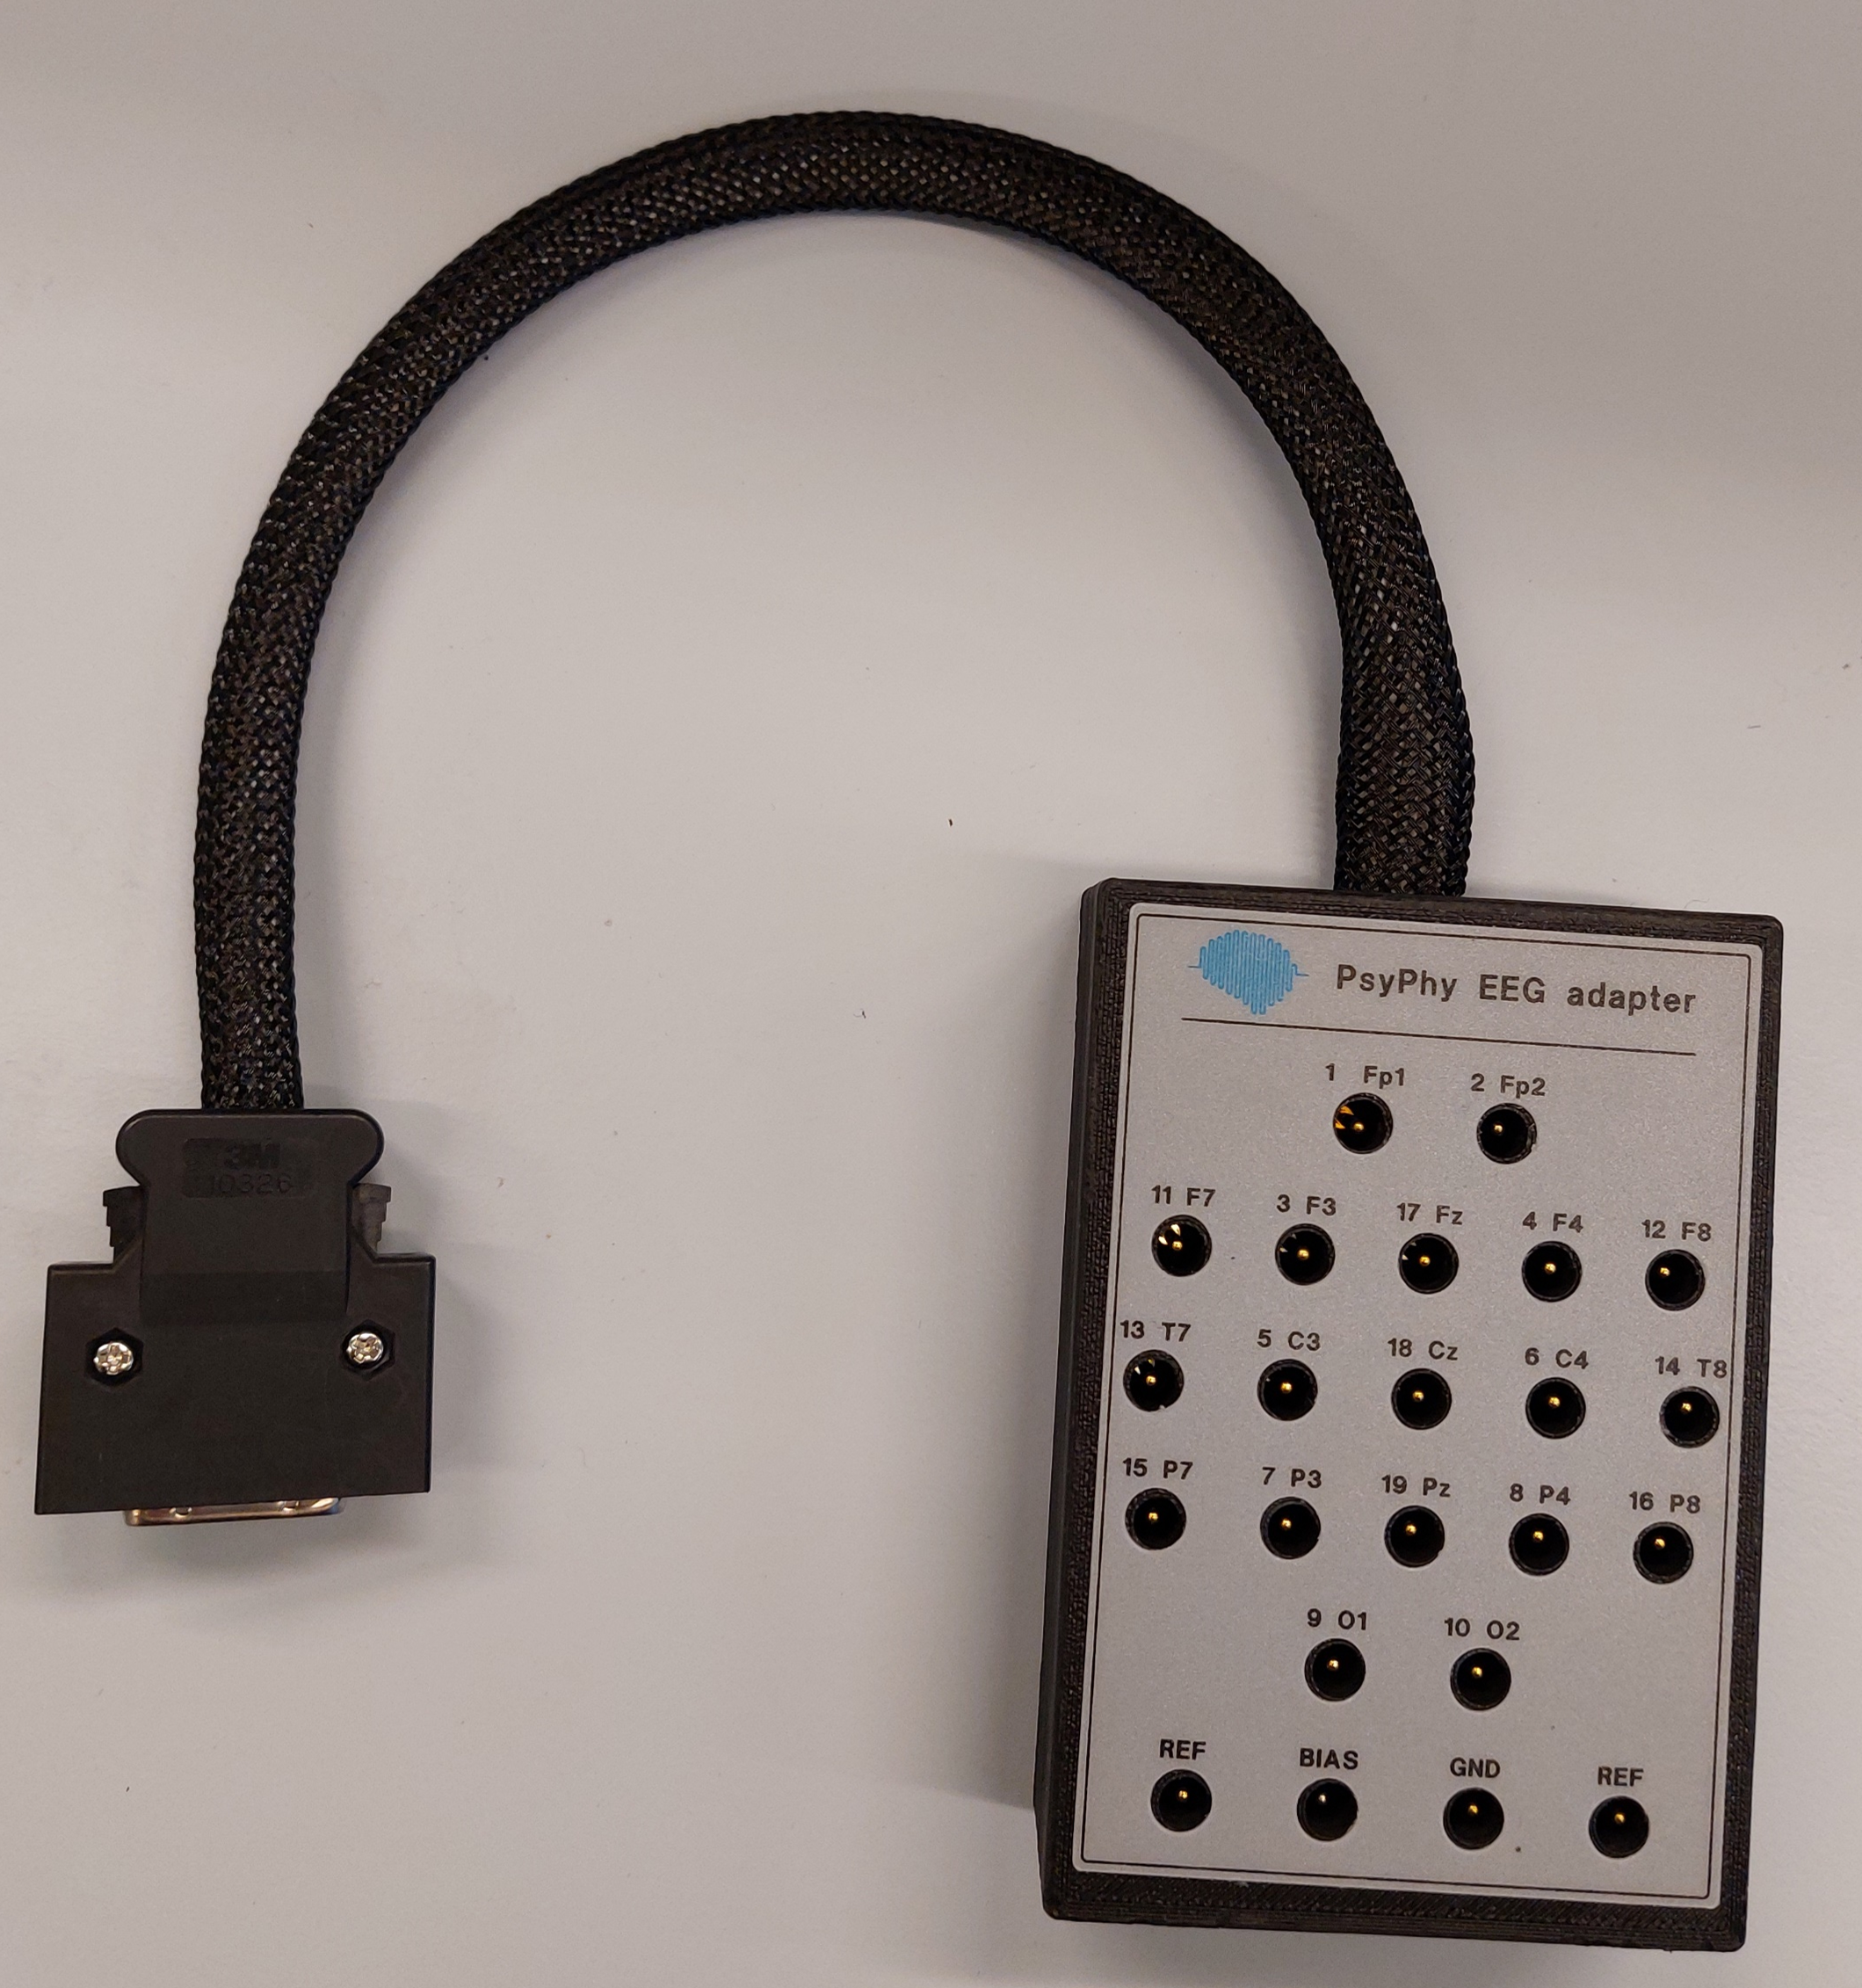 |
This contains the channels you plug the EEG electrodes in, and sends the raw EEG signals to the EEG Amplifier. |
| 5x red EEG electrodes (more on request) | 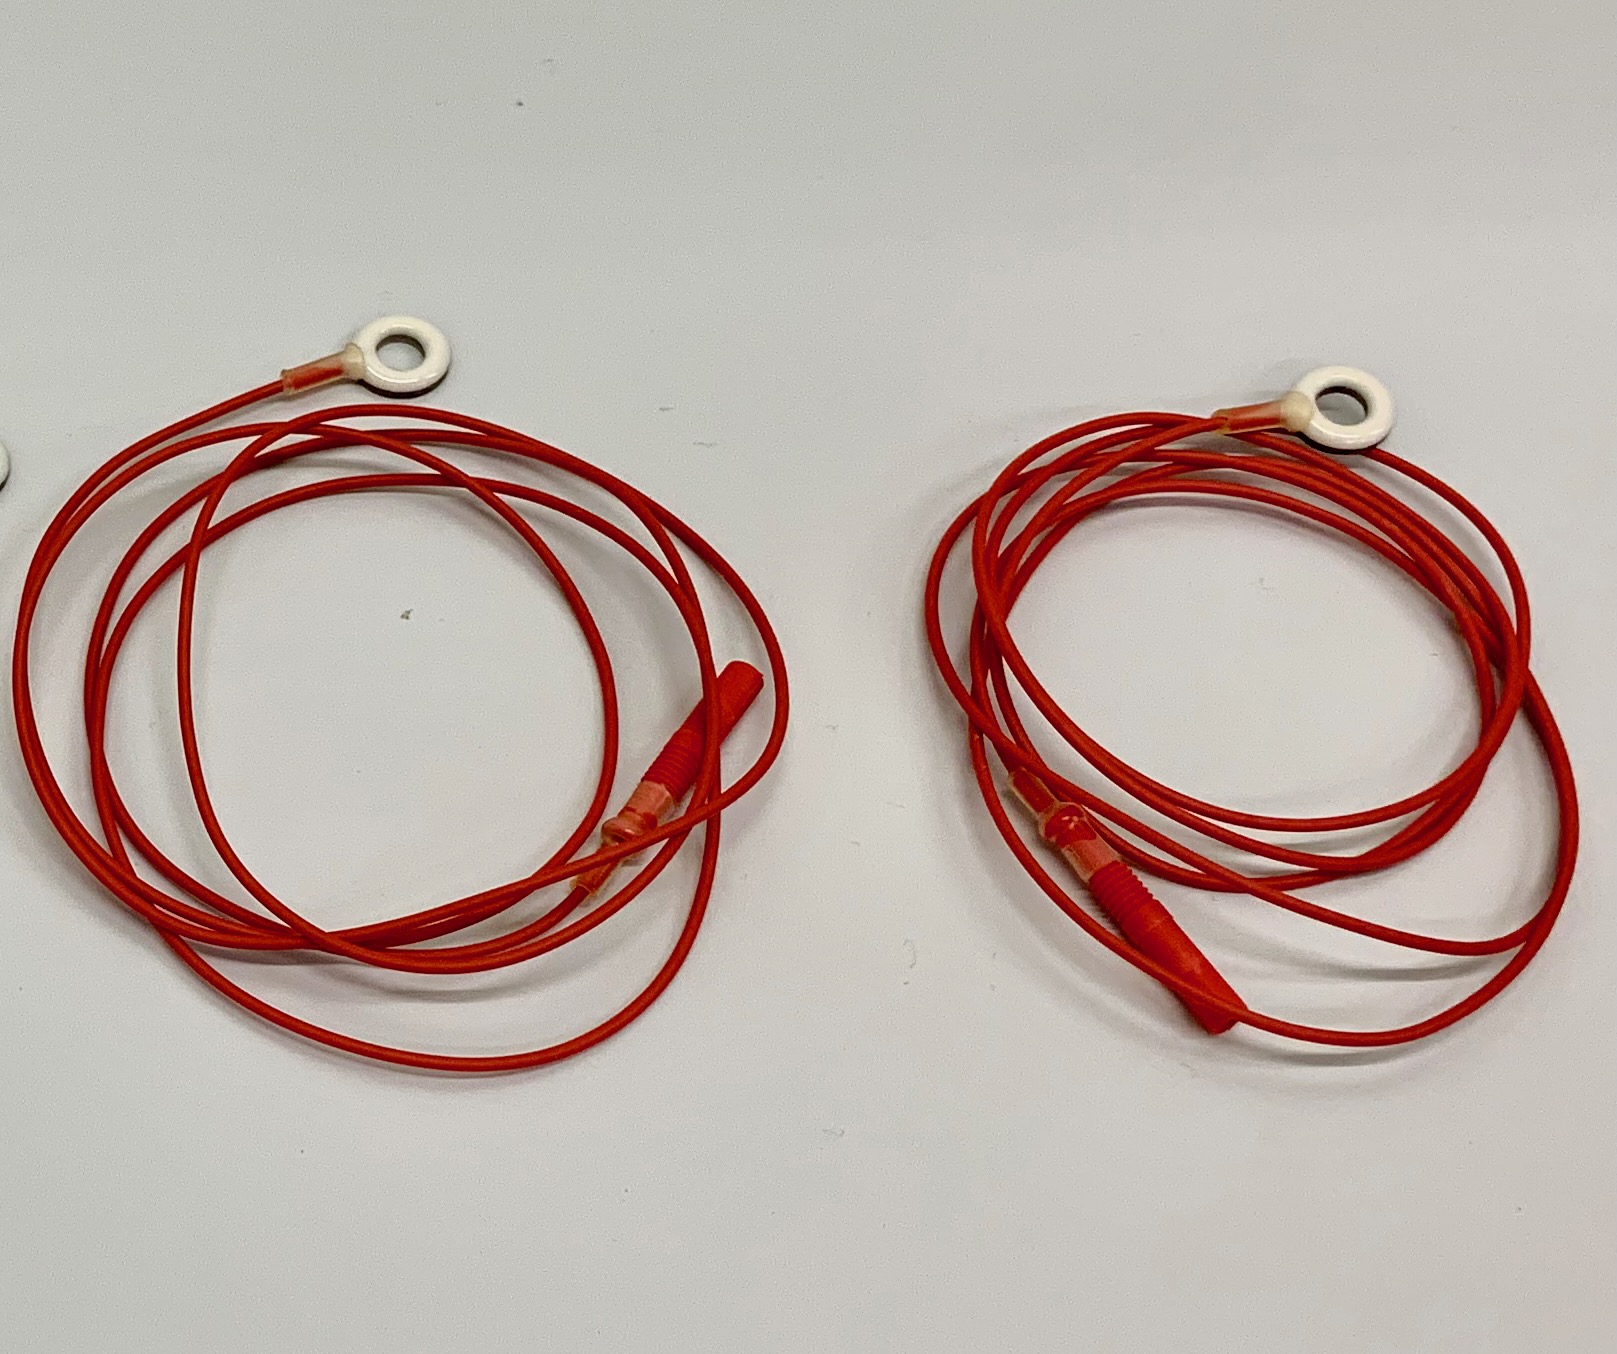 |
Used for measuring the targeted recording sites. |
| 2x earclip electrodes (1 Reference, 1 BIAS) | 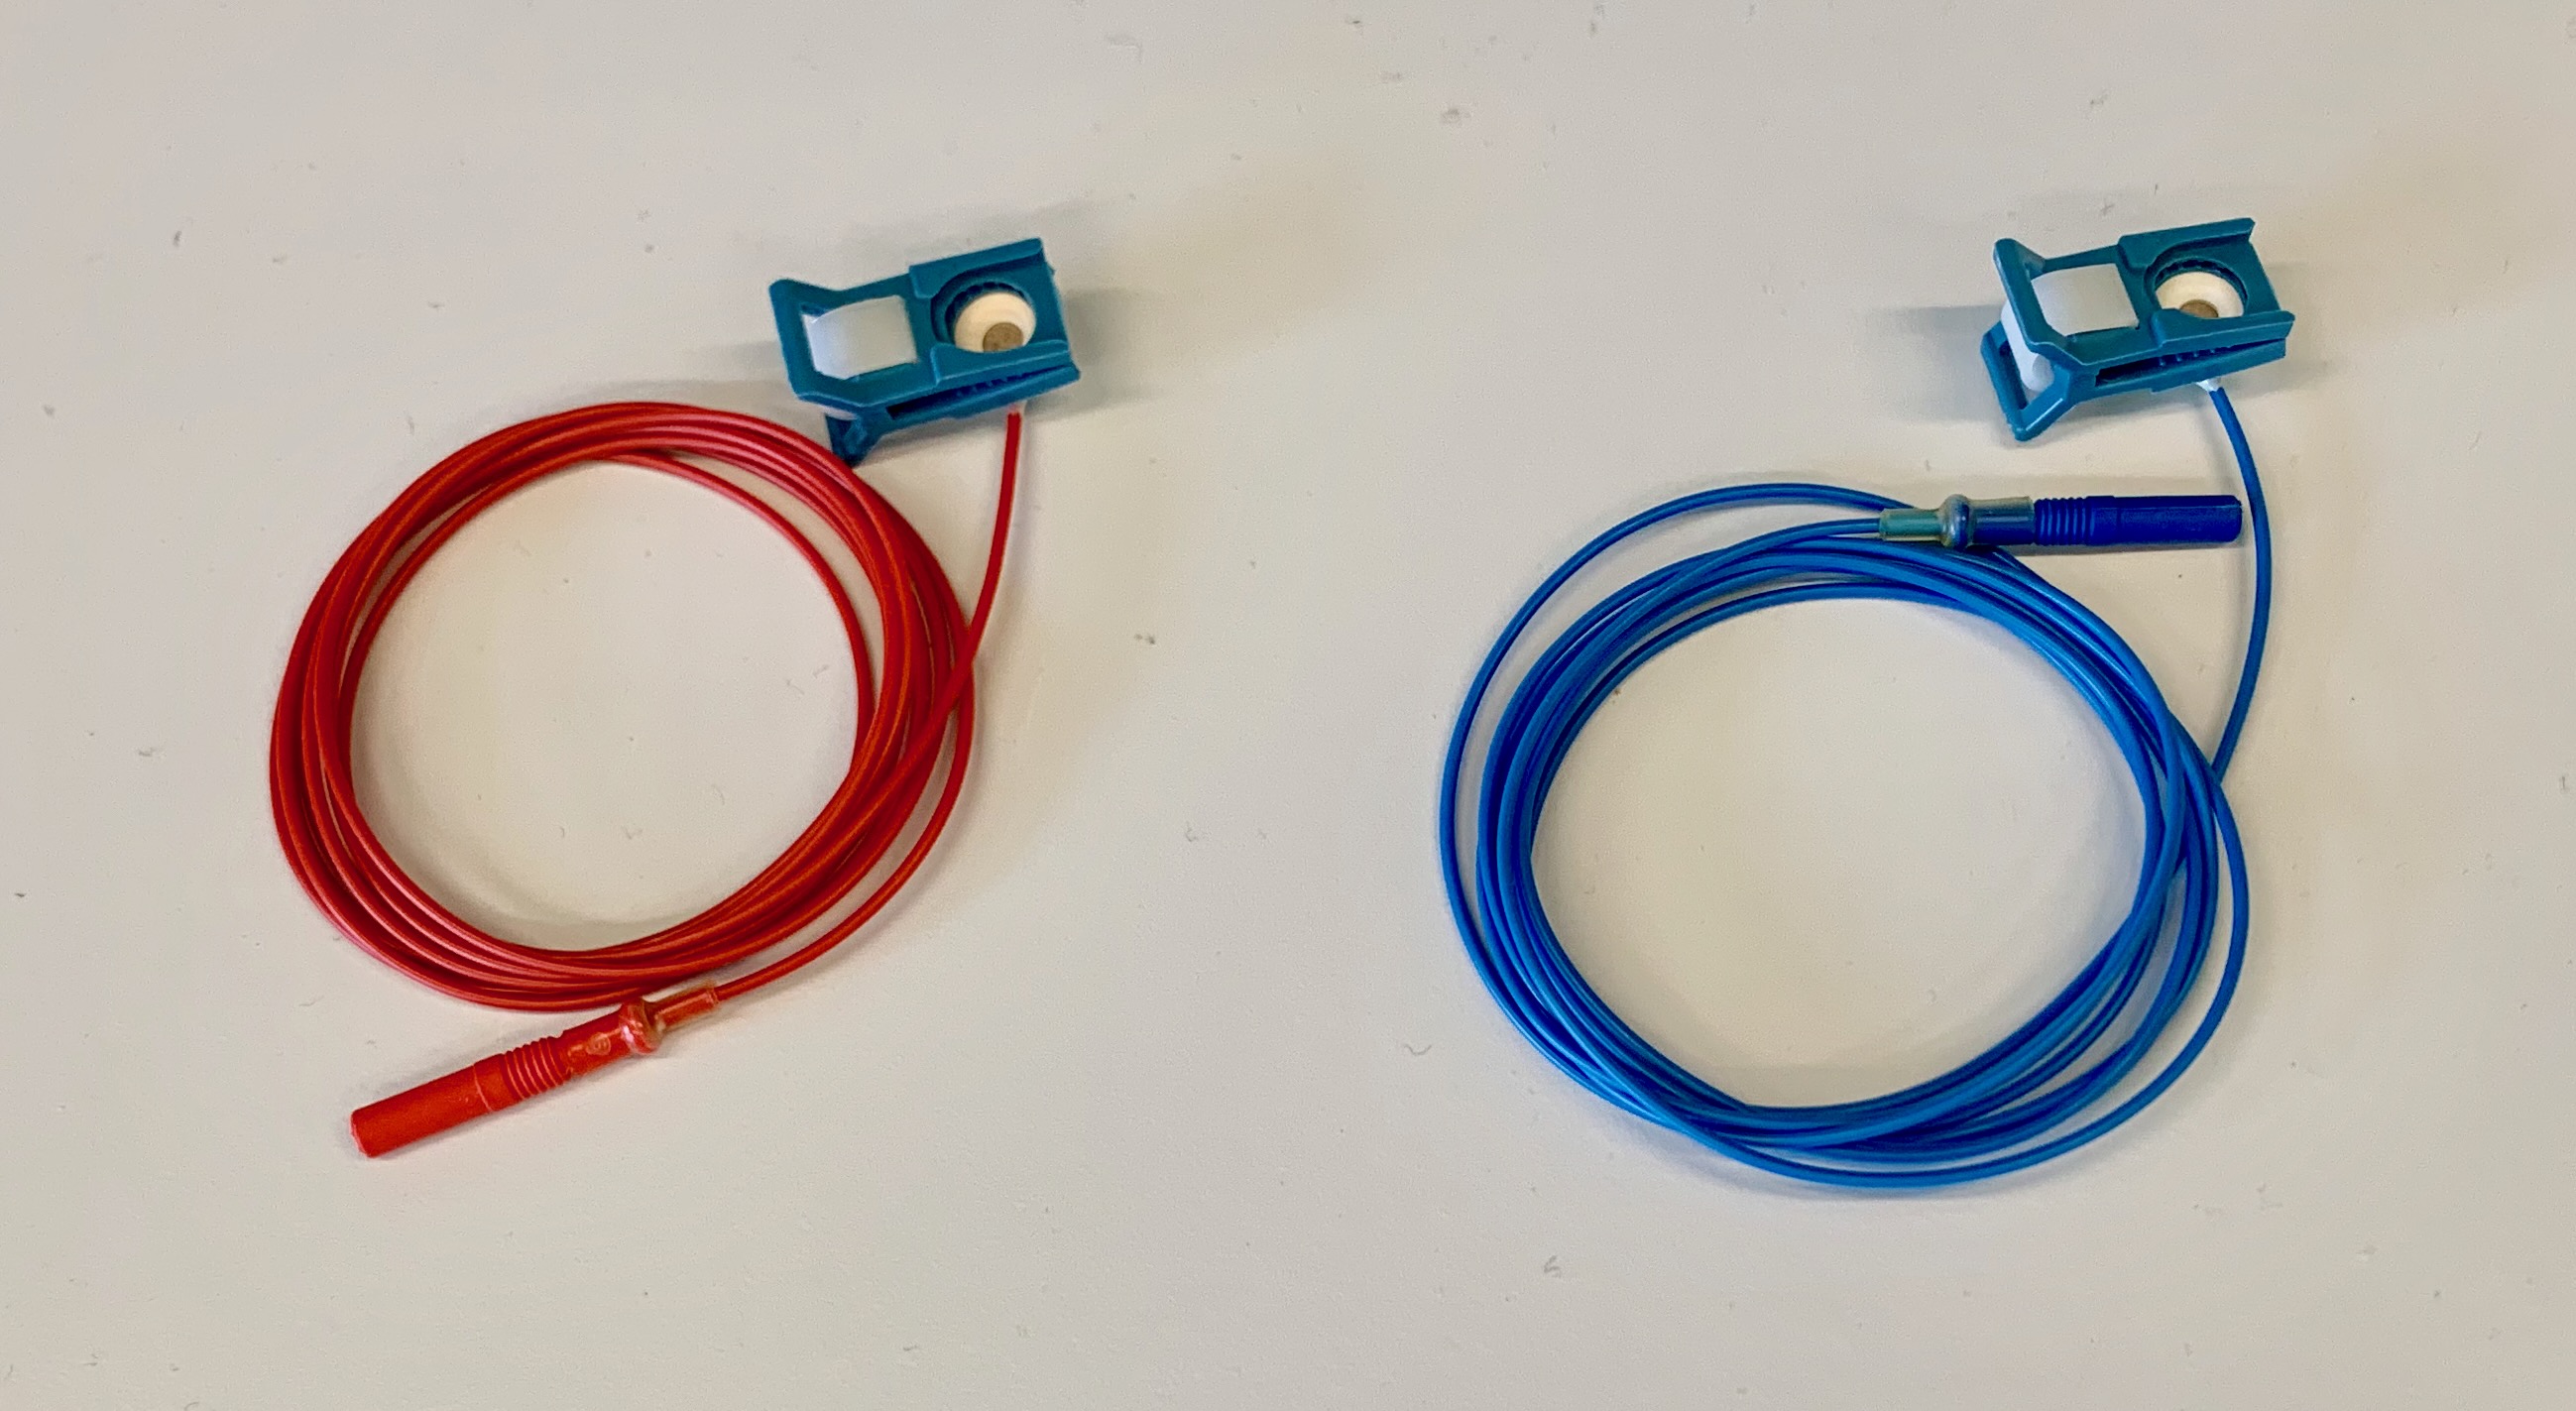 |
Reference: Used to measure the electric potential difference, by comparing this signal to the EEG electrodes. This difference is the EEG signal of interest. BIAS: Needed for the Impedance Check, which checks the quality of the EEG electrode signals. Usually placed on the earlobes. |
| 1x black Ground electrode | 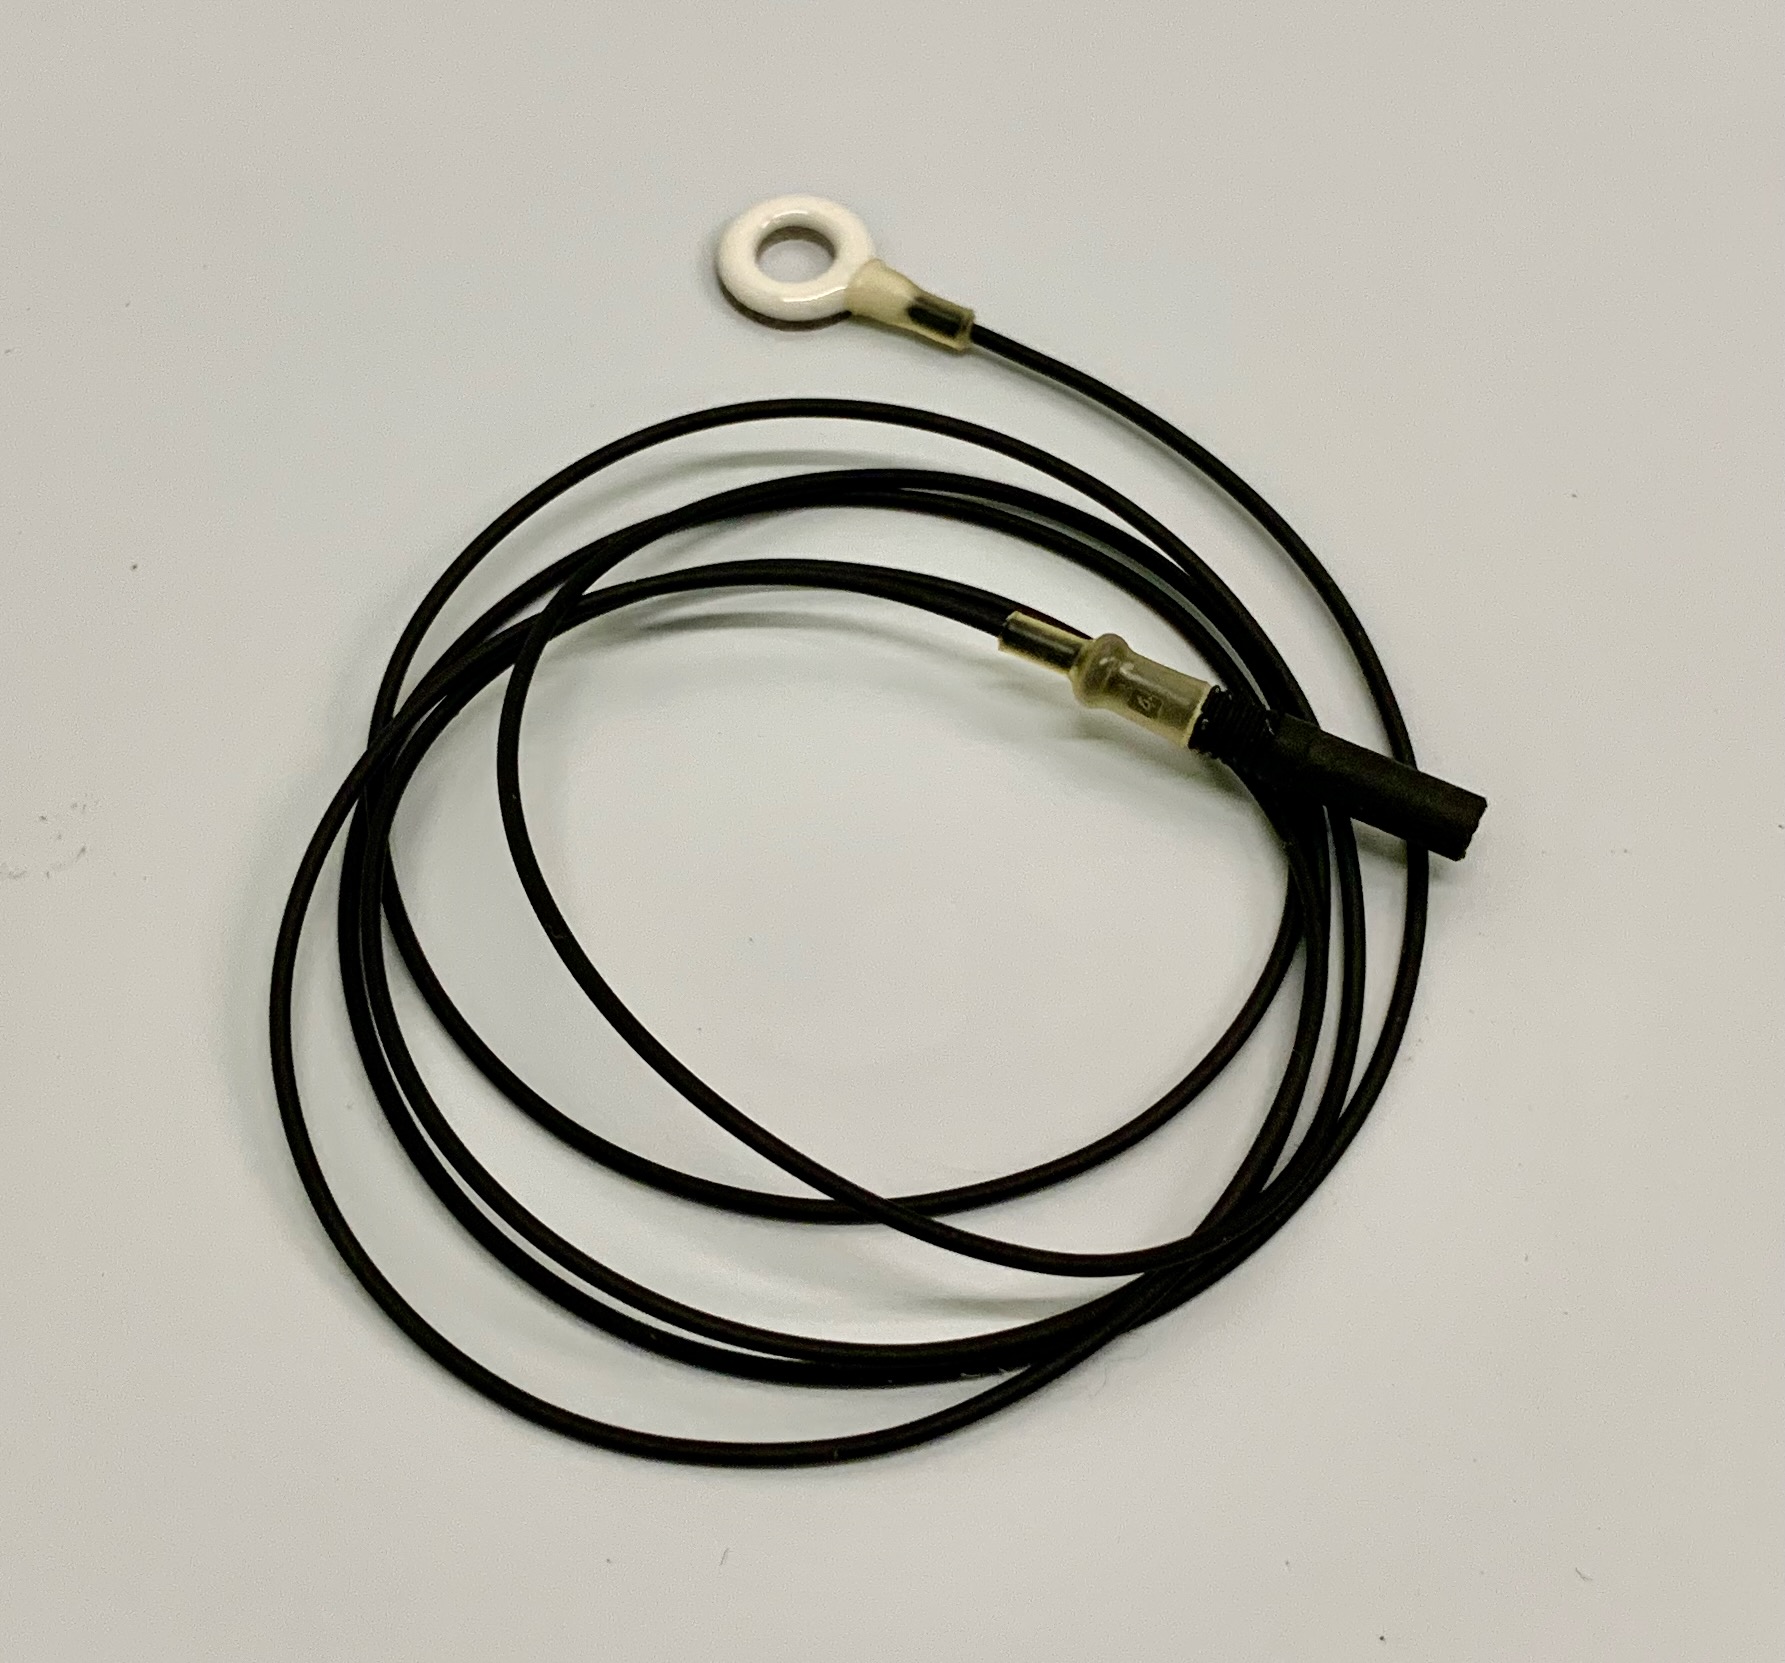 |
Adding this significantly reduces the noise in the measured signal, by suppressing the signals that overlap with the EEG electrode and the reference electrode, resulting in only the potential difference. |
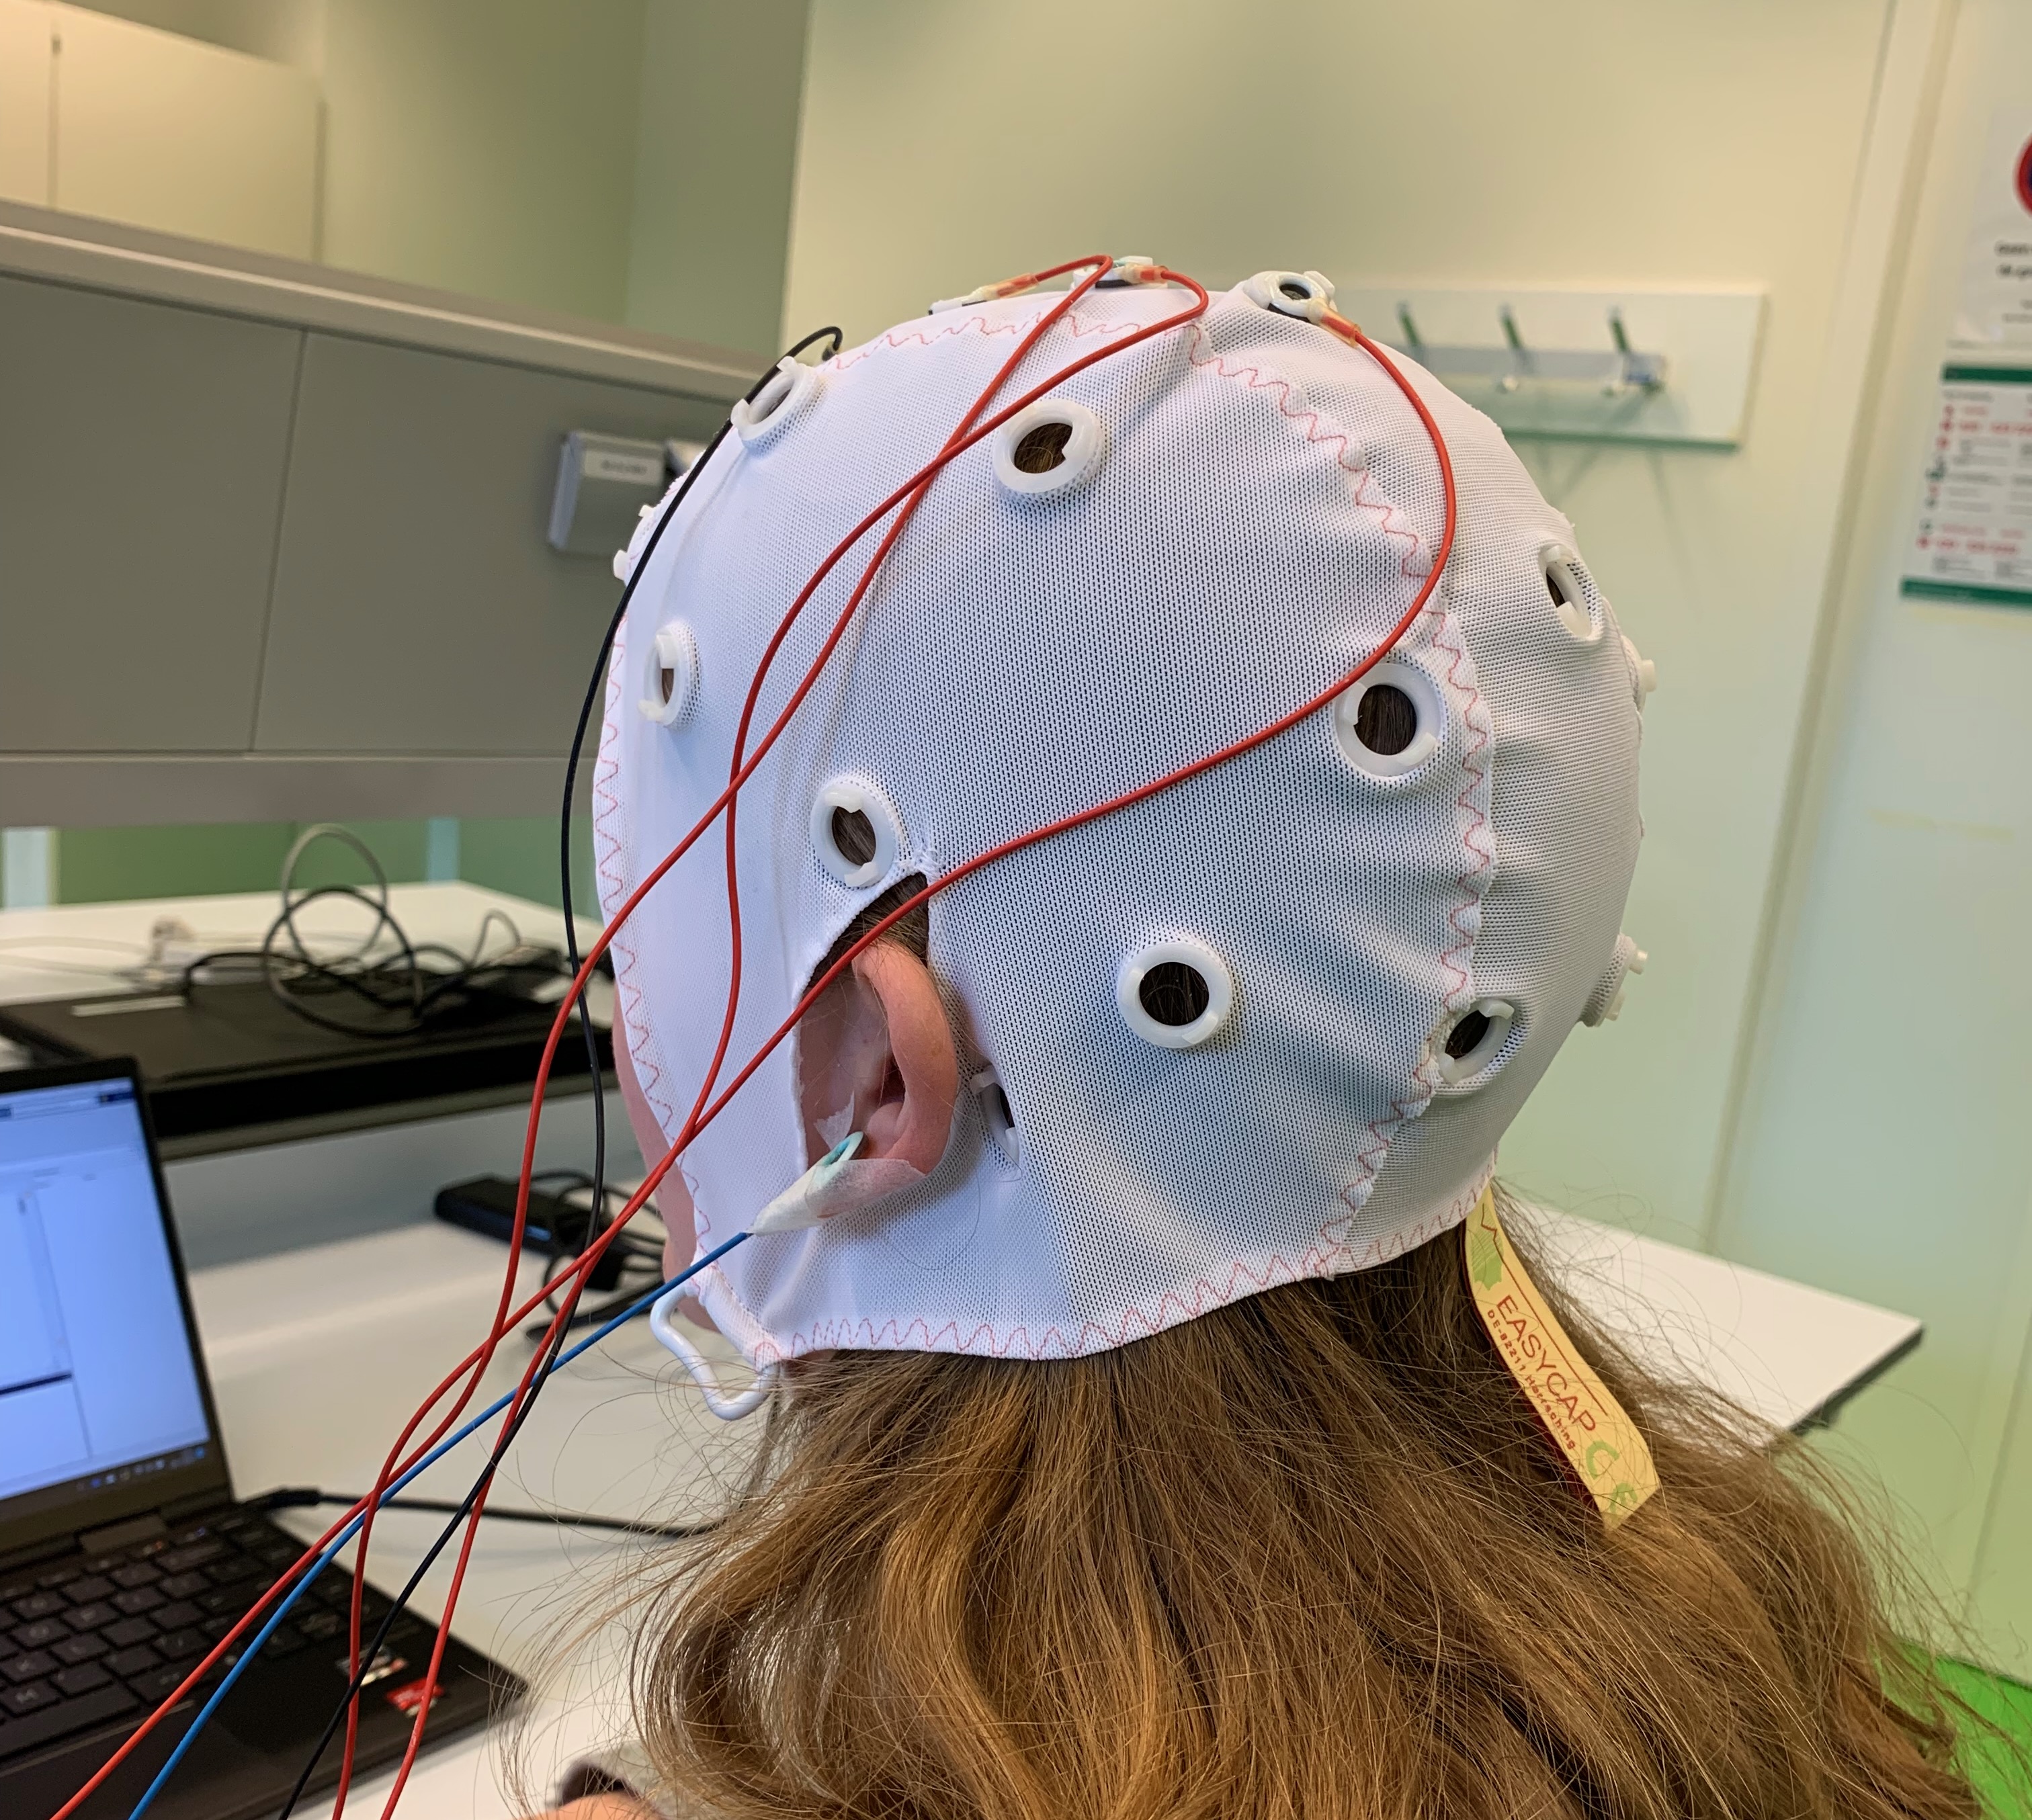
| 1x EEG cap (size medium (56 cm, green). Need a small or large cap? Ask a student assistent! | 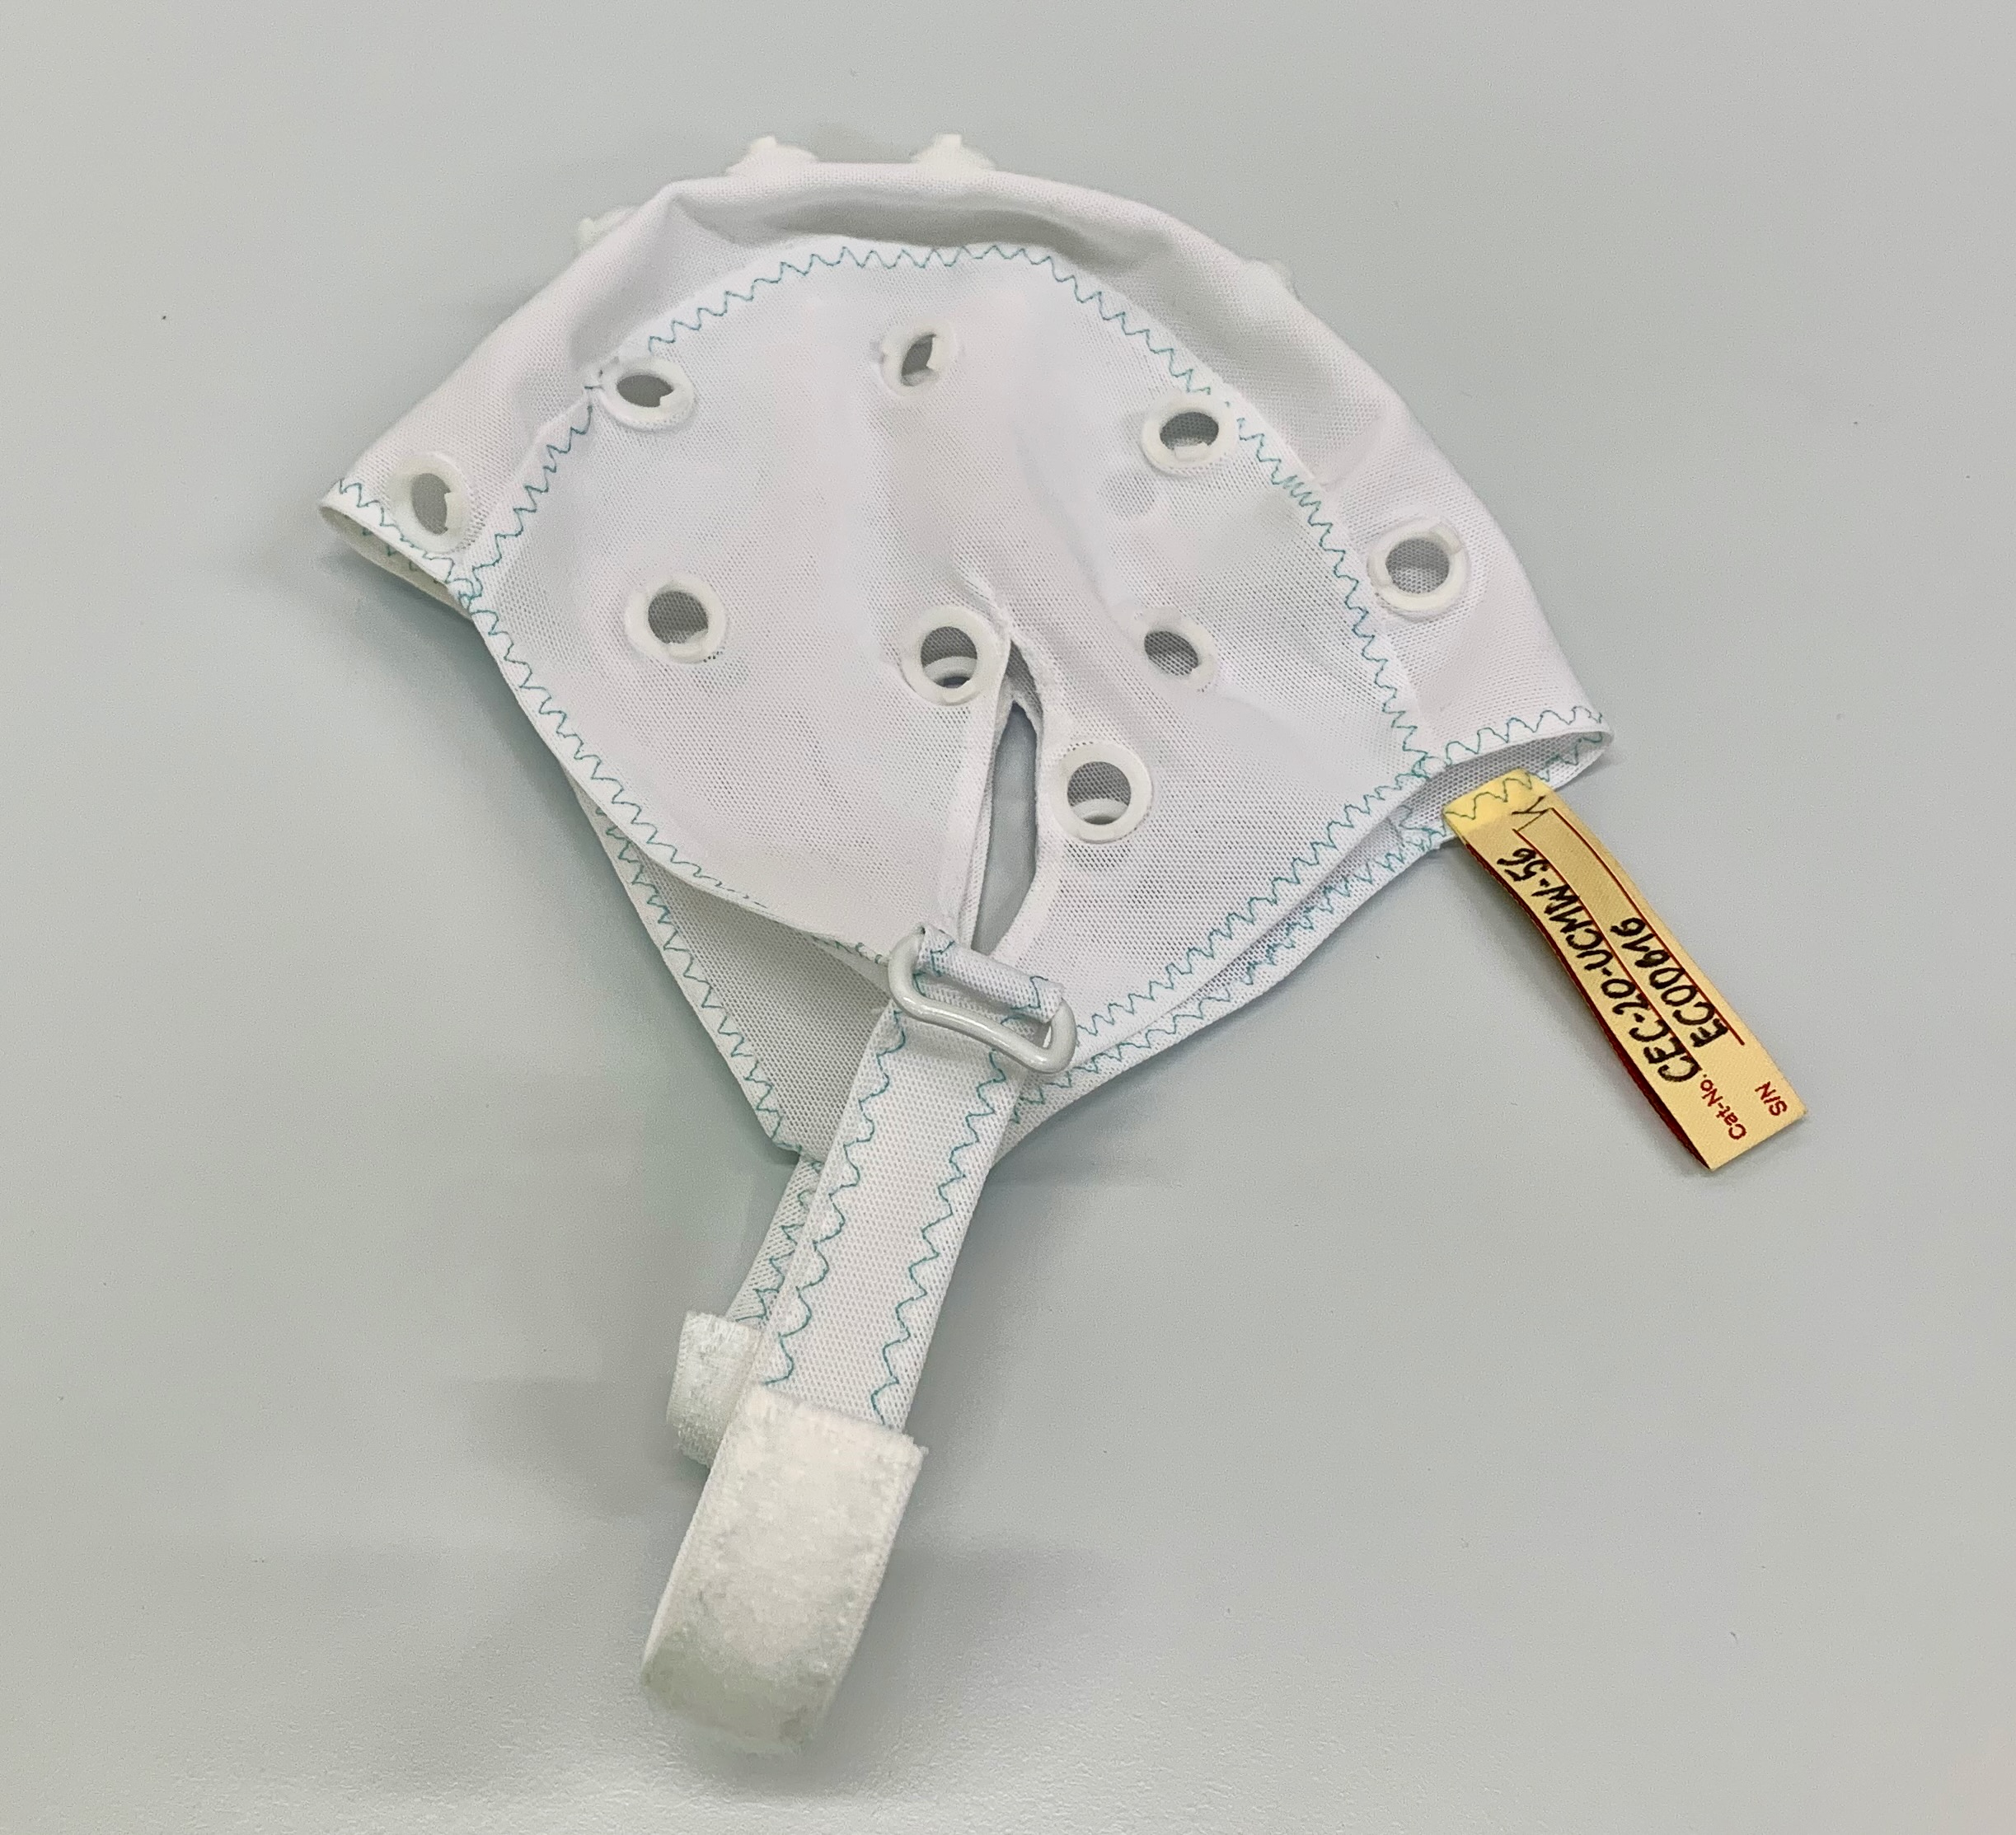
|
Head caps for the participants to keep the electrodes in place. |
| Measuring Tape | 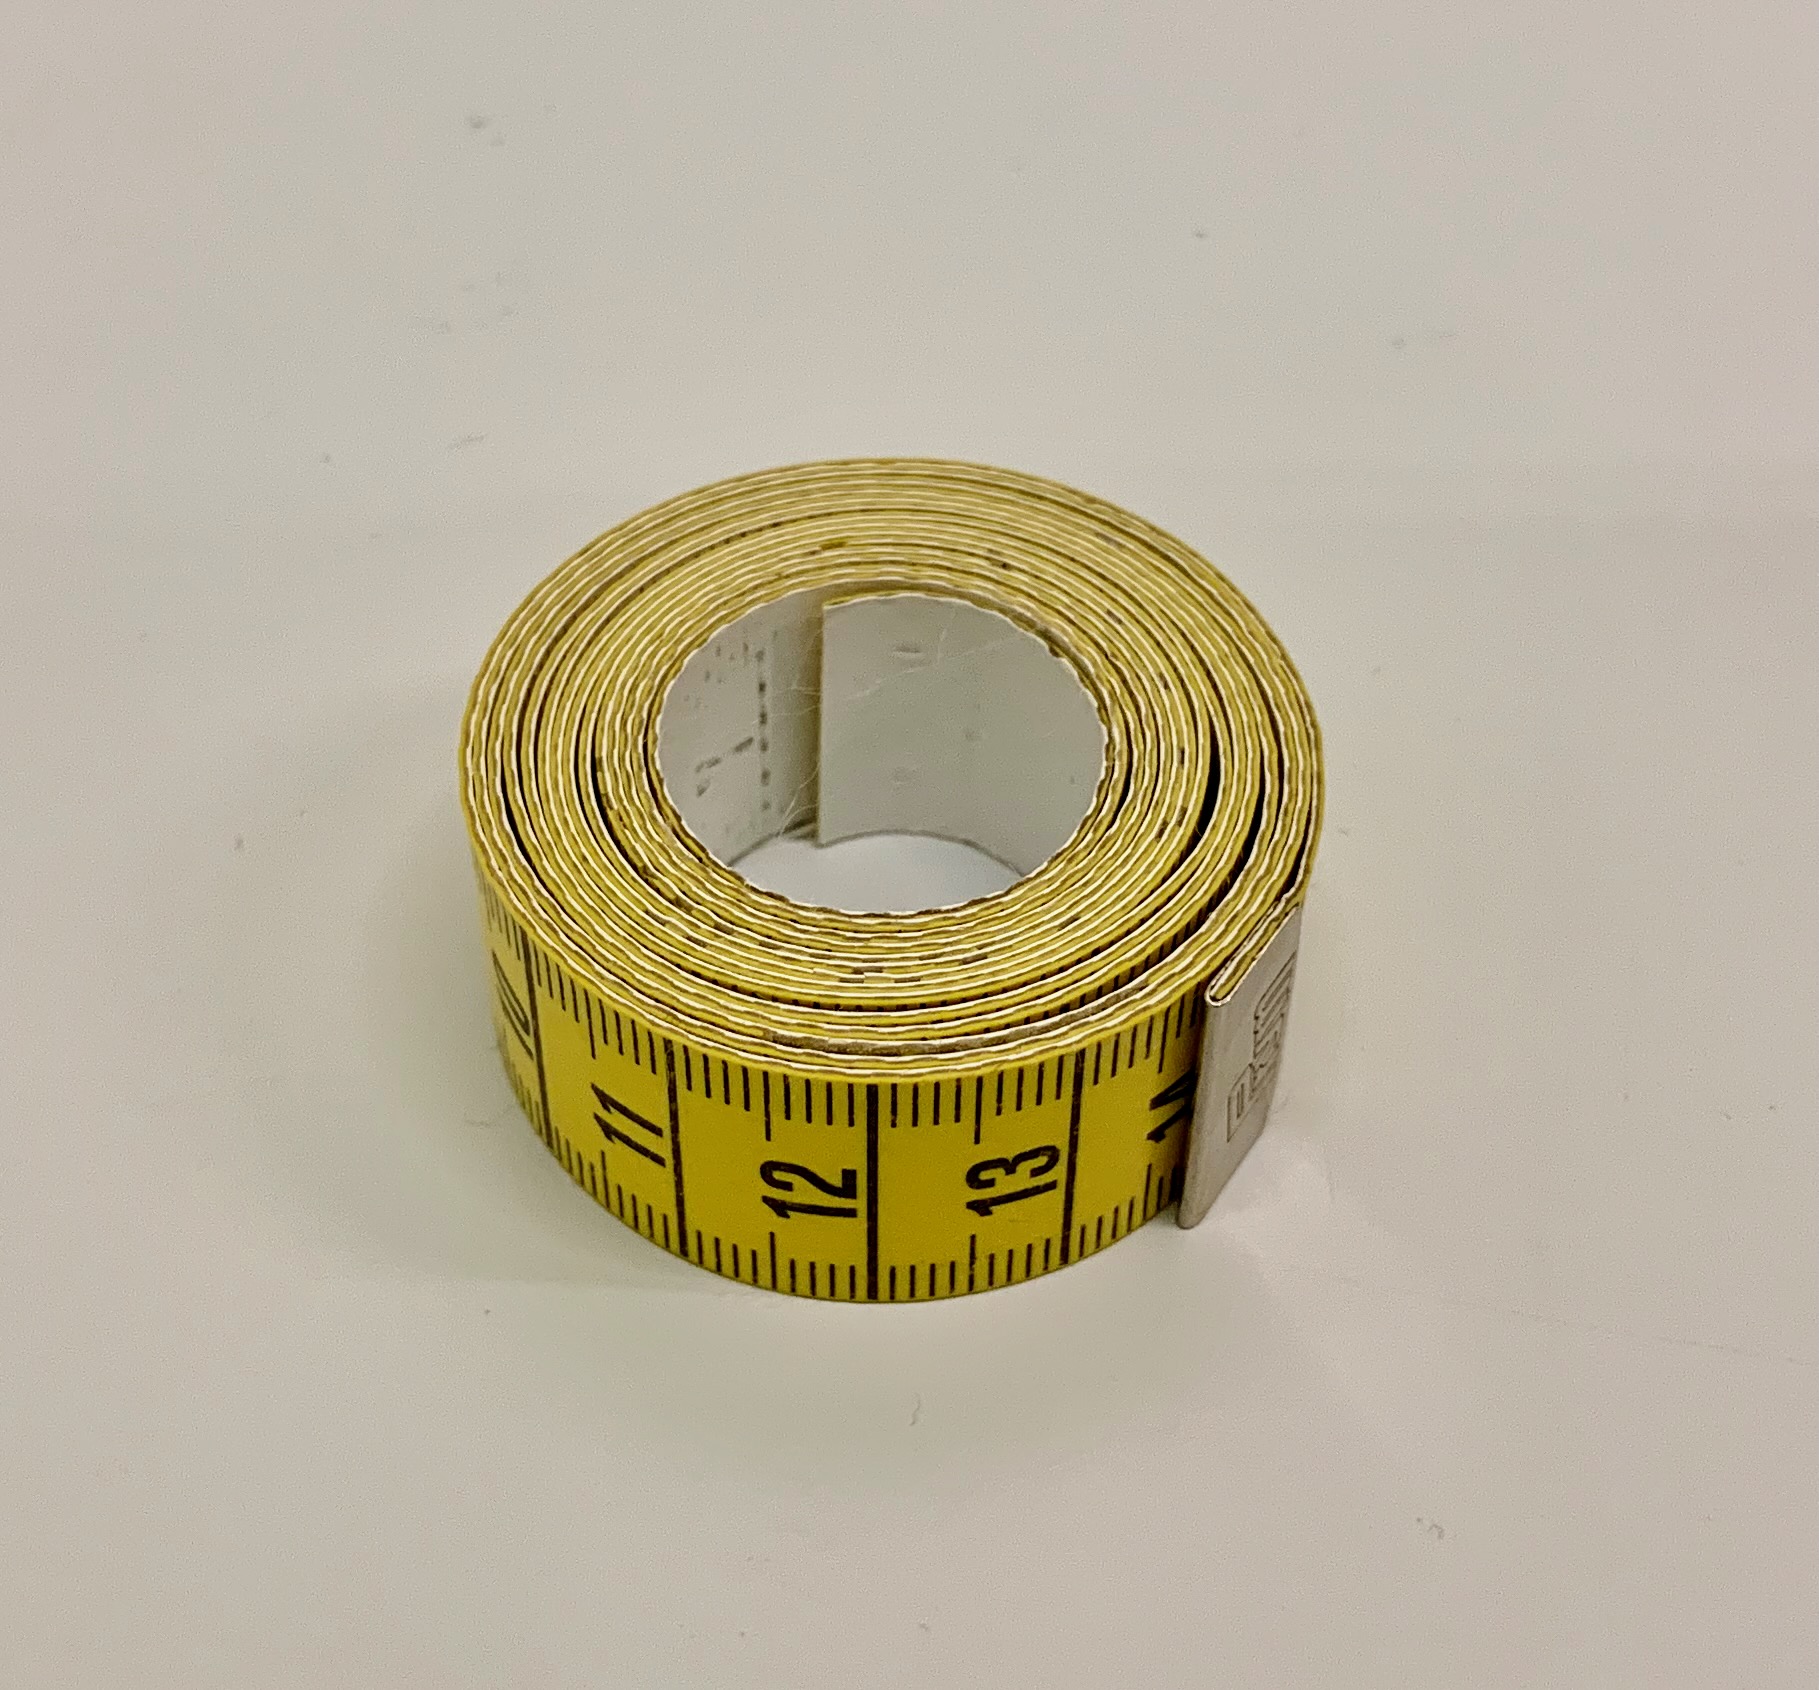 |
Used to determine the dimensions of the head of the participant to fit the right sized cap. Furthermore, it can be used to place the cap according to the international standard. |
| Gel tube |  |
Containing the gel. Works as a conductor of electric signals between the scalp and the electrodes. |
| Gel syringe | 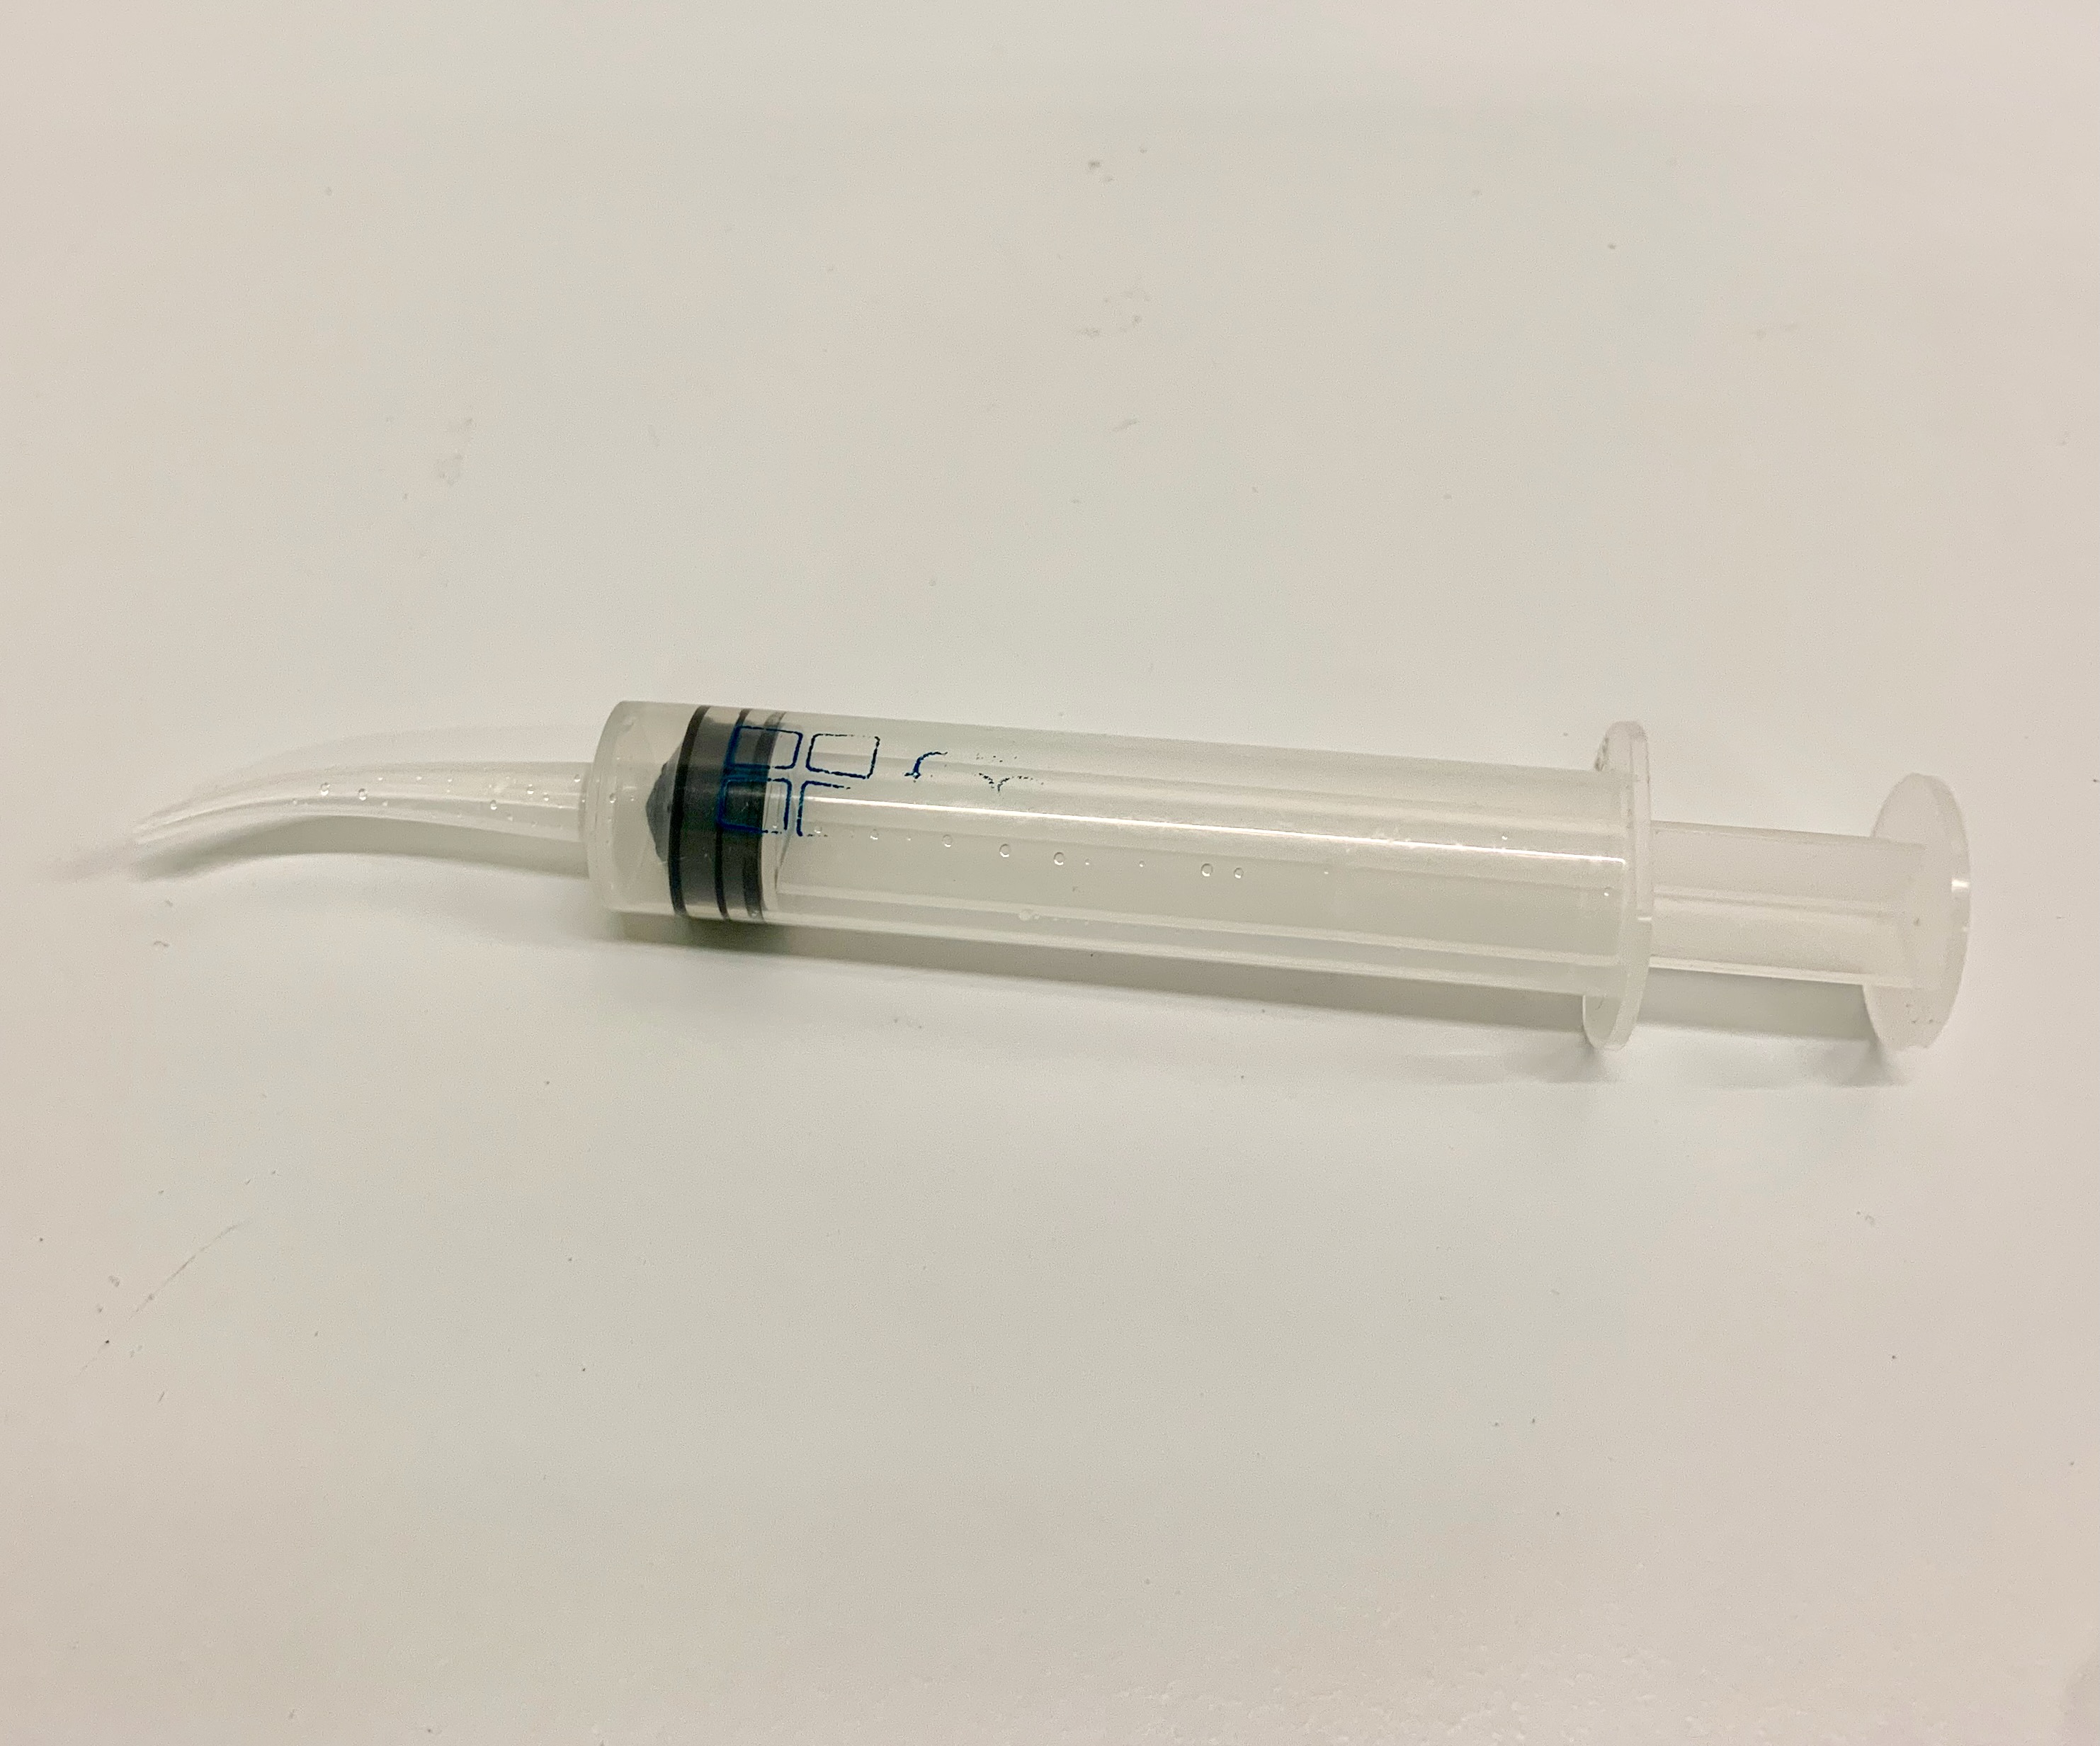 |
Used to apply gel under the electrodes to the scalp. |
ALL COMPONENTS PRESENT?
STEP 2: Connecting The Components
Now it is time to connect all the components. For this, carefully follow these steps:
Every PsyPhy EEG setup has its own numberered case. All its components have the same number. Keep them together.
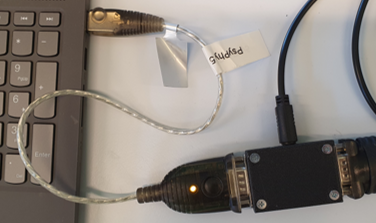
1. Place the Powerbank in the EEG amplifier and connect the Amplifier USB to the Powerbank. During the practical you find the powerbank in one of the loading docks in the room.
2. Insert one end of the Optical cable into the back of EEG amplifier and the other end into the USB to USB connectorbox.
3. Insert the LED side of the Serial cable into the PsyPhy EEG computer and the other end into the stimulus computer (your own computer).
4. Insert the cable of the Electrode 'adaptor' box into the front of the EEG amplifier. Be careful when removing this cable later. Press in the sides before pulling!
5. Power UP the PsyPhy EEG amplifier with the switch under the lid. The Red light should be flashing. (RED = ON)
6. Power Up your PsyPhy EEG laptop. Get the password from the teaching staff.
7. Find the Name and IP address of YOUR EEG amplifier. It is posted on the inside of the Amplifier lid
8. Find the WIFI networks of your PsyPhy EEG laptop and select the one that is send by YOUR EEG amplifier. When connected, it should say: "No internet, secured ". The light in the amplifier should turn green (GREEN = connected), while the Red light remains flashing.
9. The PsyPhy EEG laptop is now ready to receive input from the EEG amplifier.
NOTE: Make sure the PsyPhy EEG laptop does not automatically (re)connect to eduroam or another Wi-Fi network during the recording. Do this by turning off "Connect automatically" for all other Wi-Fi networks.
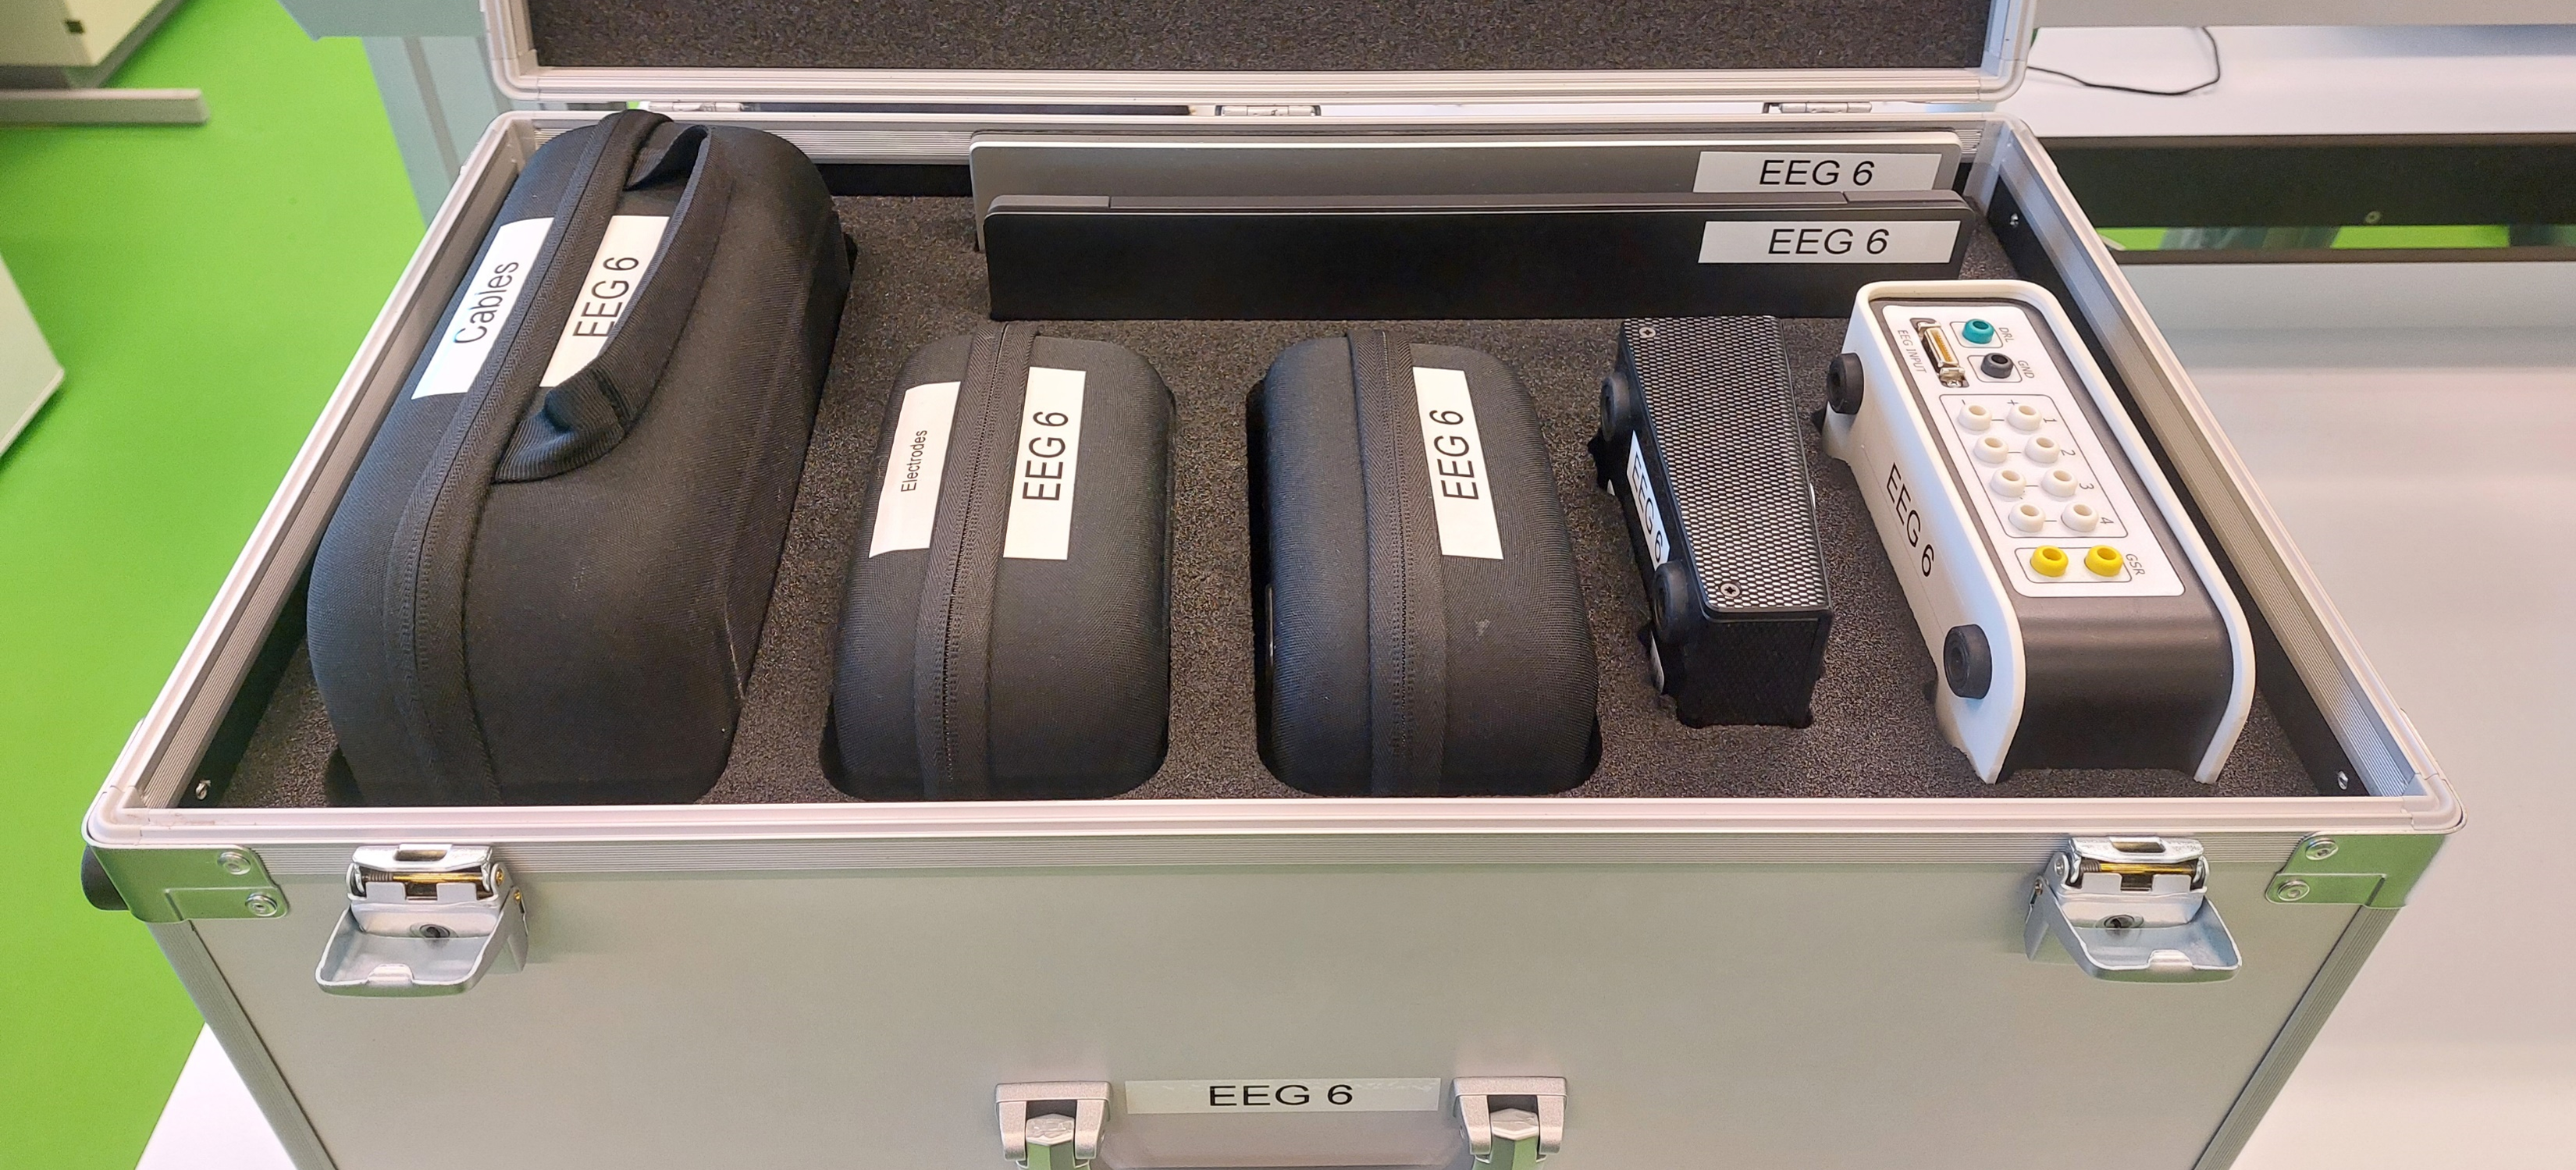
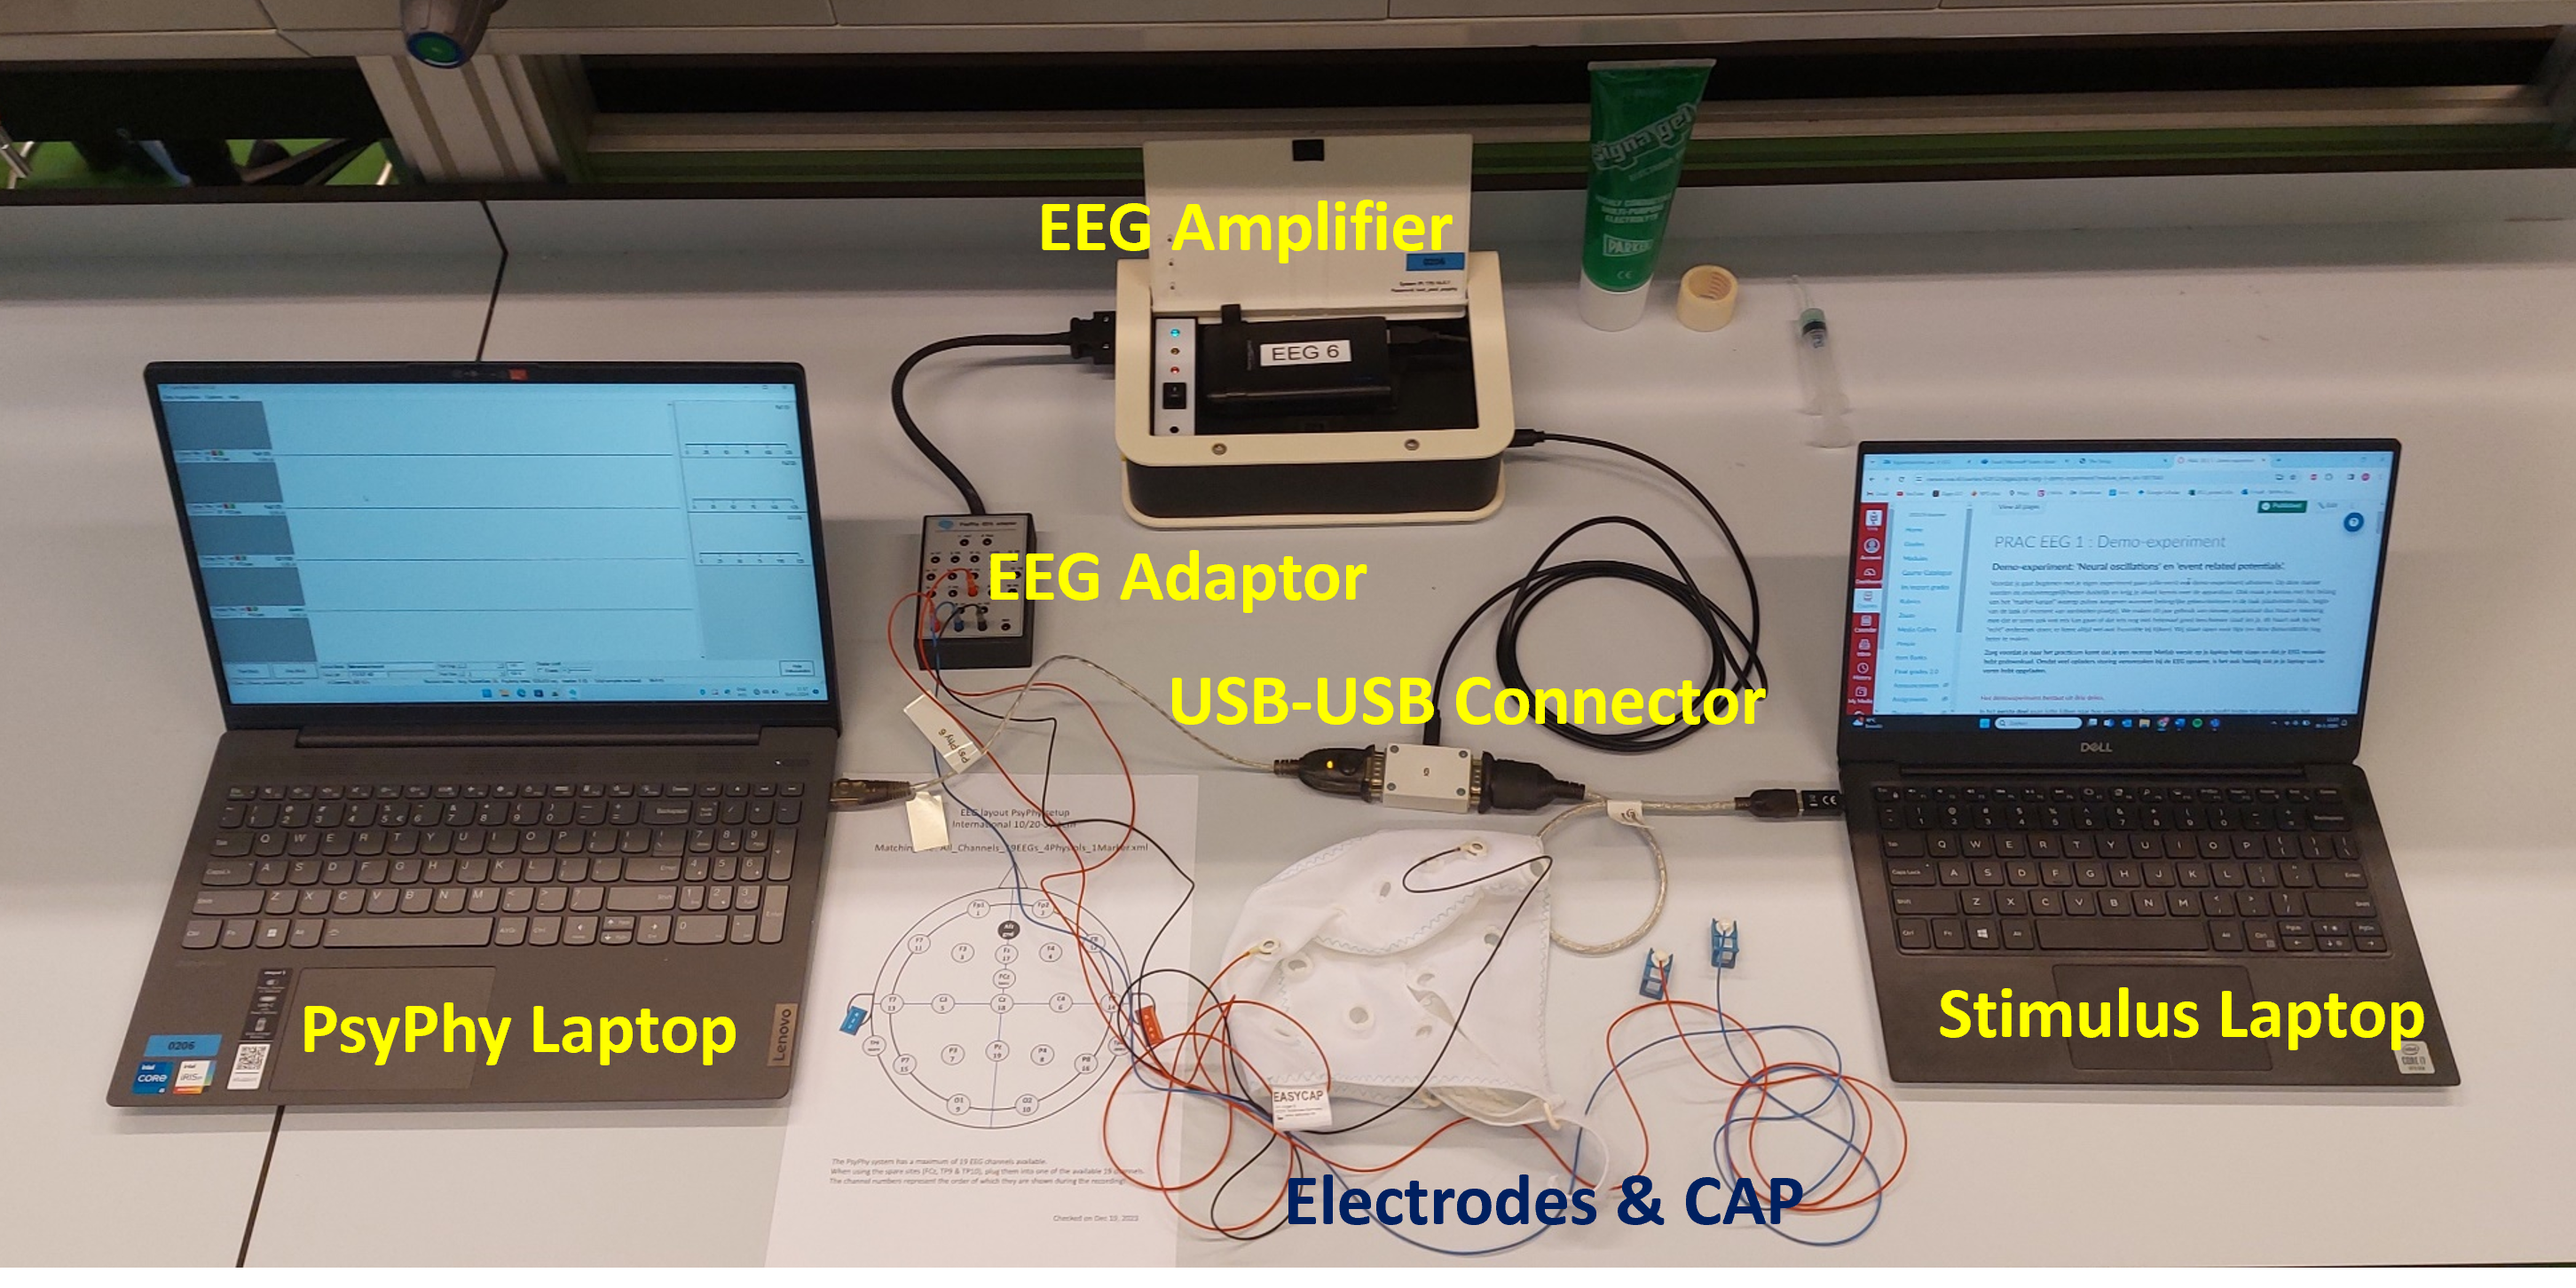
Your PsyPhy EEG setup in the BOX
1. Powerbank in EEG amplifier.
2. Optical cable from USB to USB connectorbox to back of the EEG amplifier.
3. USB Serial cable (LED ON) connected to PsyPhy EEG laptop .
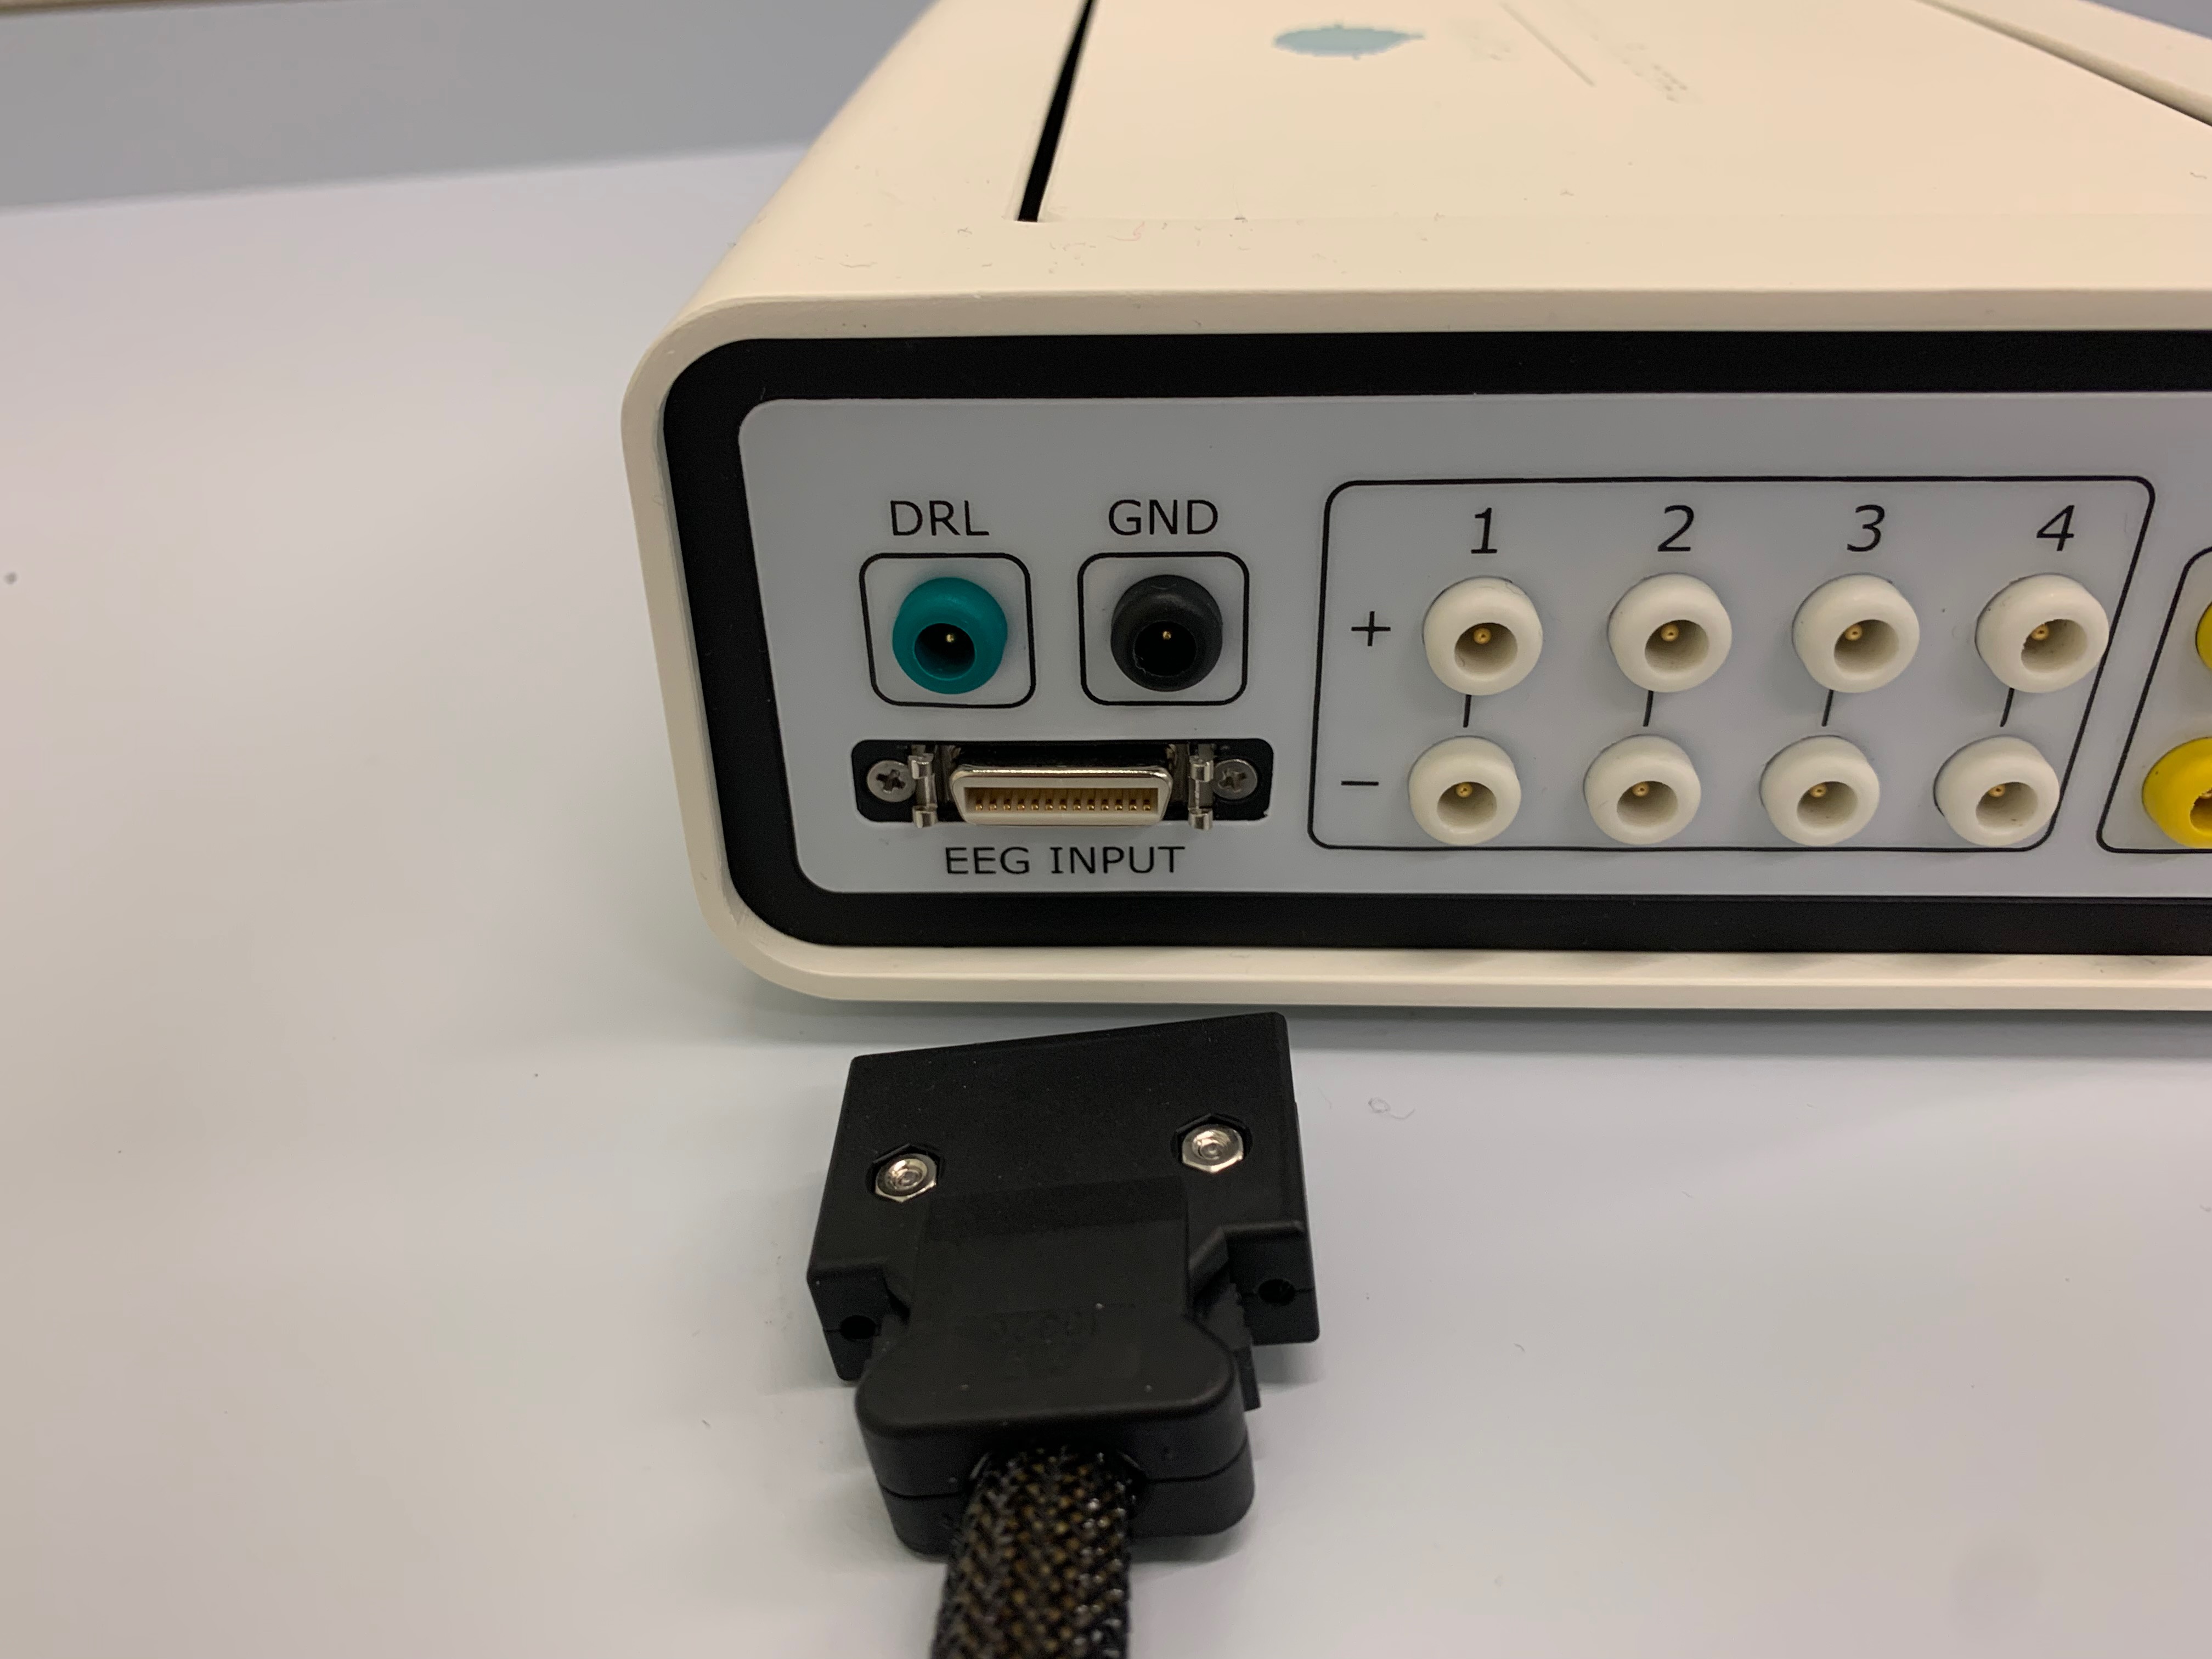
4. Electrode 'adapter' box to EEG amplifier.
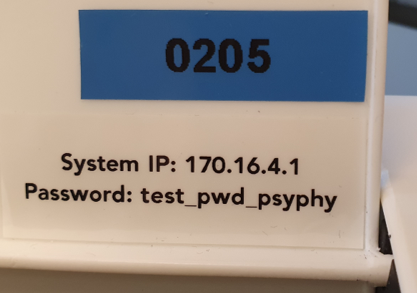
7. Name, IP address and password EEG amplifier. Can be found inside the lid of the EEG amplifier
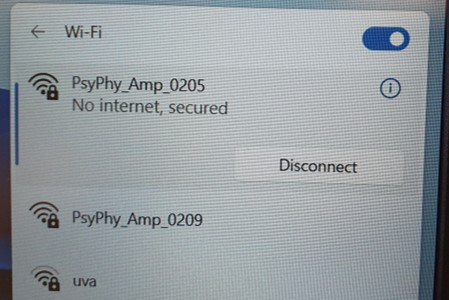
8. WIFI settings on PsyPhy EEG laptop. Make sure to select YOUR PsyPhy_Amp. As you can see, two are available!!
Your set up should now look somewhat like this (minus the electrodes and cap):
NOTE: Please double check that the cables are inserted correctly and your PsyPhy EEG laptop is connected to the correct EEG amplifier!
NOTE 2: Make sure you understand this set-up before proceeding. For help, refer back to the explanations given in the Component Checklist!
ALL COMPONENTS CONNECTED CORRECTLY? UNDERSTAND THE SET-UP?
STEP 3: Choosing Electrode Locations
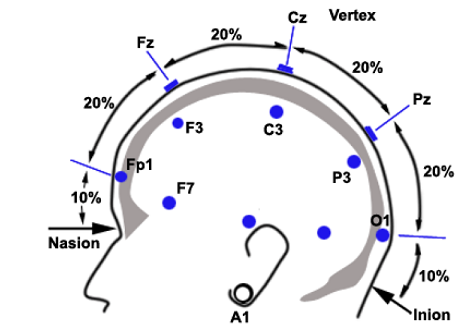
The 10-20 System
The different placements of the electrodes on the cap are based on the International "10-20 system" for EEG recording. For a detailed explanation, click on the right!
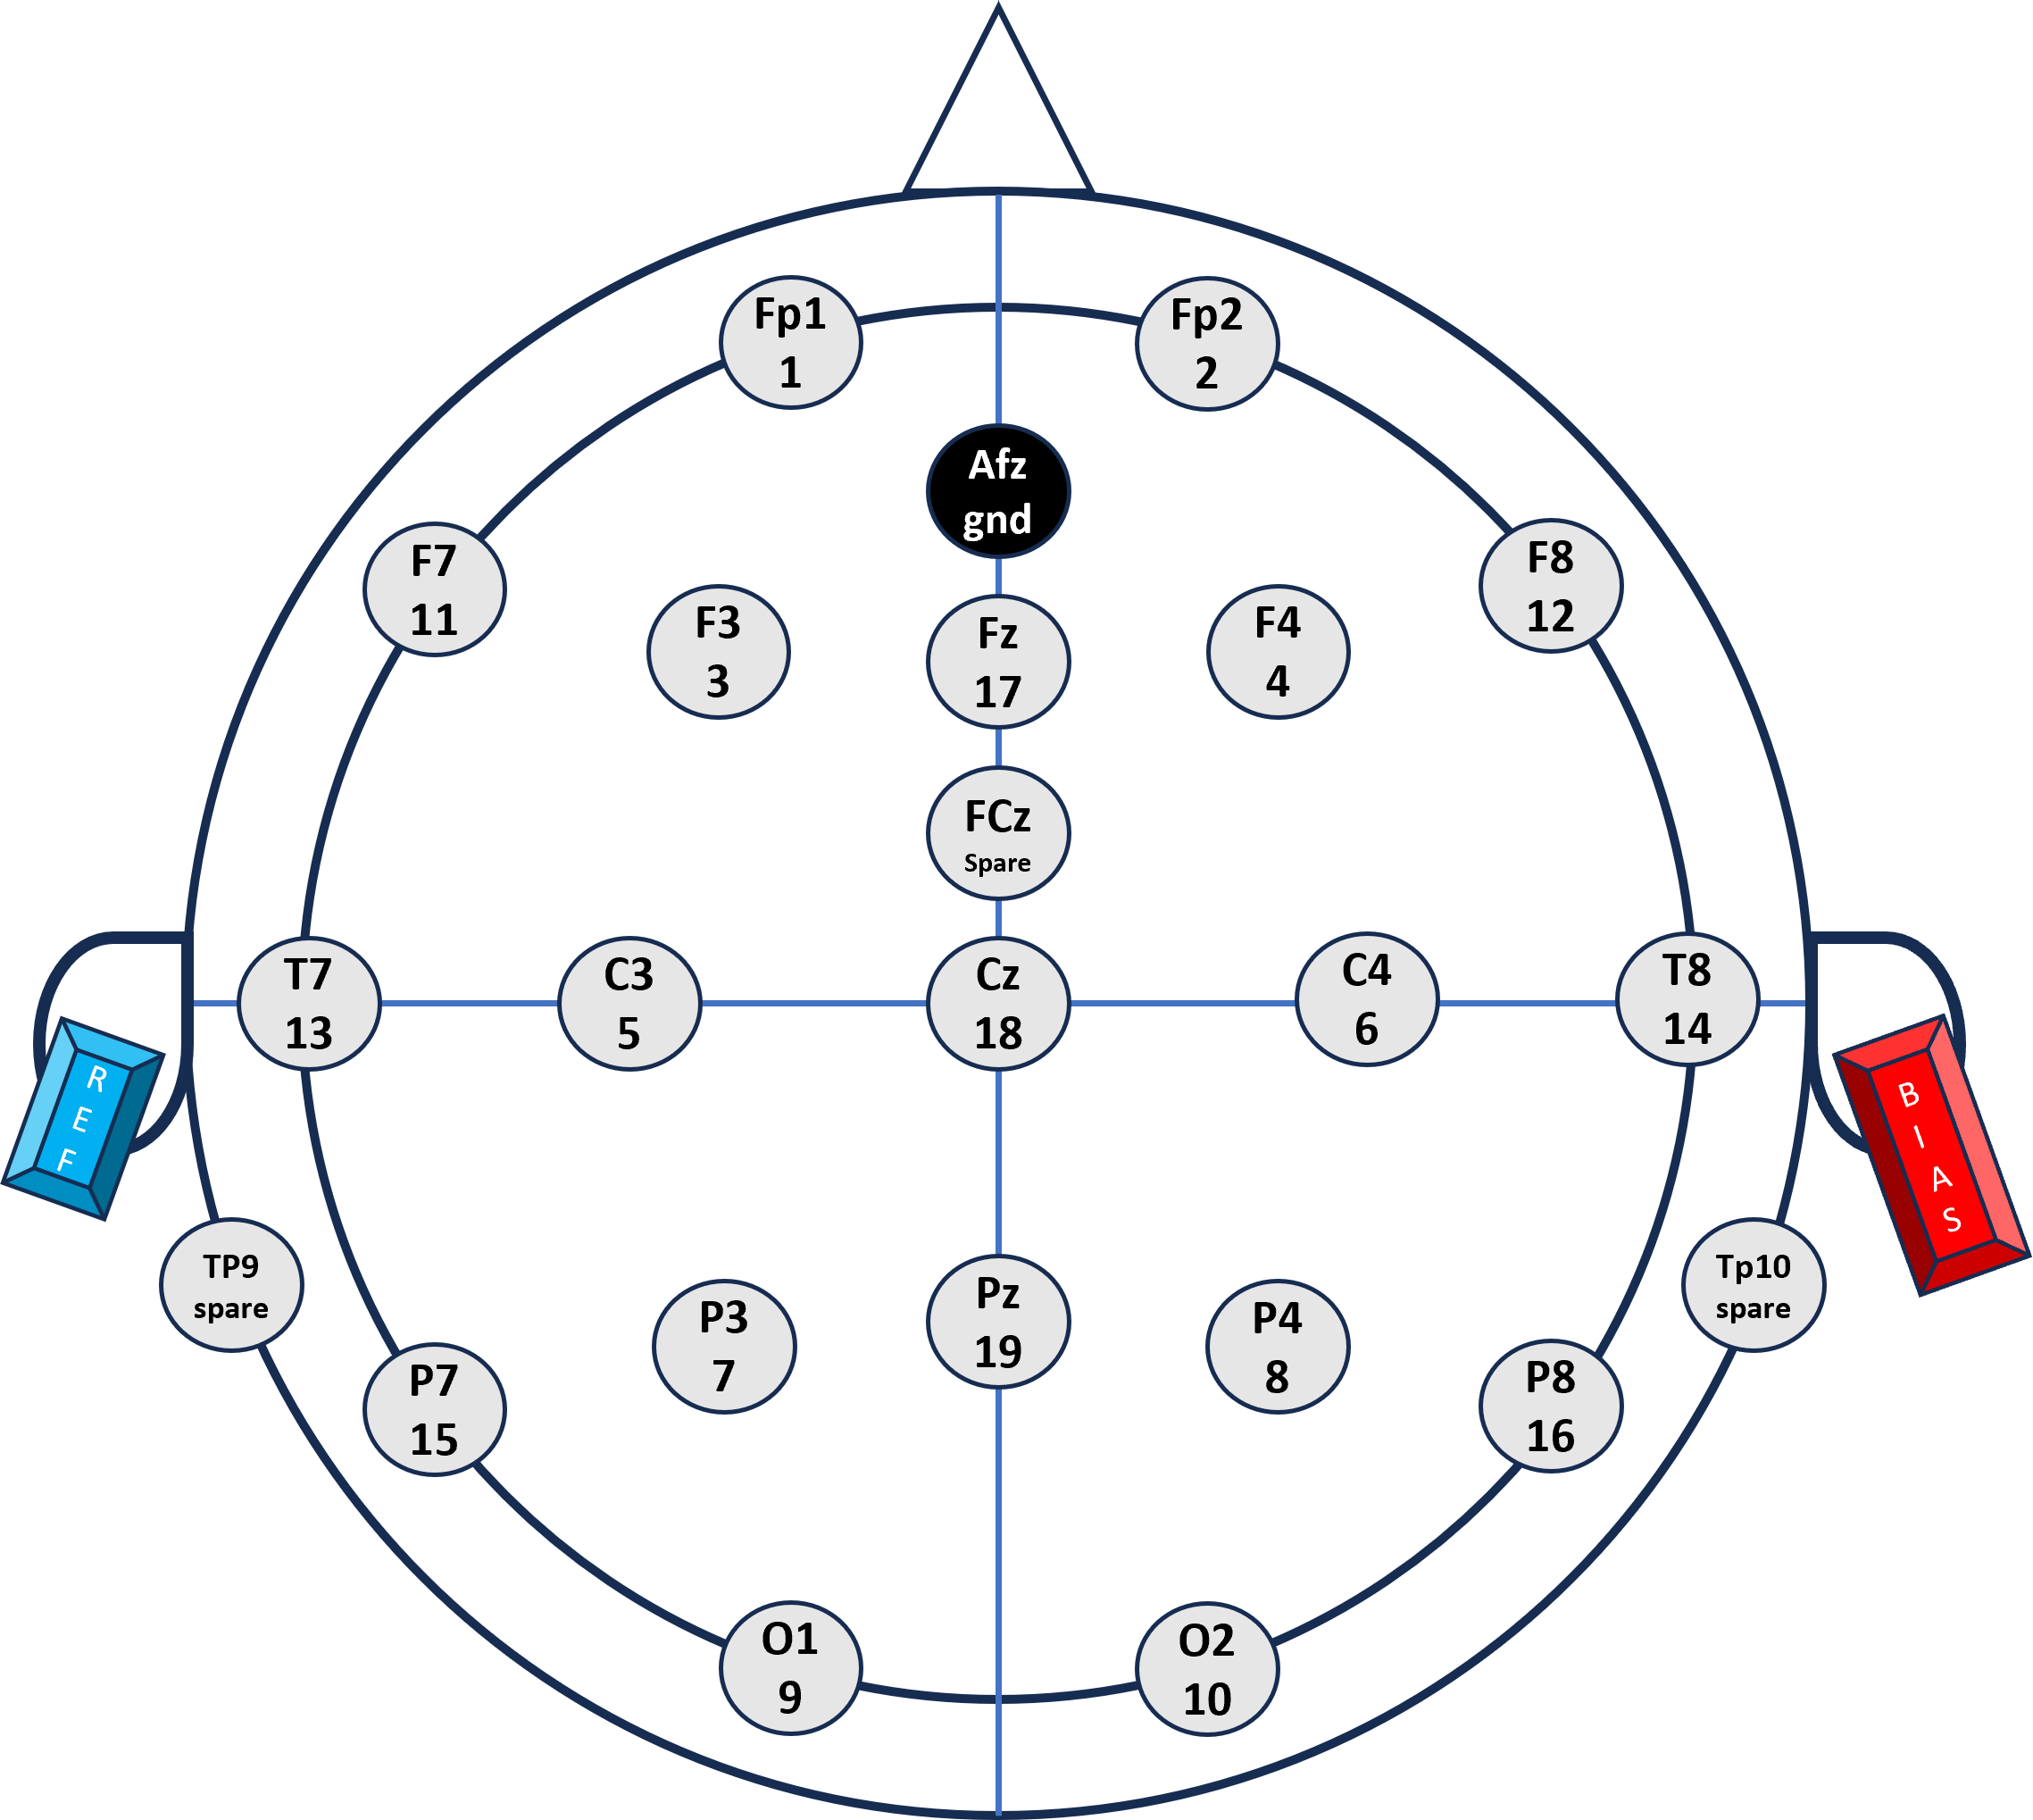
The electrodes and the EEG Cap are placed according to the international standard. Important is the standardized location of the Cz electrode. See 4.1: Fitting the CAP
3.1 Base your electrodes on relevant literature:
You will have to decide where you want to measure. With a limited number of electrodes, you can't record all areas. So select your recording locations wisely.
Select literature that studied effects in a similar setting than yours and see where they placed the electrodes. Also, you can use the placements on which they found the strongest effect.
KEEP IN MIND: Be very precise on what kind of effect you are looking for: using visual stimuli does not necessarily mean the effect will be found over the visual cortex. For example, if you use words or pictures with different meanings in different context the effect will more likely take place over the temporal cortex. Also auditory ERPs are best recorded on PZ and are less effectively recorded on lateral positions. So: base this is on literature!
Spread your electrodes
The best signal is often measured at other locations than directly over the brain area where it is generated. As it passes through the skull and scalp it can be smeared out. The result of this is that EEG has low spatial selectivity (meaning it is hard to determine where the measured signal comes from exactly). On the upside, this also means that, even if you place an electrode next to where the maximum effect actually is, you will still pick it up. Consequently, placing two electrodes right next to each other does not give you much more information. Keep this in mind as well.
For a detailed explanation on the function of the different electrodes please visit the
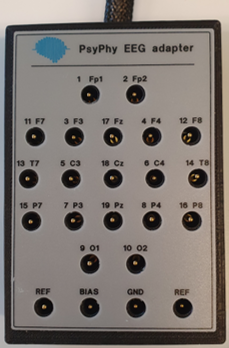
The PsyPhy EEG Adapter: Connect your choosen electrodes!
3.2 Now it's time to set up the configuration file (.XML file)!
This file is needed for the PsyPhy EEG recorder software to know which channels you want to measure and to setup the hardware connections.
READ CAREFULLY and Follow instructions!
1. Download the Default Configuration-file from Canvas, copy this on a USB stick and transfer it to the PsyPhy EEG computer. There, save it on the desktop.
IMPORTANT: Create a DUPLICATE and RENAME this file under a UNIQUE name, preferably containing the name of your group (e.g. PsyPhyC1.xml). This will be the configuration-file you can edit and the version that you will use throughout the EEG practical.
2. Next, download and read the PsyPhy Config file (XML).docx from Canvas AND the points below to determine what information you can/must change in the configuration-file and what information to leave unchanged:
3. Double click the XML file. It opens in Notepad!
4. BEWARE: For now, LEAVE the channel settings as is.
5. Scroll all the way down to the last code section called "hardware".
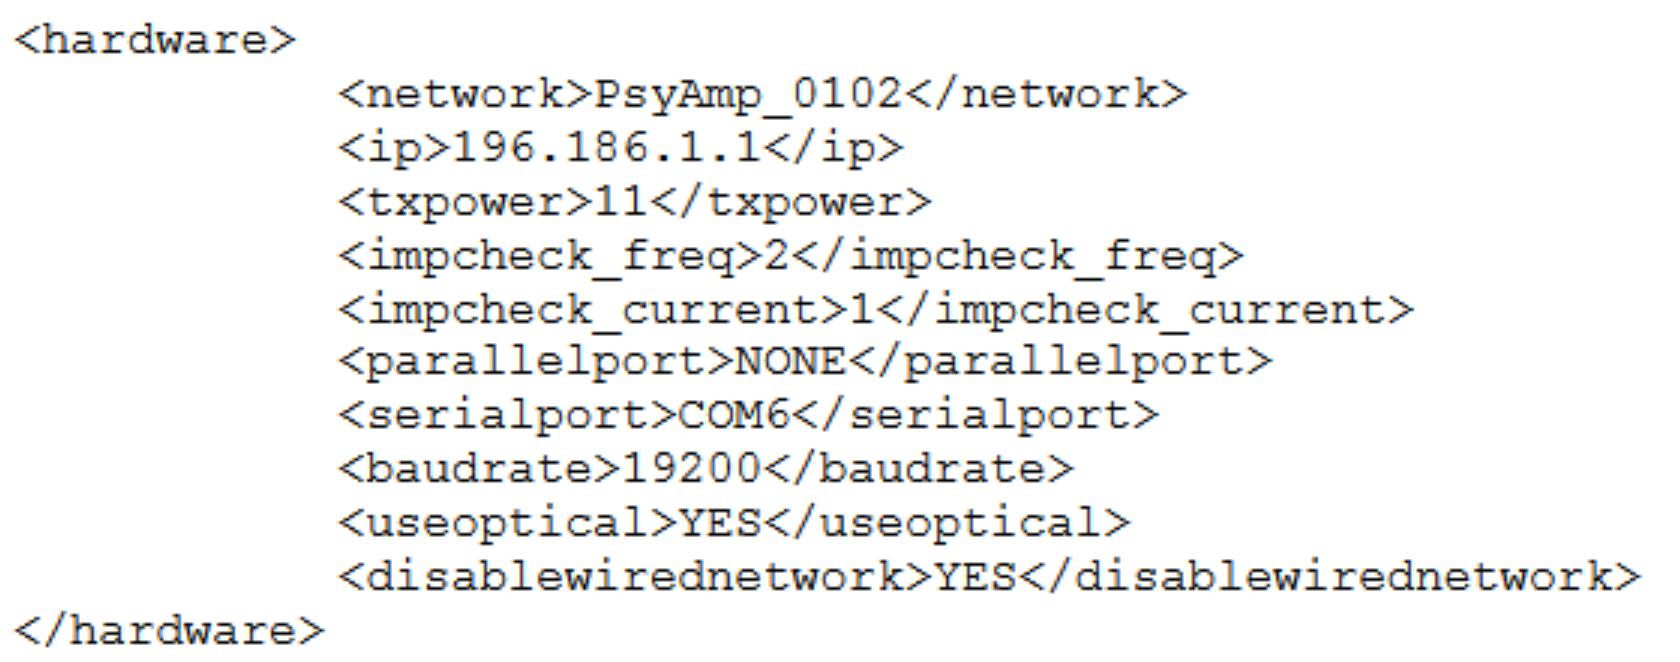
6. Now its time to select the channels you would like to record!
7. SAVE YOUR CONFIGURATION (.XML) file
8. Now you are ready for your recording!
STEP 4: Fitting the CAP
Select the cap size that fits your subject.
The green cap has a medium fit (56 cm) and fits most people. The light red cap is the largest (60 cm), and the dark red cap is the smallest (52 cm). The cap should be tight enough so the electrodes are close to the scalp but still comfortable for the subject to wear. Let the subject test out the caps.
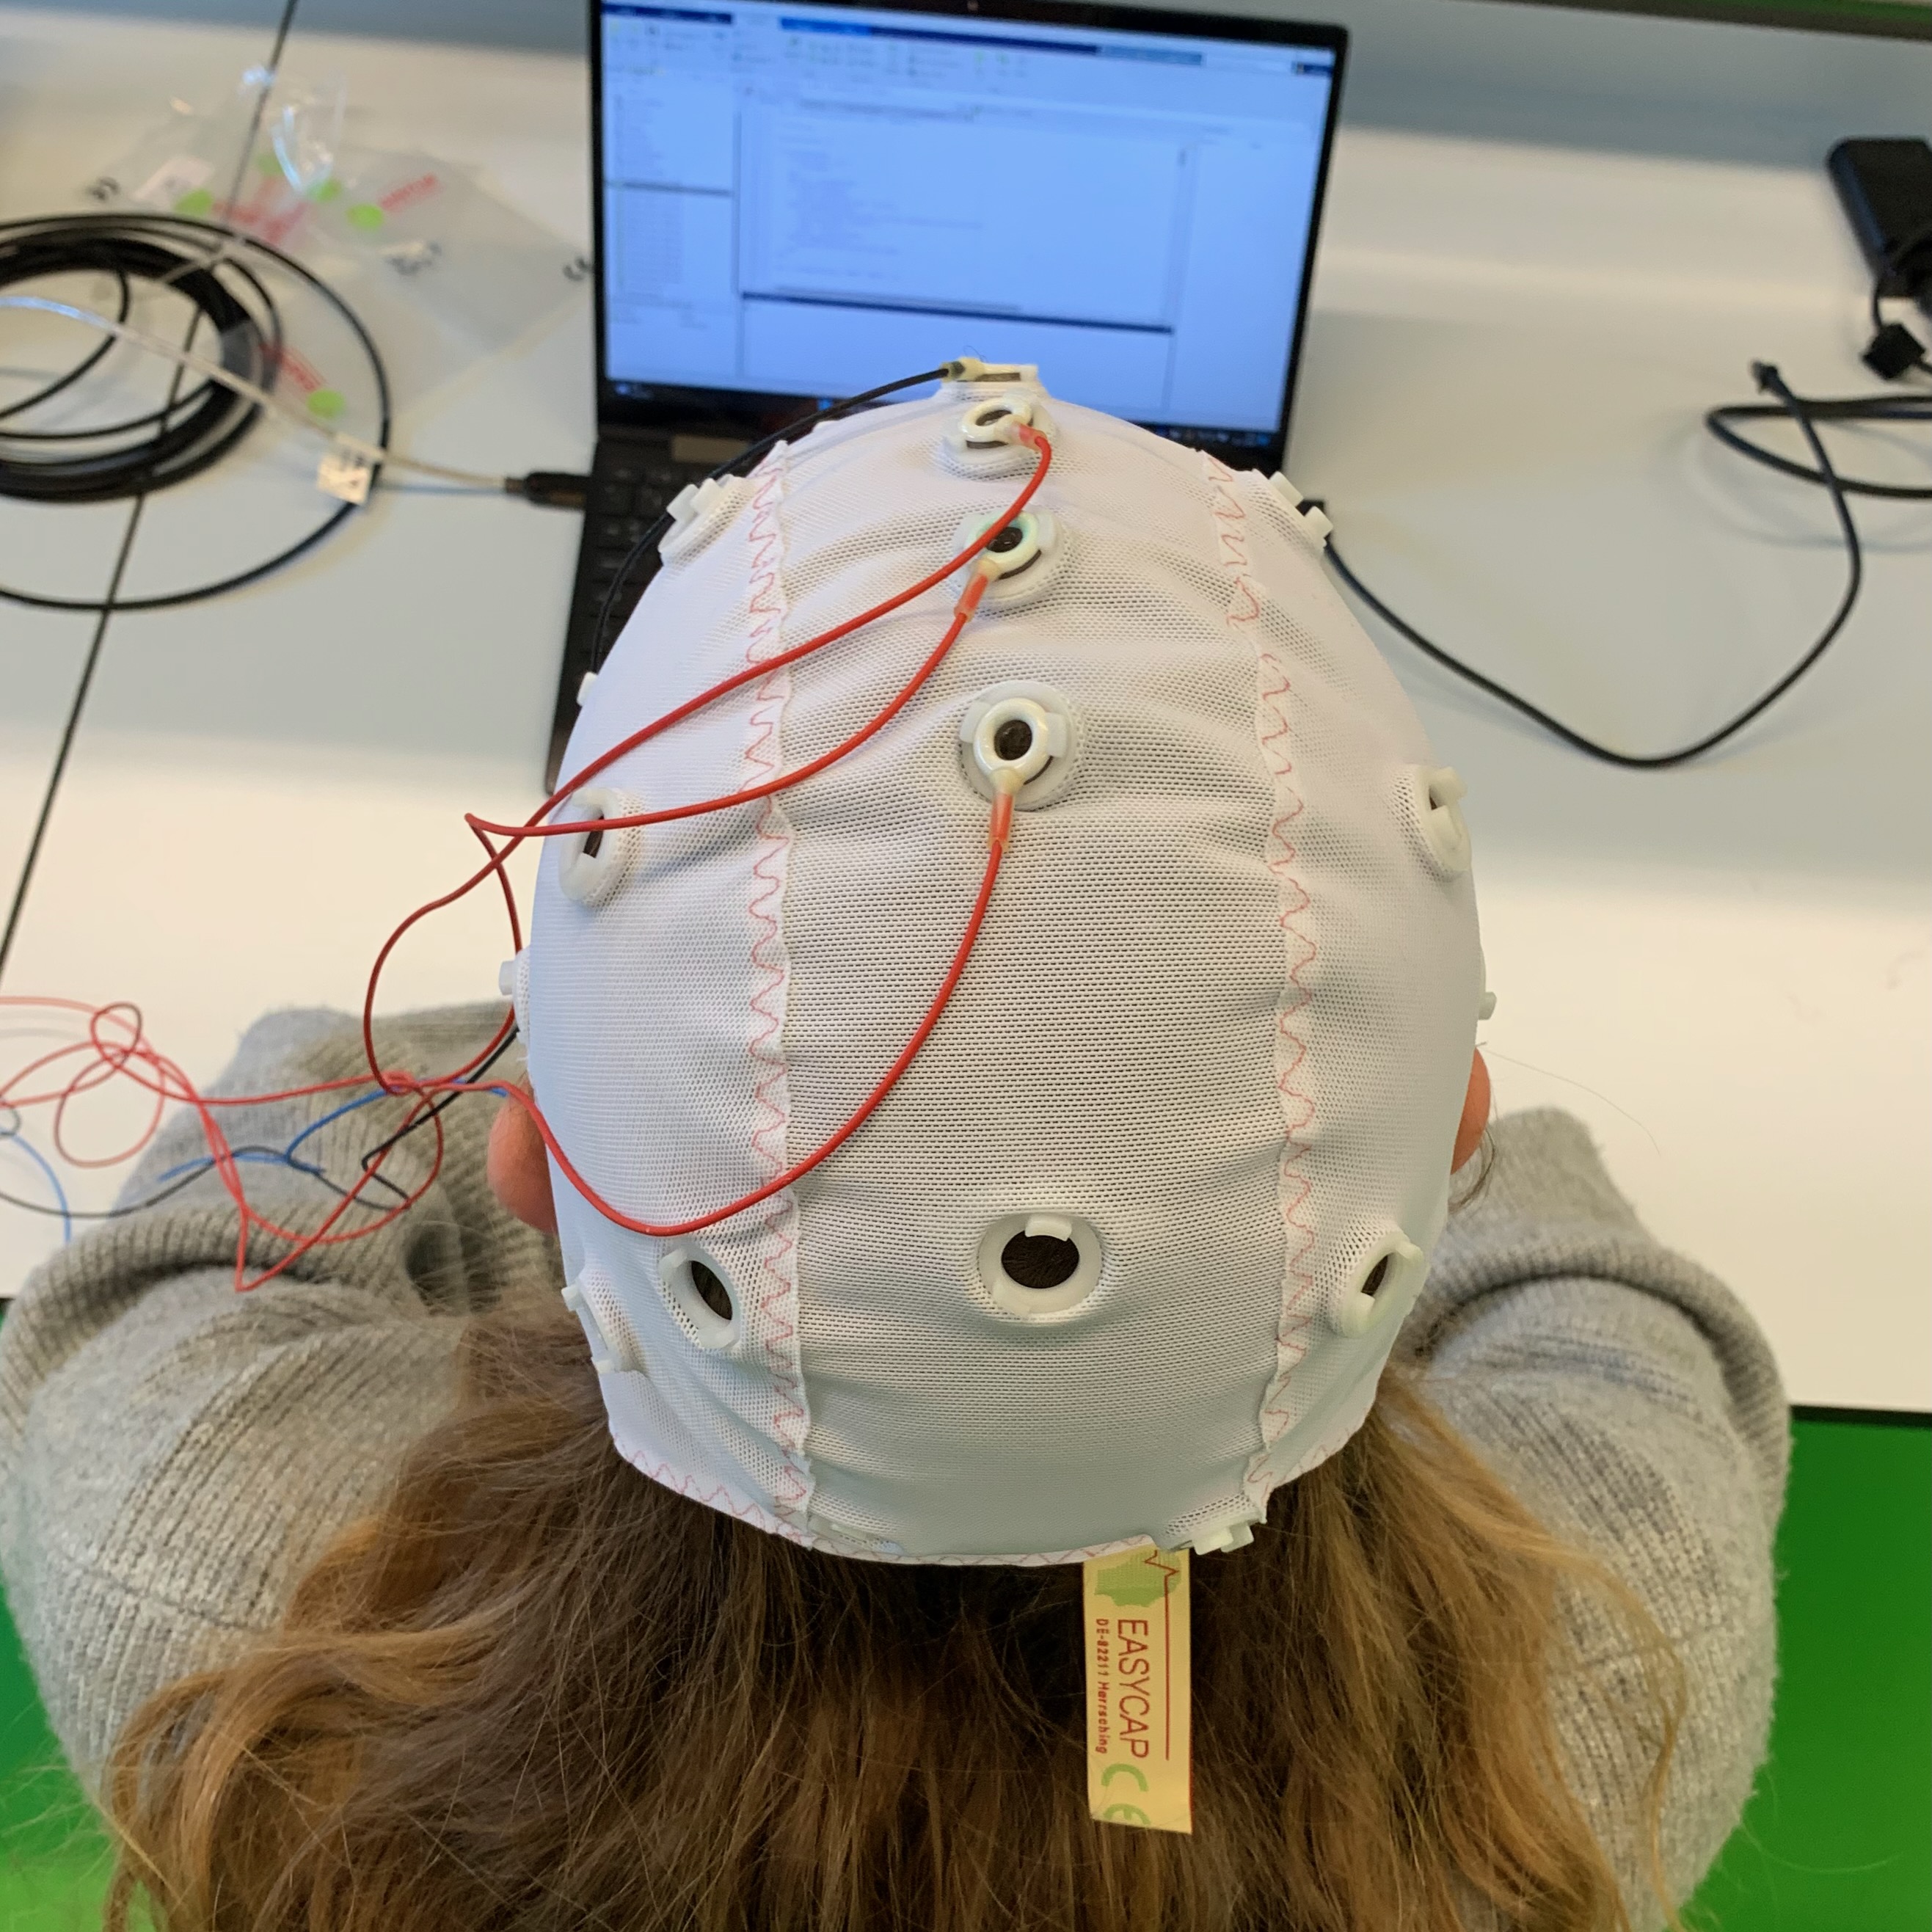
After a cap is chosen, let the participant take off the cap, and insert the electrodes on the locations chosen by you. Then let the participant put on the cap with electrodes.
Orienting the cap
Measure the head size of the subject from nasion to inion, and from the left tip of the ear to the tip of the right ear. The location of the Cz electrode should be in the center of these measures. Move the cap around if necessary and make sure it fits tight and symmetrical.
Let the subject place the chin band.
Now you are ready to gel the electrodes.
Gelling the electrodes
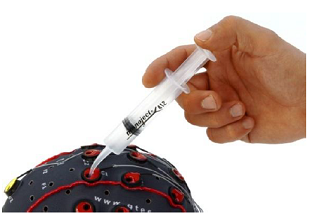
1: Fill the curved syringe with electrode gel.
2: Place the tip of the syringe through the electrode on the skull. Ask the subject whether the tip is feld.
3: Apply the gel while retracting the syringe.
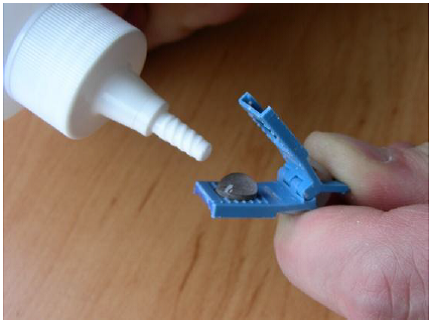
4: The reference and bias electrodes (red and blue earclips) are gelled by appying a drop of gel on the metal electrode disk and placing them on each of the earlobes.
STEP 5: Recording EEG
Opening the EEG recorder software
1. Open the recording software: 'FysioRecorder' on the PsyPhy desktop.
2. Then open YOUR own configuration-file via the 'data acquisition' menu.
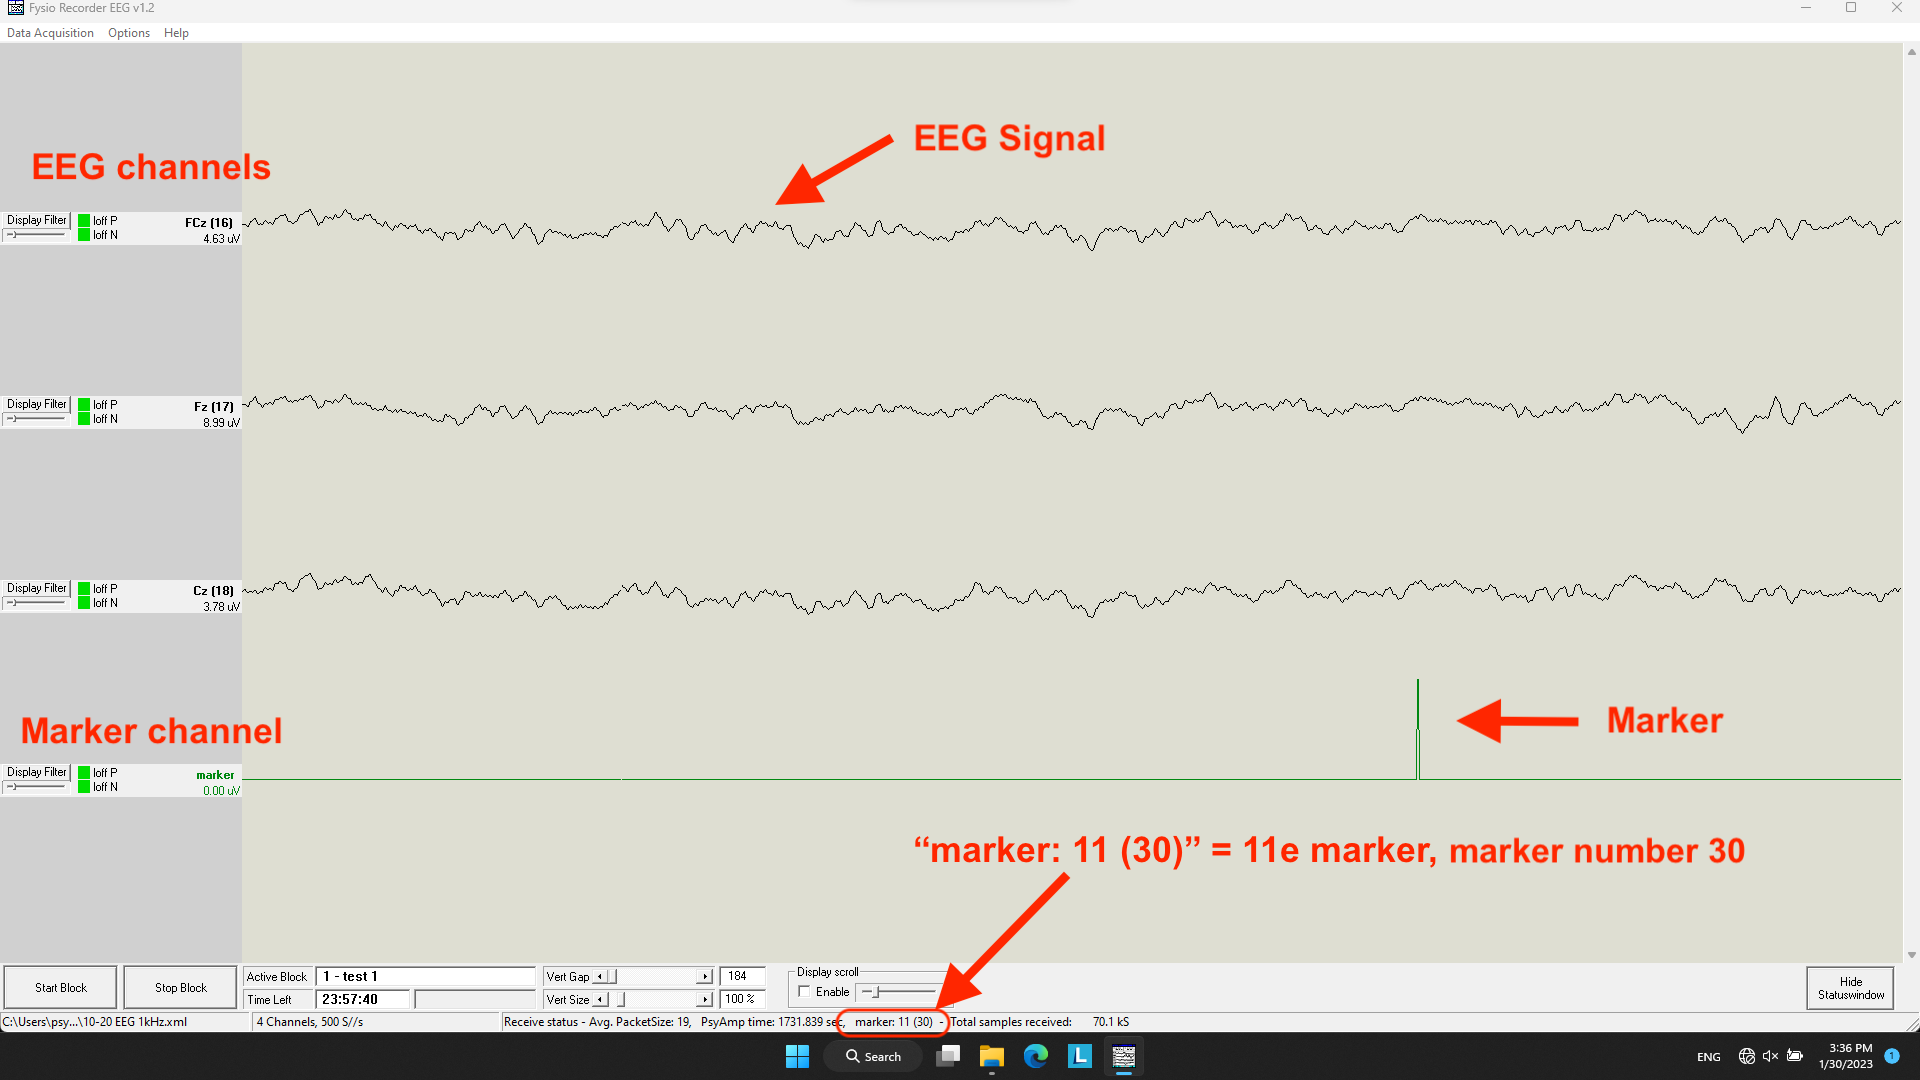
3. It should load pretty quickly and look like this:
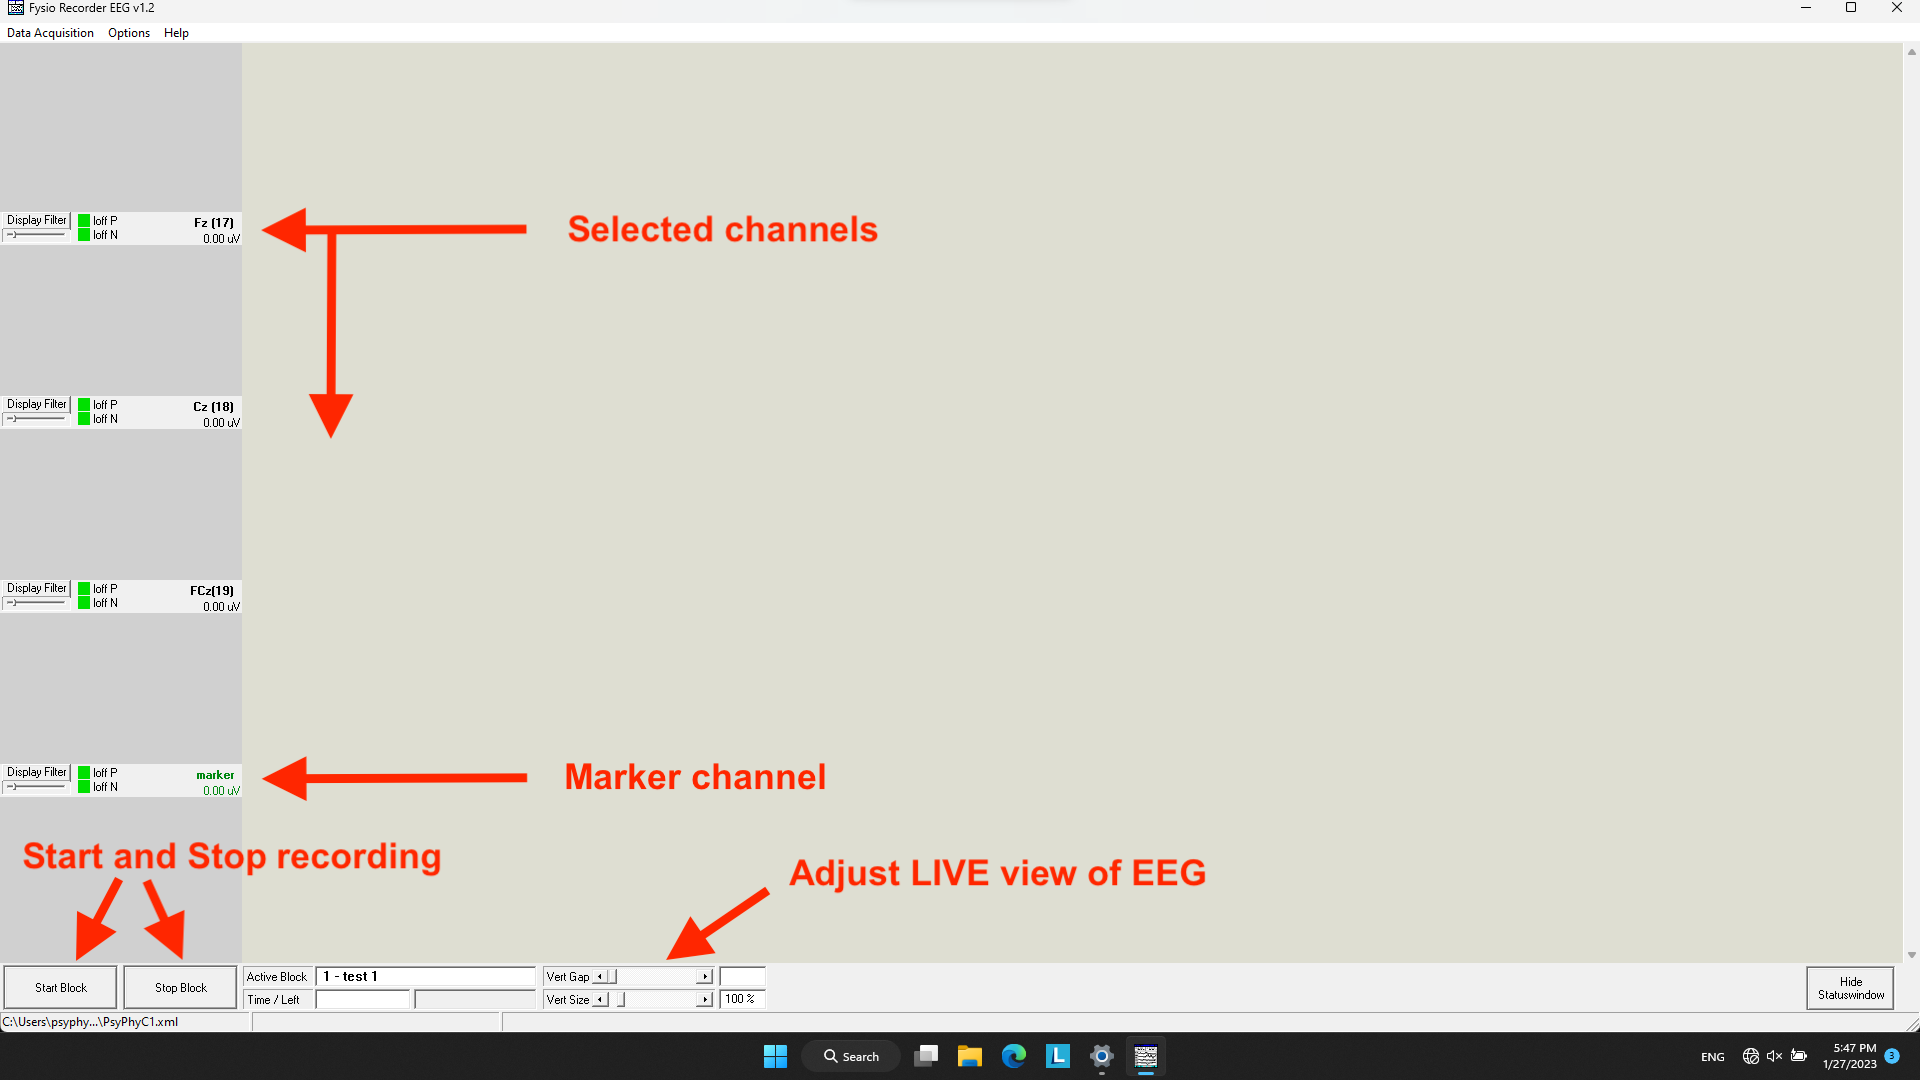
4. Check if your choosen channels are going to be recorded.
Starting a recording
3. Start a recording by pressing "Start Block" on the bottom left.
The recording has now started! The light on the amplifier should turn yellow (YELLOW = sending data). Give the signal a moment to stabilise. Be patient.
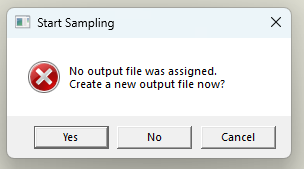
KEEP IN MIND: you can NOT pause the recording by pressing "Stop Block". This will automatically save the data and CLOSE the software! From this point on, you can leave the recording running until the participant has completed the experiment.
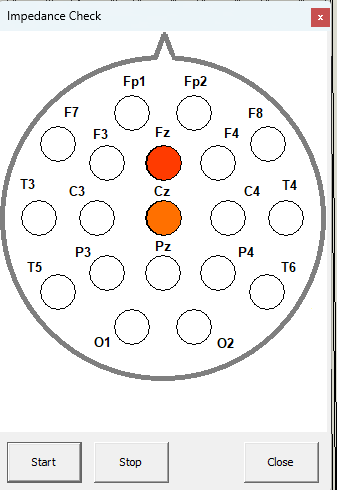
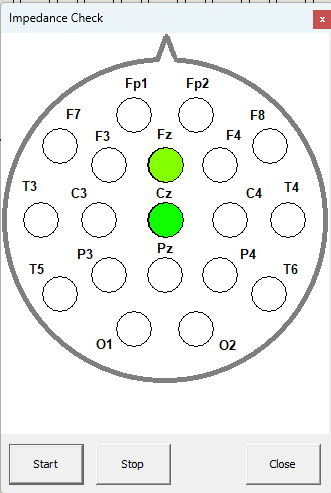
4. Check whether the signal quality is good enough.
4.1 Impedance Check:
4.2 Visibility of common artifacts/signals:
5. Once every channels shows a good signal, the participant can start the experiment on the stimulus laptop.
Stopping a recording
Once the participant has completed the whole experiment, the EEG recording can be stopped and saved:
6. To stop the recording, press "Stop Block" in the bottom left. The software stops automatically and the file is saved!
Cleaning up after recording
When a recording is finished, always complete these steps right after:
1. First, remove the reference & bias, then remove the cap with the rest of the electrodes.
2. Remove as much gel from the hair of the participant as possible using paper tissue or a towel.
3. Gently rinse the electrodes clean with warm water. IMPORTANT: the electrodes themselves can get wet, however keep the plugs (which are plugged into the electrode box) DRY at all times!
4. Dry off the electrodes immediately after washing and double check if no gel remains on the electrode. When old gel dries up on the electrode, it can block the signal during the next recording.
5. Clean the syringe with water and dry it off with paper tissue.
6. Clean the cap by removing gel rests with a bit of tissue. If possible: when a lot of gel has gotten on the cap, wash it out with warm water by hand, and leave it out to dry before measuring the next participant.