Demo Experiment: The quiet and the restless, the happy and the sad.
by Tonny Mulder

Introduction
In this tutorial you will perform a demo experiment and run some basic analyses.
Select what you want to do, by clicking on the pictures of your choice
Demo experiment
In this tutorial you are going to perform a short demonstration experiment. The main reason for this demo experiment is to get you familiar with all the equipment and procedures. Take your time and take it seriously.
During the 'Motoriek Practicum' in your first year you already used the EEG_recorder program. Now you will get further familiar with EEG recording.
Building the setup
If the setup is not intact, now it's the time to build your EEG setup.
Visit the Setup page for information.
Recording oscillations and ERPs
There are two main designs that are used in EEG experiments: Recording oscillations and recording ERPs. You will design an experiment wherein you will record both.
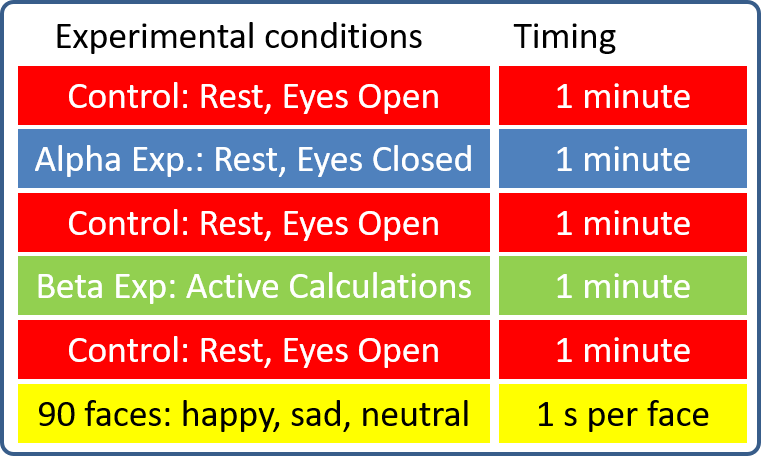
Use Stimulus Presenter to construct one task with three sub-tasks according to the design below. Have your participant perform these three sub-tasks accompanied by instruction slides:
Sub-task 1: Eliciting alpha oscillations, that are strong during rest
Sub-task 2: Eliciting Beta oscillations, that are strong during attention, concentration and calculation.
Both should have a duration of 1 minute in total and should be accompanied by proper controls and instruction slides.
Sub-task 3: Showing the participant 30 happy, 30 sad and 30 neutral faces in random order for one second each, recording ERPs. Download the pictures from CANVAS.
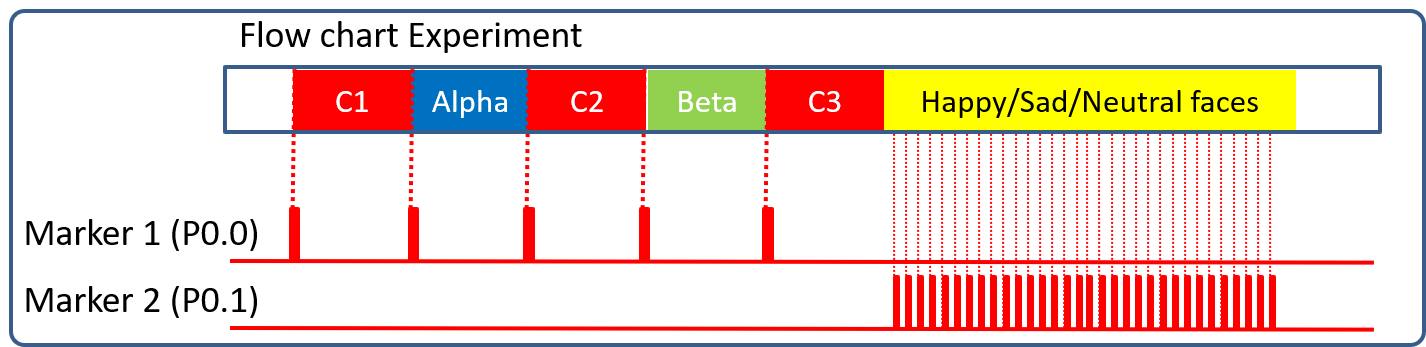
Experimental Design Demo Task:
Use Stimulus Presenter to control your experiment. Construct relevant instruction slides for your participant.
Use Markers (DIO's) acccording to the flow chart below to synchronize events created in Stimulus Presenter with your EEG recording.
Then dry-run your experiment, before connecting a participant.. This will verify that everything runs properly and the markers are detected by the EEG-recorder: See next section!.
Note: for a dry run it isn't neccesary to present all faces or present a full duration of your alpha and Beta experiment. You can, for instance, dial down the number of repeats in your Stimulus Presenter program. This makes trouble shooting easy and fast!
Recording for the first time
The EEG Recorder software is already downloaded and available on your EEG_Recorder laptop.
The latest version = UvA_EEG_recorder-3.1.1_(4Jan_2021) is already available on the recording laptop.
To perform analysis on your own laptop: Download EEG_Recorder from CANVAS
This will be a dry run recording that will test the following:
- The EEG_recorder starts poperly
- Recording setting are properly set
- MobiLab is detected by EEG_recorder
- Markers are recorded in EEG_recorder
NOTE: No participant is being recorded and electrodes are not connected. So the signal will be bad!!
NOTE: You wil check the quality of the signal after connecting a participant in the next section
Start EEG_Recorder in MATLAB (32bits)
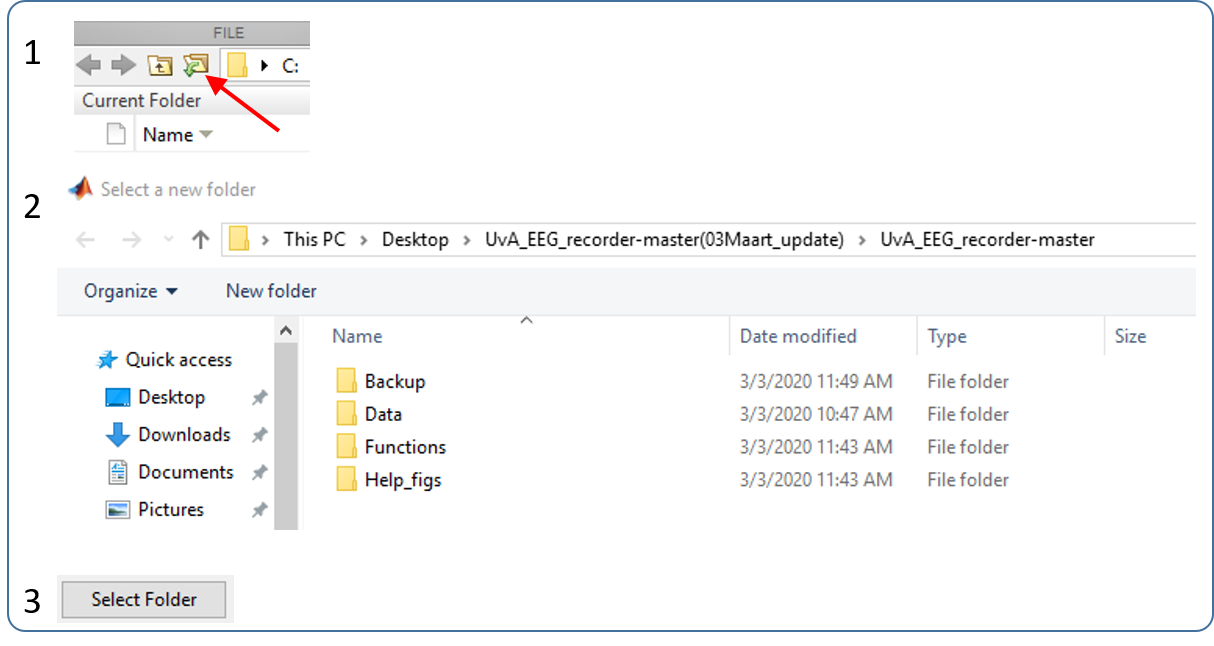
Start MATLAB (32bits)
- Make the content of the EEG_recorder folder, the current folder. See example on the right.
- START THE PROGRAM
- by typing ‘eeg_recorder’ in the command window
- by dragging eeg_recorder.m to the command window
- Via the edit Mode. DANGER: ONLY USE THIS OPTION IF YOU REALLY WANT TO EDIT. Double clicking eeg_recorder.m and then clicking on the green ‘Run’‐button. This opens the eeg_recorder.m file in the editor.
Setting recording parameters
With all electrodes connected the signal can be tested. First select all EEG channels and Marker channels (DIOs) that are in use. (See figure below).

Figure: Example of the lower left panel of the EEG_Recorder. 'View EEG channels' and 'Select Markers to record' are interactive, 'DAQ settings' are default settings.
- Select only the EEG channels you want to record. In this case the first two, since you have two electrodes connected.
- Select the Marker Channels (DIOs) you have implemented in your task.
- The DAQ settings are default settings and need no adjustments. Note: sampling rate = 256 samples/s
LIVE VIEW PANEL
In the ‘Live view’ panel you can adjust the settings of what is visible on your screen. These settings have no effect on the recorded data or what is eventually saved.
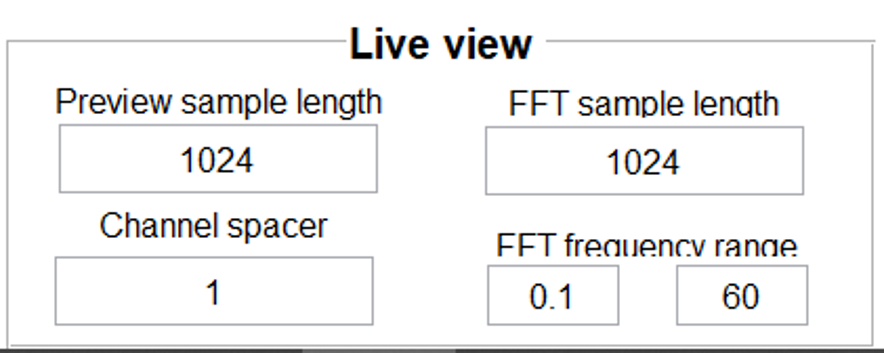
Figure: Example of the interactive ‘Live view’ panel of EEG_Recorder.
- ‘Preview sample length’ = 1024 samples. 1024 datapoints are shown in the viewer. With a sampling rate of 256 samples/s, four seconds of data of each electrode is visualized.
- Set the ‘Channel spacer’ = 1. The smaller the channel space the larger the amplification of the signals.
- Keep the ‘FFT sample length’ equal to the ‘Preview sample length’. The FFT will than be calculated over the segment of the signal as shown on the screen.
- Select the ‘FFT frequency range’ from 0.1 to 60 Hz
Starting and Stoping the RECORDING
Before starting the recording first some explanation about the right panel with which you control the recording.

Figure: The Clear/Start/Stop menu of EEG_Recorder.
Set the ‘Duration acquisition (s)’ to the time of your liking.
- Calculate how long the experiment will take in total and add at least 5 minutes.
- At the end of the set time the acquisition stops automatically and the signal can be saved.
- You can stop the recording at any time (see Stop EEG below).
- CLEAR: Voor een meting wordt gestart gooit CLEAR de buffer (dus je tijdelijke dataopslag) en het scherm leeg. De instellingen blijven behouden.
- LET OP: Gebruik nooit CLEAR als je de data nog moet saven! Je bent dan alles kwijt.
- Start EEG: De acquisitie start.
- LET OP: Wees geduldig. Het duurt even (enkele seconden) voordat het signaal ook werkelijk verschijnt op het scherm en de groene LED op de MOBILab continue brandt.
- De opname stopt automatisch als de ’Duration acquisition’-tijd is verstreken of nadat Stop EEG is ingedrukt.
- De hele registratie van alle 8 kanalen (ook de niet gemeten kanalen) verschijnt dan in beeld.
- SAVE de data: File > Save.
- LET OP: Niet gesaved is alle data weg! Save dan ook meteen, ga daarna pas discusseren, praten, etc.
- Stop EEG: Als je tijdens de acquisitie de meting wilt stoppen voordat de ‘Duration acquisition’ tijd is verstreken.
- Let OP: Wees geduldig. Het duurt even (enkele seconden) voordat de meting is gestopt. Pas als de hele registratie van alle 8 kanalen (ook de niet gemeten kanalen) in beeld verschijnt, kan je de geregistreerde data SAVEN. Wacht hierop voordat je IETS anders doet.
- SAVE de data: File - Save,
- In een folder die door julie op de desktop is gemaakt.
- LET OP EERST SAVEN, DAN DISCUSSEREN
- DAQ settings zijn standaard ingesteld en hoeven niet te worden aangepast.
Now Start your recording and check if your markers are visible, trouble shoot if neccesary.
Connecting your participant.
If the task is ready AND running properly, connect a participant.
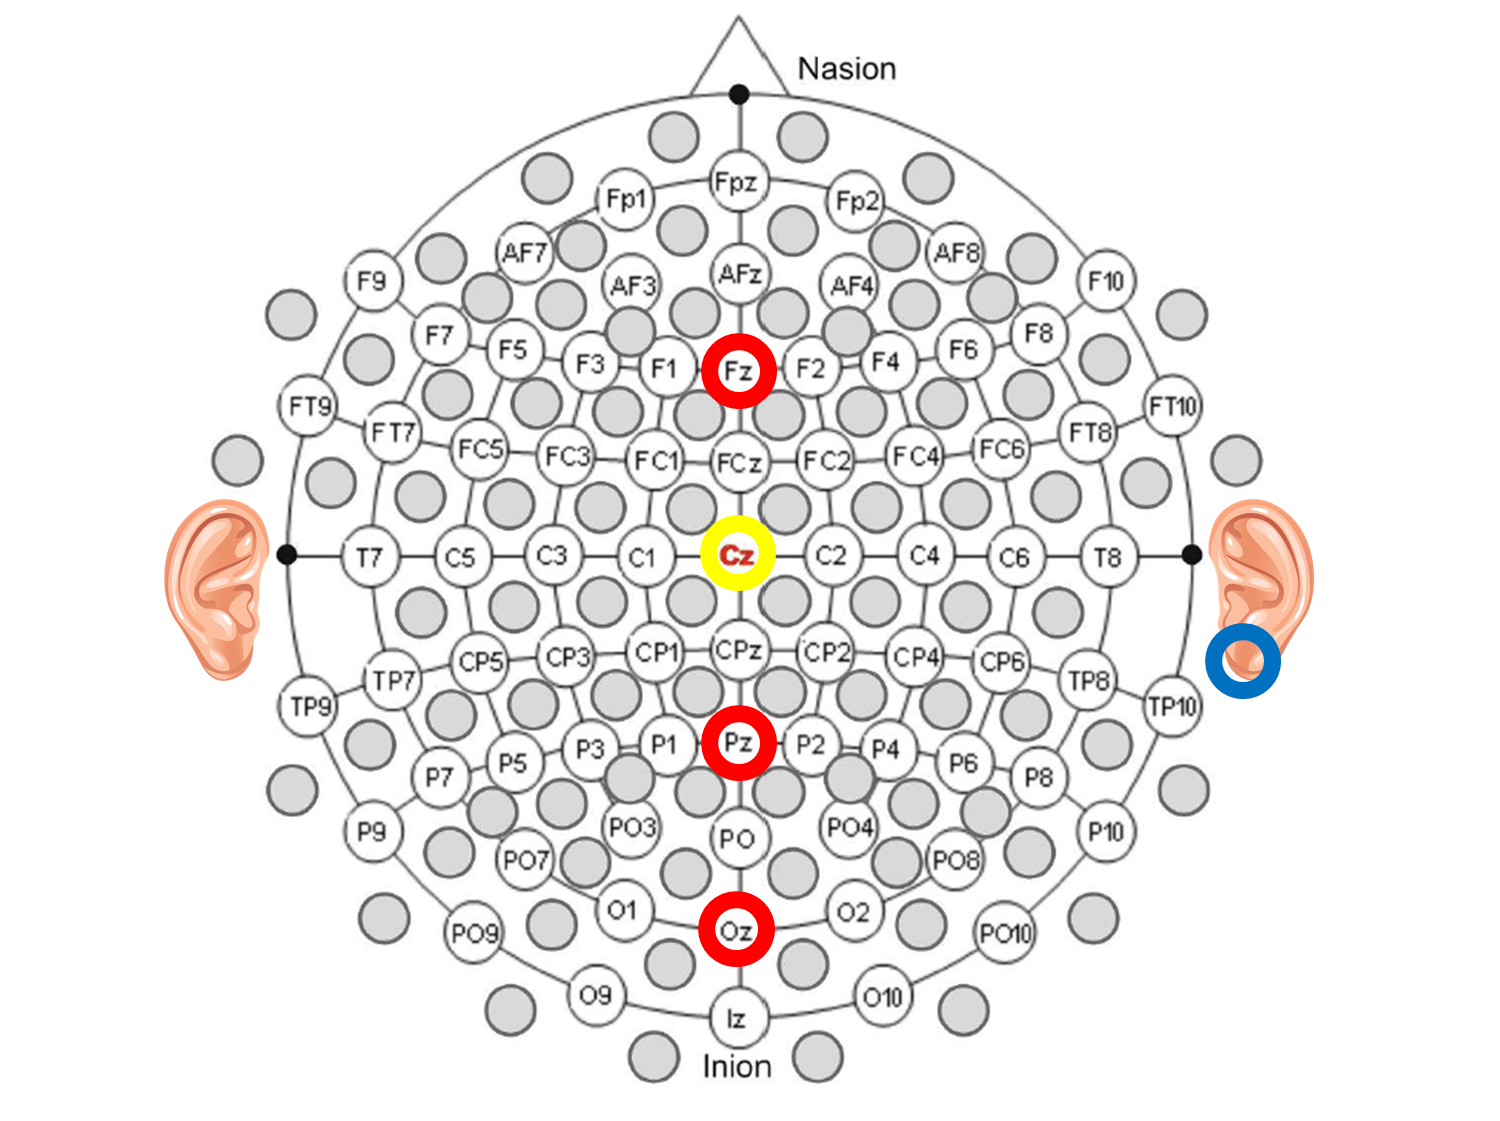
Setup a recording for Fz and Oz locations. In case you have a third electrode use Pz also. Fill the cap with the red recording electrodes, one yellow ground electrode on Cz and connect the blue earlobe reference when the cap is on the head of the participant. If necessary, use the setup page for reference
Fitting the cap.
Select the cap size that fits your subject.
The red cap has a medium fit and fits most people. The blue cap is the largest, and the green cap is the smallest. The cap should be tight enough so the electrodes are close to the scalp but still comfortable for the subject to wear. Let the subject put on the cap.
Orienting the cap
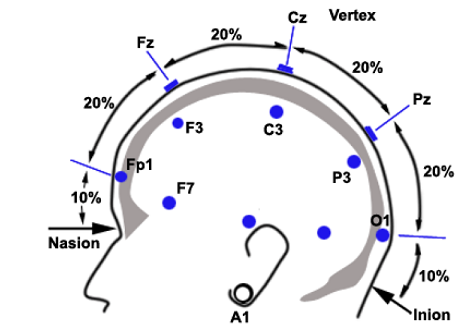
- Measure the head size of the subject from nasion to inion, and from the left tip of the ear to the tip of the right ear.
- The location of the Cz electrode should be in the center of these measures.
- Move the cap around if necessary and make sure it fits tight and symmetrical.
- Let the subject place the chin band.
- Now you are ready to gel the electrodes.
Gelling electrodes.
Gelling the electrodes
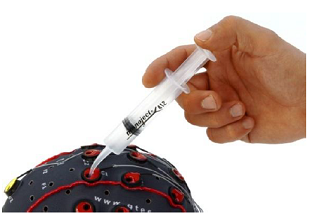
- Fill the curved syringe with electrode gel.
- Place the tip of the syringe through the electrode on the skull. Ask the subject whether he/she feels the tip.
- Apply the gel while retracting the syringe.
- Apply the gel while retracting the syringe.
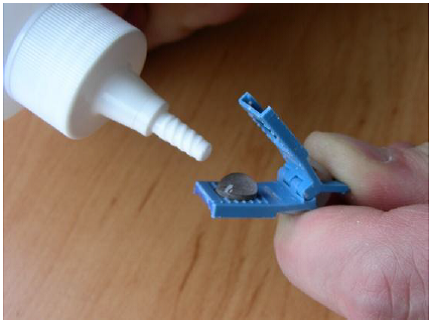
- The reference electrode (blue clip) is gelled by appying a drop of gel on the metal electrode disk and place it on one of the ear lobes.
Time to test the recording setup :
In the following segments you will run EEG_Recorder for the first time, set the parameters, learn about its functionalities and make a test recording.
No Connection with the MobiLab.
| The Situation | Diagnosis | Solution | |
|---|---|---|---|
| 1 | The MobiLab is not plugged in | Cable is not connected | Press Clear, Plug MobiLab in, Press Start |
| 2 | The MobiLab is not switched ON | The MobiLab is not switched ON | Press Clear, Switch MobiLab ON, Press Start |
| 3 | The MobiLab is switched ON but LED is blinking red | The MobiLab batteries are dead | Press Clear, Change MobiLab Batteries, Press Start |
| 4 | The MobiLab is switched ON and LED is blinking green | Driver issue | Restart Matlab and EEG_Recorder and try again |
| 5 | None of the above | HELP! | Contact the assistant |
Now the recording should start
Continue with section: Recording started!
Recording Starts.
| The Situation | Diagnosis | Solution | |
|---|---|---|---|
| 1 | ALL channels are bad | GammaBox is still OFF | Switch GammaBox ON |
| GammaBox is ON but no Green light | Change the battery for the GammaBox | ||
| Yellow ground electrode and/or blue reference electrode are not connected | Connect Ground and reference electrodes. Dont forget the GEL | ||
| No Gel into red recording electrodes | GEL all electrodes, make sure no air is trapped between the gel and the skull | ||
| ALL Electrode Plugs not properly connected to GammaBox | Push Plugs in to the hilt | ||
| Still none of the recording electrodes work | Change the Yellow grond and/or the Blue reference electrode | ||
| 2 | A few channels are bad, the rest is okay! | Ground and reference electrodes work, some recording electrodes don't. | GEL the faulty recording electrodes |
| Still a few recording electrodes don't work properly | Push Plugs of faulty electrodes into the GammaBox | ||
| Still a few recording electrodes don't work properly | Change the electrode (s) in question after discussing this with your teaching assistant |
Perform the experiment and save the recorded data:
If everything is set, start your DEMO recording.
The proper procedure to perform any recording is:
- The participant is connected and the signal has been verified (See trouble shooting)
- Load your experiment in Stimulus Presenter
- Verify the settings of the EEG-recorder, Set duration of recording beyond task duration!
- Start your recording
- Verify that the signal is still noise free, abort when it is not.
- While the recording is running and noise free, start the Stimulus presenter task
- Verify that your markers are actually recorded by EEG-recorder
- Wait for the task to finish
- Stop recording
- Wait for the entire recording to be plotted on the screen!
- Save the recorded file!